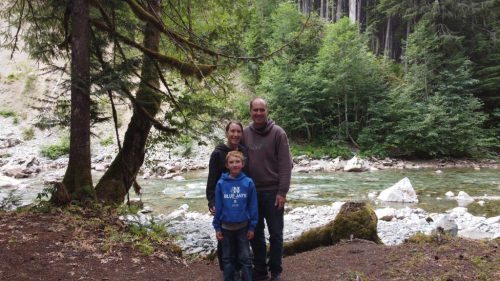
Studio711.com – Ben Martens

My Name In Windows 8 Screenshots

The other day I was telling the story of how my name showed up in many of the Windows 8 screenshots when they launched it. But look as I might, I could not find any blog post about it, so I’ll rectify that ~10 years later as Microsoft gets ready to release Windows 11.

The backstory is that lawyers sent a form to employees asking if they had our permission to use our names in marketing materials. I said it was fine with me, not expecting to see my name anywhere either because they wouldn’t use it or because I’d never see it since there are so many different products.

Fast forward a couple years and I started seeing my name everywhere because they used it for some marketing shots in Windows 8. You can still see some of the news stories, as shown in the example from CNN below.

Disclosure: I work for Microsoft.

Fantasy Football 2021 – Week 1

The Seahawks are off to a 1-0 start with what felt like a pretty solid win over the Colts. Shane Waldron seemed to do a good job in his first game as offensive coordinator. Beating a team on the road that went 11-5 last year is a solid start to the season.

And our league was back in action after taking a COVID break last year. This year we have added one more roster spot plus two IR spots to account for players that get hit with COVID for a game or two.

Last year Tim defeated Tyler in the championship but I was able to squeak out a win. Tyler defeated Chelsea in her first game in the league. Logan put up a lot of points like he usually does, and Andy demolished Luke’s otherwise respectable score.

We’ll start the weekly awards by including stats from last season for comparison.

 This WeekThis SeasonAll Time
Highest Team ScoreAndy had 166.61Luke had 202.63 (Week 5)Luke had 202.63 (2019)
Lowest Team ScoreChelsea had 89.69Tyler had 61.23 (Week 13)Andy had 41.29 (2015)
Biggest BlowoutAndy beat Luke by 44.87Ben beat Tyler by 87.13 (Week 13)Luke beat Andy by 113.02 (2010)
Closest WinBen beat Tim by 2.47Logan beat Tim by 0.41 (Week 11)Tyler beat Nick by 0.01 (2018)
Longest Active Winning StreakAndy, Logan, Ben, and Tyler have 1 game winning streaksLuke has a 5 game winning streak (Week 5)Micah (2011) and Ben (2015) had 8 game winning streaks
Longest Active Losing StreakTim, Luke, Nick, and Chelsea have 1 game losing streaks.Nick has a 6 game losing streak (Week 6)Kyle had a 14 game losing streak (2011)
Highest Scoring PlayerKyler Murray had 41.56 for Andy.Aaron Rodgers had 53.76 on Ben’s bench (Week 7)Drew Brees had 60.54 on Tim’s bench (2015)
Lowest winning scoreTyler won with 114.63Tyler beat Nick with 92.63 (Week 4)Tim beat Jim with 79.34 (2015)
Highest losing scoreTim lost with 125.72Tim lost to Luke with 169.11 (Week 5)Tim lost to Luke with 169.11 (2019)

DIY Tent Stake Puller

After one particularly challenging camp site where I ended up leaving a tent stake or two, I searched around on the web and found a better solution. I didn’t come up with this but I’ve used it for the past few camping trips, and it has worked wonderfully! Take a small diameter PVC pipe and cut a length about as wide as your palm. Run some paracord through it and tie it into a loop. Voila! Pull as hard as you want on that PVC pipe without hurting your hand and direct all the force right where it needs to go.

VertiDesk v3 Standing Desk Review

When I used to work from home, I would usually end the day with a sore back. I figured it was because I was used to standing at my desk for part of the day at work and sitting all day was just not working. I had been shopping around for a while but wasn’t willing to pull the trigger… until the pandemic hit. The day we got sent home from work, I immediately placed an order, expecting there to be a shortage of standing desks.

Fast forward to 18 months later and I’m so thankful that I made the purchase! I raise and lower it multiple times throughout the day and couldn’t be happier with this model. I keep saying I’m going to build a nice top for it but I’m still using the cheapo plywood top that I built for it on day one.

My model is the VertiDesk v3 Electric Sit Stand Base. It has a keypad with four programmable heights. The key reasons I chose this one are:

  • It raises up tall enough for me. I’m 6’4″ and a few models on the market wouldn’t quite be tall enough.
  • It has very little wobble when raised up to it’s maximum height. This seems to be a major differentiator in the market. If you find a model that costs less, it’s usually because it has more wobble.

With a standing desk, it’s important to spend time with cable management. My main goal is to keep the CPU on the floor and then have as few cables running down to it as possible. This means having power strips and USB hubs move up and down with the desk. I stuck those on the bottom of the desk and then bought three a sleeve, raceway, and cord holder to help with cable management.

Even with all that, it’s still a rats nest of wires, but it’s enough to be functional and keep the cats from playing with the cords.

Red Top Lookout

At a risk of doing too many hikes in a row and burning out Elijah, I decided that Labor Day would be a good day to tackle Red Top Lookout.

We left the house around 7:30 and got to the trailhead around 9:30. Once turning off of Highway 97, the dirt road isn’t too bad, but about halfway, the route turns onto a second dirt road that was rough. I was happy to have four wheel drive and a lot of ground clearance. It took us about 25 minutes to go the six miles on that road, and I posted a video from the dash cam because when I’ve done that in the past, random people have seemed very appreciative as they stumble across it.

The hike was short. Really short. I knew it was short, but it seriously only took us 20 minutes to get from the parking lot to the top. So 2 hours in the car for a 20 minute hike, but still, the view was uh-mazing. The lookout was locked so we couldn’t go up but we still had an incredible 360 degree view, and best of all, there were zero other people on the trail for the entire trip. We had the place to ourselves! There were a few other cars in the parking lot but they were all taking a slightly different trail to look for agates.

Photos don’t do a scene like that justice, but I’ll post some below. This Google Street View photo (I didn’t make it) does a better job of recreating the view, but it still doesn’t capture the pucker you feel standing up there with cliffs all around!

The hike down was easy, the drive down was slow and bumpy, and then we hit some Labor Day traffic in Cle Elum, but we made it home around 2pm. It was too much driving for the short hike, but I think we were all happy to have the memory of that view. The weather was just too perfect to pass up! I will need to make sure I pick a closer hike next time to keep Elijah interested though.

I was really bummed when I got home because I realized that it would have been perfectly legal to fly my drone up around that lookout. It would have been amazing! It will be hard to justify going back just for that, but maybe if we’re already in that part of the state doing something else, we can head back. I need to start thinking about taking my drone on more hikes, but it’s just so unlikely that I’ll be in a place that allows it AND there won’t be many people around so I won’t feel annoying.

Investing

Don’t make money decision based on my ramblings, but somehow I’ve found myself in and around quite a few investment conversations lately so I wanted to share a couple things that have helped me.

  1. When I found Dave Ramsey’s “7 Baby Steps“, it solidified a lot of ideas and thoughts I had around saving for emergencies, getting out of debt, and saving for retirement. He has plenty of books, website material, and podcast episodes about it, but honestly, the list alone is a great guide for us because I didn’t need to be convinced that it made sense.
  2. If I only read one book about investing (and that’s not too far off), I would want it to be “The Little Book of Common Sense Investing” by John Bogle. It’s short and it’s simple. He repeatedly lays out statistics to show that buying individual stocks is a gambling hobby. Investing for the long term means buying and holding a total stock market index fund (or ETF) and maybe a total bond fund and a total international fund too. Yes, there will be flashes of success here and there where people beat the market in the short term, but the lasting, winning bet is a low cost index fund that covers the whole market. It’s nearly unbeatable, and it’s super easy.

Ask me in thirty or forty years how it worked out.

High Rock Lookout

At the beginning of summer, I handed Elijah a kids hiking book and asked him to pick out a few ideas. He came up with four. The first one we did was Coal Creek, but this past weekend, we tackled the toughest one: High Rock.

We left the house before 7am on Saturday since there is only space for about a dozen cars at the trailhead. It’s on the south side of Rainier just outside the park. It’s about an hour and 45 minutes to the start of a 10 mile dirt road. Thankfully the dirt road was very smooth and we were able to get down it pretty quickly in the truck. There were quite a few cars there already but we had no trouble parking.

The hike is about 1.6 miles and 1300ft to the top so it’s pretty steep the whole way. The kids hiking book lists it as “moderate for kids” and I think that’s because the bulk of the trail is pretty smooth. There aren’t a lot of rocks and roots to climb over.

The last ~100 feet of elevation is pretty intense for a little kid though. You have to pick your way up a rock face and walk up to the edge of a cliff that falls off hundreds of feet. Up until about a month ago, there was a fire lookout perched up there but they recently had to remove it because of vandalism. (AUGH.) Thankfully they left the wood platform and that made a relatively safe place to hang out to enjoy our snacks and snap photos.

The photos are disappointing though. The enormity of the view can’t be communicated in a photo. There’s just SO MUCH of everything. You can see to the horizon in every direction. You can see straight down the cliff face. You can see Mt. Rainier front and center. It’s incredible!

We had planned to attempt this hike a few weeks ago but canceled because of smoke that was rolling in. I’m glad we did because it sounds like the bugs on the trail have died down since then and we had pretty clear skies and perfect temps.

We didn’t get back home until 3pm and the day took a lot out of us but we were all glad that we did it. It’s one that we’ll remember for a long time!

As I mentioned, the lookout building has been removed. It is being restored by a museum and will hopefully be reinstalled in 2023. That site has some good photos of the lookout and some really interesting history of the lookout too.

I’ll include some photos below but this link should also take you to a quick panorama that I took from the top. If you click all the way into the photo, you can swipe left and right to move around the circle.

The last bit of the hike was a rock face up to the platform.
We could see the parking lot from the top.
On our way out, we spotted the platform from the parking lot.

Wood American Flag

Over the last year or so, I’ve made a handful of wooden flags and after a bit more learning curve than I expected, I think I finally have it mostly figured out. Some stumbling blocks along the way were:

  • I did all the math for how wide each strip of wood should be and programmed my CNC accordingly but I forgot to account for the actual size of the union before cutting. It’s never EXACTLY what I had planned so I need to scale that before cutting.
  • I finally found a couple stain colors that work well. I settled on Varathane classic water based wood stain tinted to Navy Blue and Scarlet by Home Depot. I just bought a quart of each one and I could probably make at least a hundred flags before running out.
  • Staining first and then scorching with a torch has worked well for me. While I felt weird about adding burn marks to a flag, I like the way it looks and it does a nice job of hiding imperfections.
  • Gluing up 13 strips of wood makes it easy to bend. Use at least 3 vertical strips on the back to hold the shape. Four is probably better.
  • To get a nice clean line between the union and the stripes, I pound in a razor blade. It severs the fibers so the stain won’t bleed across and I can stain right up to both sides of the blade without waiting for anything to dry.
  • I generally try to avoid the knots. They really stand out when burning the wood. It’s fine to have one or two but I’m a little bit strategic about where I put them. I do all the math about how many 1×4, 1×6, 1×8, etc boards I would need so I can adjust my plan based on what boards are available. There is a different amount of waste with each size of board though.

I made one of Elijah’s school auction and priced it at $100 since that seems pretty consistent with Etsy prices. They have a “buy it now” feature in the auction where you can overpay by 50% and that happened almost immediately.

It’s a fun project and while I like letting the CNC cut the stars for me, there are plenty of templates for painting them on or you could hand cut them with a router or even a chisel.

Strawberry Planter

We’ve gone through a variety of attempts at having a garden over the years. It’s tricky with the lack of sun on our lot, the local wildlife, and our inability to make things grow. In 2019 I made a strawberry planter for the back yard. In 2020, the birds were eating all of the berries so I tried to make a cage around it but it was too bulky.

I had a lot of time to think about how to design a better cage and I think this year finally hit on a winner. While the frame is held to the planter with screws, I could remove about 4 screws and the whole thing would fold flat. I didn’t really want it up all winter because I don’t think it would hold up to snowfall.

The front face is held in place with some hooks I bent out of wire and bird netting covers the whole thing. We’ve seen zero birds in there and we got a lot of strawberries! We’ll never recoup our investment in the planter even ignoring all the time I put into the cage around it, but it’s still enjoyable to grow something and eat it. The picture below shows the front face pulled off and leaned against the cage.

Day Trip to Kingston

One of our go-to family adventures is taking the ferry from Edmonds to Kingston, having lunch, and then coming back. We can easily walk onto the ferry so there’s no need to plan ahead or worry about the lines. I’ve shared this with quite a few people individually and realized that I should just have it on my website so I don’t have to hunt for the info every time. So if you’re looking for you own fun lunch, here’s what we’ve learned.

  • You can park close to the Edmonds terminal, but you have to pay ~$15. If you look at a map, find 6th street. If you park east of 6th street, there is no fee and no time limit. West of that you are limited to 3 hours. You MIGHT make it back in three hours but I don’t like to have that hanging over my head. We’re rule followers so we just park east of 6th and make the ~5-10 minute walk to the ferry.
  • Walking on the ferry is $8 for adults and $4 for kids. You can buy the tickets right in the terminal but to buy the kids tickets you have to go to the actual ticket booth and not the automated kiosks.
  • The ferry ride is 30 minutes.
  • When you get off the ferry, start walking straight up the hill. There are a number of good places to stop:
    • The Kingston Ale House – This is a table-service restaurant with lots of craft beer on tap.
    • J’aime  les Crepes – You could probably eat a full lunch here but we’ve only gotten crepes and ice cream to go. There’s no real indoor seating.
    • Mora Iced Creamery – Delicious hipster ice cream.
    • The Grub Hut – This is a bit farther up the hill but we really liked it! You order at the counter and then go sit down. They had a lot of options on the menu.
    • There are a lot of other places within walking distance and that strip of restaurants does change. Yelp is your friend.
  • There’s no ticket booth on the way back. You travel east for free.
  • If you end up with a bit of a wait for the next ferry back to Edmonds, there is a big grassy park right by the terminal and sometimes they have a little farmers market/craft fair. There’s often a farmers market on the Edmonds side too.
  • The whole trip usually takes us 4-5 hours including the drive to/from Edmonds.