
One of my favorite classes in my undergrad studies at Purdue as CS251 – Data Structures and Algorithms. Do I use them every day? Nope. But the fundamentals from that class are a key part of being a successful programmer. For a field of study that is full of text, I remember loving the mental part of this class. I could visualize how all these algorithms were working on a small scale, but then I’d be amazed to see how fast they could run over enormous datasets. It’s still at the root of what fascinates me today. This recent video from Veritasium dives into one of the most discoveries in computer science: Dijkstra’s algorithm. So if you want to know part of what excites me about programming, check this one out.
Copilot for the Win!

I don’t blog about AI every day, but you can bet I’m using it and discussing it every day. I’m still unable to explain it to non-tech friends. It just sounds unbelievable, and if I wasn’t living through it with a front row view, I wouldn’t believe it either.
I thought it would be worth documenting again some of the projects I’ve done at home with it. Every time I say “Copilot” below, I’m talking about GitHub Copilot with unlimited, full access to everything. (This is extremely different from any free Copilot thing you’ve chatted with on the internet.)
- My main PC was having trouble falling asleep reliably. I knew I could reboot and make it better for a while but it would keep coming back. I fired up copilot.exe and asked it why my machine wasn’t sleeping. It found that one of the apps I use (PowerAutomate) wasn’t being shutdown completely and it was keeping my machine awake. This was a tiny win but it was something I would have just lived with for a long time if it wasn’t so easy to figure it out.
- My file server was rebooting frequently and it would get stuck at the BIOS screen when it started up. Again, I fired up copilot.exe and asked it to analyze my reboots. It analyzed my recent reboots and thought maybe it was an old video driver so I updated that. The next day I had it look again and it identified two of my four hard drives were going bad! It wasn’t enough for Windows to report them as being bad in Storage Spaces yet, but I kept asking for more and more proof and was finally convinced that they really were bad. These were two 8TB drives but thankfully the two 12TB drives were healthy and could handle the full file storage requirements on their own. Hard drive prices are extreme right now so I just removed the bad drives and will live with the 12TB drives (in a mirror configuration) for now. Along the way, Copilot also wrote a Powershell script for me that stores off the SMART data from the drives periodically in a CSV so I can monitor health over time.
- As I was listening to Spotify, I got curious to look at some stats about my listening habits. For example, if I took all my listening over the past year, looked up the year the songs were originally released, and made a histogram, what would it look like? Copilot made quick work of helping me set up a Spotify developer account, connecting to the API, and writing a tool that would periodically pull my usage going forward. It also showed me how to request my previous year of listening history from Spotify. I haven’t gotten around to analyzing it all yet, but I’m collecting the data now.
- When we show videos on the screen in front of church, I usually re-edit them to add a black screen at the start so that I can leave it paused on that black screen throughout the service and not distract anyone until we’re ready for it. I realized that I could probably automate that, and sure enough, in about 15 minutes, I had a powershell script that automates ffmpeg to do this. As a bonus, I did that whole project by chatting with Copilot through the GitHub app on my phone while I was cooking dinner.
- As we think about moving, we’re curious how far various properties are from places we care about (school, Costco, home improvement stores, grocery stores, etc.) Copilot wrote me an app that uses a mapping resource in my Azure subscription to run all this analysis and report it back.
- I was thinking about paying for a ChatGPT subscription to remove the limitations and see how it worked when not in free mode, but then I realized that my Azure subscription can host all of these models. So Copilot wrote me ChatGPT clone that runs on my PC or my phone and uses models hosted in my own Azure subscription. As a bonus, I can use whatever models I want, crank them up as high as I want, and not be limited. (Yes it costs money but I get $150/month for free and that goes a long way.)
It’s a blast being a nerd right now. The cost of experimentation and ideation is approaching zero. You’re only limited by your ambition and imagination and so far that hasn’t been a problem for me!
The Impact of AI
The other day at church, someone asked me if I thought AI was a fad. I was caught off guard. I could tell the person was probably not a fan of AI, and I had to be up front to play the piano in about 30 seconds. So I rattled off a quick answer that probably didn’t land and I headed off to play. It was a quick conversation, but it got me thinking about how people’s opinions of AI are the result of them reacting to a very narrow slice of what they’ve personally experienced.
If I had it to do over again with more time to respond, I would have started by asking what they meant by “AI.” Everyone means something different when they say it and even when they define it, it’s still easy to misunderstand them. In practice, many people mean “the free chatbot I tried.” If that’s your only exposure, I completely understand why you might decide that AI isn’t very impressive.
The free versions of Copilot and ChatGPT might not amaze you, but for coders, it’s incredible. Programming languages are a perfect playground for LLMs because the language is perfectly defined and there are countless examples for it to train on. But for other professions where AI isn’t as good (yet), it can be harder to see the value.
Anthropic (the company behind some of the most impressive AI models) recently published a paper on the labor impacts of AI.
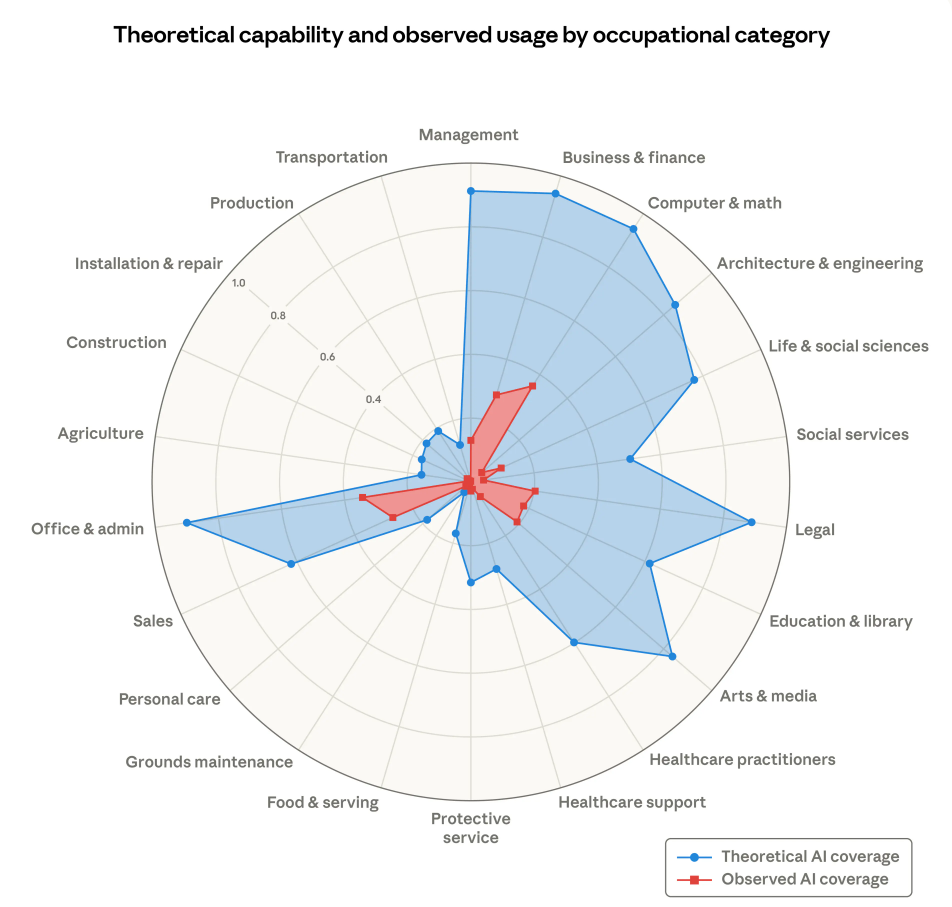
Note that the red area is the impact that is already happening and the blue is the theoretical impact. I don’t know how they judge the theoretical upper bound, but the chart is a helpful way to frame the conversation. Will AI impact all areas of life? Yes. Will it have the same level of impact on all areas? Not even close.
The other big takeaway that is hard to grasp is that we ain’t seen nothing yet. So many areas are going to see enormous growth. For example, someone DNA sequenced their dog, developed a custom cancer vaccine, and cured their dog. It will take a while for this kind of thing to translate to humans, but I think we’ll look back on the next decade and see a noticeable increase in expected lifespan. It’s so much easier to zero in on plausible new drugs for trials when we can feed an agent tons of existing research, all the existing legislation around what can be done, and a series of desired outcomes. We’ve seen similar paths to this at work where we are researching new datacenter technology for physical tasks like improved heat dissipation.
In my area of computer programming, the change has been indescribably large. I’m blessed to have unlimited access to the best models on the planet regardless of cost, and my work life is completely different from what it was even six months ago. I have barely typed a line of code in the last three months, but I have produced more code and more business value than I ever have before. Is it perfect? No, but it is clear that people who know how to use the tools can produce a lot more value than those who don’t.
Areas that rely heavily on the generation of documents are not nearly as far along in their journey, and, according to this analysis, will not see quite the theoretical maximum impact as the more technical areas. This aligns with my personal experience as well. AI is better at summarizing documents and editing them than at creating them. I don’t write documents with AI, but I regularly use AI to review my work, suggest where the document might be confusing for readers, etc.
And finally, areas that are heavily based on physical work have the least impact now and the least theoretical impact. If I’m mowing the lawn, an LLM isn’t going to help me, but it can be valuable when I’m trying to figure out how to repair a broken mower.
As with almost all hot issues, there is more to this story than “AI is dumb. Look at this ridiculous output!” and “AI is going to solve all problems.” AI for software developers hit an inflection point at the end of November last year when two key models were released (Opus 4.5 and GPT 5.1). My work life changed almost overnight. That hasn’t happened in a lot of other areas yet, and a lot of people are judging “AI” by what they can get for free and applying it to areas where it’s not a great fit. That doesn’t make it a fad. It just means AI isn’t growing at the same pace in every field, and it isn’t equally useful in every industry.
The AI Age of Discovery

A couple weeks ago I wrote about how difficult it is to explain the changes that we’re seeing in the software development world. Any skeptics that remain, at least at major tech companies, are at risk of being a lost cause. In my own org, I’ve purposely adjusted my approach from “get everyone to try it once” to “how do we let great things bubble to the surface”. But outside the tech world, it’s nearly impossible to explain. There’s a great quote from a strong AI skeptic who recently “converted” (original language included):
The real annoying thing about Opus 4.6/Codex 5.3 is that it’s impossible to publicly say “Opus 4.5 (and the models that came after it) are an order of magnitude better than coding LLMs released just months before it” without sounding like an AI hype booster clickbaiting, but it’s the counterintuitive truth to my personal frustration. I have been trying to break this damn model by giving it complex tasks that would take me months to do by myself despite my coding pedigree but Opus and Codex keep doing them correctly. (source)
I finish work and immediately want to start working on whatever new idea I had for a project at home. I’ve literally had to forcibly put my computer to sleep so that I stop and go to bed. It’s an incredible amount of fun to be able to go from idea to working code in one evening. There is a whole world of ideas that were previously too expensive to try that are now easy experiments. As an example, in the last 10 days, here are apps that I have built:
- Copilot Chat Export – VSCode extension that renders copilot chats as HTML for easy sharing
- CommuteTracker – This app runs on my phone and automatically knows when I leave home and when I get to work or vice versa. It also automatically logs whether I took backroads or the interstate. Notably this was the first app I’ve ever developed in Kotlin.
- RouteWatcher – This desktop app uses Azure Maps to determine how long it will take to get to work (or home from work) and it does this every 15 minutes with the results getting logged to SQL.
- MlcSports – This phone app is basically a reworking of the MLC Athletics webpage, quickly showing me news for all the teams along with upcoming games.
- TraktLite – I didn’t fully start this one within the last 10 days but it’s by far the phone app I’ve spent the most time refining. This is an alternative to the official Trakt.tv application for knowing which shows and movies I have watched or want to watch. I started with a specific scenario in mind and I’ve slowly expanded it to add more features that are tailored specifically for me and I’ve spent time refactoring the code to keep it clean.
- WelsCallStats – Scans all of the call reports for WELS pastors, teachers, and staff ministers to generate statistics about the average call duration for each position, the percentage of calls that are accepted, the churches who have made the most calls, etc. (No I’m not publishing the stats. It’s for personal curiosity. Jon Hein and his team would publish them if they wanted to.)
- WelsFamilyDevotions – I use devotions from the WELS at night with Elijah, but I don’t 100% love the mobile browser experience and it’s sometimes hard to remember which ones we’ve done before. This app just shows me the family devotions in order and hides any that I have read before. It also has a very clean view of only the devotion text without anything else.
- Temperature Probe – Again, this wasn’t fully developed in the last 10 days but I spent a lot of time tweaking this embedded Python project that runs on a little QT Py ESP32-S2 board to record the temperature and humidity periodically.
- Teams X Expander – This was a side project at work where I wanted to have a flow that would watch all Teams messages in a particular chat and anytime someone posted a link to a post on x.com, it would get the content of the post and share it in the chat so we didn’t all have to click the link to read it. It sort of worked but ultimately it was too hard to make it work within the security limitations of work apps plus the x.com API access is very expensive.
- OneNote addon – This was another side project at work where I was trying to give GitHub Copilot access to search around all my OneNote notebooks. This has been a challenge to get working within our corporate environment and this one ended up failing too, but it was a fun experiment and I learned a lot about how OneNote add-ins are structured.
- Interview question generator – This was another project at work that came from thinking about how to conduct interviews in this new agentic engineering world. It’s a bit silly to give people coding questions to answer, but how do I evaluate them? I used GitHub Copilot to generate easy, medium, and hard questions in three popular languages that would test how well the candidate could review code and find bugs. I was thrilled with the way this came out and shared it broadly in the company. There is a lot of discussion about how to handle interviews and I think this is a strong step forward.
- I tried to make a tool that would convert drawings from the old “Microsoft Expression” software package into SVG. It churned on my request for a long time and eventually told me that the file format was completely proprietary, but it also discovered a way to install and old copy of it and export to something that could then be converted to SVG.
Ok, now look at that list and remind yourself that is 1.5 weeks of mostly spare time. It’s a couple hours each night. Now imagine how much I’m able to get done in my full work day on all the projects I actually get paid for! Now imagine this multiplied by 80,000 other devs (or whatever the acutal number is) at my company. And remember what I said before about new capabilities coming out almost daily that lets us run faster and do more things in parallel with less oversight.
I have always thought how cool it was to be around for the mainstream birth of the internet. I was the perfect age to start coding HTML in notepad. It was a whole new frontier and we were (in parallel with others) discovering amazing new techniques and ways to combine technologies to make cool experiences. This has been a similar feeling except now I’m getting paid to do it and the changes that took months before are happening daily now. It is awesome to get paid to learn this, make discoveries, and share them with others!
Two Days Behind
I’m writing this as I’m still processing this excellent article: Something Big Is Happening — matt shumer. It is long, but honestly I would rather have you read that than this post.
Even for people in the tech industry, it’s difficult to explain how fast AI is improving. At work, one of my main responsibilities is literally to figure out what new tools and capabilities we can apply to our team and then help the team grow. Even with 100% of my effort focused on this, I feel like I’m holding on by my fingernails. It’s not fear that robots are taking over but a realization that things are changing faster than any of us expected. We are watching chapters worth of history books fly by every day.
For example, last week I was out sick for a couple days. The morning when I finally felt well enough to check messages, a non‑technical friend asked me what it was like working with AI. I joked that I’d been gone for two days so I was probably already behind. Then I logged in and… sure enough, a brand‑new, ground‑breaking model (Claude Opus 4.6) had dropped, and my programming tool (VS Code) had released features that make it even easier to work with multiple coding agents at the same time. I spent the entire afternoon just absorbing what had changed.
The pace of change is difficult to describe. Last summer I was mildly interested but it was clearly just a toy and most of the demos were hype. In the September, Claude Sonnet 4.5 came out and I could see how it was on the verge of being legit. On Nov 24, Anthropic released Claude Opus 4.5 and it was the inflection point. It was clear to anyone using it that there was no turning back. Opus 4.6 came on Feb 5 and OpenAI’s Codex models are surging too. People ask me what this is going to look like in a year. Who knows? I can’t even tell you what next WEEK will look like.
So yes, if you’re in software engineering, this is life‑altering in a way we’ve never seen before. But the key point is that this will change your life too. Whatever your job is, AI is already working to make parts of it obsolete. It’s a general‑purpose skill amplifier. That means whatever you’re already good at, AI can make you dramatically better and faster at it. This rewriting of reality matters for everyone, not just for people in tech. Here’s how to position yourself:
- There will always be people around you who think this is all hype and the fad will pass. Do your best to bring them along, but the most important thing is to make sure your future isn’t tied to their denial. If it’s your management chain, find a new job. If it’s someone you’re thinking about hiring, keep looking. Denying AI’s usefulness today is like believing in a flat earth. It is provably better right now. This isn’t up for debate. Don’t waste energy arguing with people who refuse to see it. You gave them a chance to come along. If they resist, they’ll get left behind. Honestly, it might already be too late for them to catch up.
- You might not be able to predict exactly how this will change your job, but you can keep yourself relevant by leading the way. Be the person who keeps up, uses these tools to undeniable effect, and teaches others how to do the same.
Back in December, I would still try to soft pedal all of this when I was in a group that I knew was mixed on AI. I did not want to sound dramatic or turn them off even more with my enthusiasm. But week by week, that is getting harder to do. The gap between people who use these tools and people who do not is widening so fast that it feels strange to pretend nothing is happening. I would normally end this by saying the future is now, but honestly it feels more like the future was last week and we are all just trying to catch up to it.
Church AV Equipment List

I’ve written previously about the 2022 upgrade of our church’s AV booth, but it feels like it’s time for another update, and I also want to include a full list of all our gear in case its helpful to anyone else.
- Mackie ProFXV3 16 audio mixer
- We basically got this model because I counted all our possible inputs and then wanted a little headroom. We don’t really use any of the extra functionality over the smaller versions.
- Two PTZ Optics Move SE 12x cameras
- I LOVE these! It’s hard to stomach the price initially but it’s definitely a “buy once cry once” situation. More details: PTZ Optics Move SE Review – Studio711.com – Ben Martens.
- Blackmagic ATEM Mini Pro video switcher
- This has dramatically simplified our video situation. It takes care of various resolutions and framerates, records to a USB key (or connects to the computer), and allows me to perfectly syn the audio input with the video input.
- I also enjoy having this be its own device. Some day we’ll probably move to something like OBS running on the PC, but for now, it’s really nice to have a device that “just works” without worrying about any updates or configurations.
- This device also supports streaming directly to YouTube or Facebook but we haven’t started that yet.
- Shure microphone setup
- Pastor:
- Shure BLX24R/SM58 Wireless System with Rackmountable Receiver and SM58 Microphone Capsule Band H10
- We usually have this by the piano. We aren’t often recording/posting piano stuff but it helps us amplify the piano volume during the services to make sure people can hear it while they are singing.
- Mackie C200 speakers
- QSC GX3 300-Watt amplifier
- I would not buy this again. There’s nothing wrong with the product, but it’s extremely overpowered for our space. We usually leave it on volume 2/10 and I’m pretty sure that if I turned it up much past 7 I could damage the building. We were coming from an extremely underpowered system so I guess I overshot the goal.
So our whole setup is PC independent. Once the service is done, we take the thumb drive out of the video switcher, plug it into the PC, and upload to YouTube.
We also updated our internet service from DSL to business cable and now our service is reliably at least 200Mbps symmetric. Uploading is usually done before we can finish entering the metadata!
We have a TV in front of church that is mostly used to show quick videos after church but is rarely also used during a sermon. We can control that from the balcony using an HDMI over Ethernet extender. This adds about 200 ms of video lag but we take care of this by using VLC for playback and adjusting the synchronization in the VLC settings. The TV in front of church is set up as a second monitor on the balcony PC so we can prep content privately and then drag it over to the TV in front of church. Via an HDMI splitter, that front TV feed also gets sent to an input on the video switcher. This lets us show the sermon PowerPoints directly in the video recording with perfect quality.
We have a great crew that is trained to operate this booth. Our sweet spot is around 4-6 volunteers. That is big enough that we don’t feel like we’re doing it too often, but we also do it often enough to remember how it works.
If you’re curious to see what it all looks like, check out CalvaryLutheranWA – YouTube. I edit the shorts after the fact, but pretty much everything else posted on that channel comes straight out of the AV booth with no post processing.
If someone gave us a bunch of money to upgrade this, I could easily spend it, but unless we get asked to start live streaming the whole service or something like that, I think we’re in a pretty good spot with our setup … for now.
AI Coding Update

Let’s take a quick minute to update where we are at with AI in my daily job. It’s changing so quickly that it’s hard to organize my thoughts around it.
Over the last year (and even the last 6 months), AI coding agents have gone from “overhyped party trick” to “fundamental necessity”. A lot of that comes from advancements in models (Claude Opus 4.5 is my current favorite) but it also comes from us learning better ways to interact with the models. There’s still too much hype, but my personal daily reality has been permanently altered by these new capabilities. At this point, coding without AI feels as unthinkable as coding without StackOverflow or a search engine did last year.
Stepping back for a moment, it’s good to note that Large Language Models (LLMs) are a great fit for software development. If you think about training a model on the English language, it’s a mess because there are so many different styles and rules and unwritten rules and colloquialisms, etc. But with code, there the languages are strictly defined and there are intense levels of documentation for every piece of every language. This gives the AI agent a very well-defined playground to do your bidding.
What really pushed this tech over the edge for me was learning to start by having it generate documentation about the work it was going to do. I’d explain the requirements, have it generate a plan, and then iterate on that plan document until I was happy with it. Then I’d have the agent tackle pieces of the plan, step by step, verifying its progress along the way.
I can’t tell you how much faster I’m able to get projects done! There have been two giant projects floating around in the back of my mind for years at work, but I could never justify the time to do them. Not only did I get them both done in just a few weeks, but I did it in my spare time at work without slowing down the rest of my job. My output is skyrocketing and it feels like I have a new superpower.
I have no idea where this is going or how it’s going to change our jobs in the future, but I don’t think it will be too long before I’ll move up the “AI management” ladder. Instead of directly commanding one agent at a time, I can imagine telling a “manager agent” what I want and then letting it create its own agents to do different parts of the job and make sure they’re all still heading toward the goal. That’s potentially another order of magnitude increase in my output. After nearly 20 years at the company, I have a very long backlog of ideas to try, but now I’m wondering if that list is long enough. I can churn through ideas so quickly now and see which ones pan out.
“Will AI take coding jobs” is a common question but my answer is that if your job is typing in code, then yes, you’re in trouble. But if your job is seeing things that can be improved and solving problems, then this is an incredible tool amplify your impact. In that case, AI won’t take your job, but someone who knows how to use AI more effectively than you might.
Recurring Subscriptions

I distinctly remember sitting in a Computer Science class at Purdue around the turn of the century (I might as well own it, I’m getting older) where a professor was trying to convince us that the model of paying once for software was going away. He certainly was right. Everything is a subscription now, and those subscriptions can be a huge drag on your financial future. I feel like we are pretty careful about any recurring subscriptions, but let’s review them and see how we’re doing:
- Amazon – At $139/year, this isn’t cheap, but we use it a lot. I know there are various feelings about shopping at Amazon, but I love all the extra family/hobby time it gives me because I can just have stuff show up instead of driving around in traffic trying to find some random item.
- Monarch Money – After Mint closed, I was looking for new personal finance software and I’m happy that I landed on Monarch. It’s $100/year well-spent. It’s what I’m using to write this post because I can easily find recurring bills. If you only do one thing for your financial future, spend time every month categorizing your transactions and keep a solid understanding of where all your money is going. If you want 50% off your first year, consider using my referral link.
- Comcast Internet – I keep costs low here by buying my own modem, getting the cheapest plan I can find, and setting an annual reminder to sign up for a new one year contract at a lower price. We currently pay $56/year for 500/30 service. That’s way more download speed than we need (I lived fine with 100Mbps until very recently) but this was the best deal when it was time to renew. Pro-tip: don’t let them upsell you on speed. You will almost never notice the difference between 100Mbps and 500Mbps. This is coming from someone who works fully remotely and has over 50+ devices on the network.
- Xfinity Mobile – Our total household cell phone bill each month is $25. No that’s not a typo. Xfinity Mobile operates on the same network as Verizon and I can’t tell any difference from when we were paying $80/month for Verizon. That $25 includes two lines with 1GB of shared data. Yes that’s ridiculously small but since I work from home, I rarely need cell data, and, more importantly, knowing that we have almost no data available means that we do not spend any time surfing around on our phones when we’re out and about. If we need to bump up to unlimited data for a month, it’s only $65 total. If you don’t want Xfinity Mobile, there are plenty of other similar companies like Mint Mobile, Boost Mobile, Straight Talk, etc. I don’t understand how the big companies still exist.
- Spotify – Tyla and I both listen to music for much of the day and so we have a the $15/month family plan. It’s integrated into our Tesla too so we get access to our playlists and the full library anywhere we go. And since we have the family plan, it was easy to add Elijah and keep his musical tastes out of our recommendations.
- YouTube – We pay the $15/month to have no ads on YouTube. I’m allergic to ads. Unless there’s no other option, I’d rather not watch something than watch something with ads. This YouTube subscription is permanent. We carefully manage our other streaming TV services, but YouTube is a constant. For now we just share my account, but when Elijah is old enough to get out of his kids account, we’ll upgrade to the family plan. This does include YouTube Music which theoretically should be as good as Spotify but my attempts in the past to switch over have fizzled out. If you love YouTube Music, I’d love to learn more about why you love it.
- Prime Video – I was very frustrated when Amazon nickel-and-dimed us by making it an extra $3/month to get rid of ads on Prime Video even with a Prime account. It still feels very cheap to me, but we’re currently playing it. This is one of the temporary subscriptions. We’ll drop it and move on to something else soon.
- Disney+/Hulu – Again, I pay for the no-ads version at around $21/month. We’ve had this for about the last six month while Elijah and I are plowing through tons of Star Wars content. I’ve canceled our subscription though and starting in December I think we’ll switch over to Netflix for a while.
- Trakt – This $60/year service that helps us keep track of the TV and movies that we watch. It’s especially helpful since we hop around services. When we come back to a service, I can easily see what episode we were on in each show. It’s also a good way for me to remember shows that I want to watch with just Tyla or as a family. There are a lot of different front-ends to Trakt but I just use the standard app.
- Duolingo – I’m almost up to 1900 days on my Duolingo streak. I pay $80/year for this and I’m most of the way through the Spanish program. Once I complete it, I think I might drop Duolingo and switch to another language app that is a little less gamified.
- Tesla Premium Connectivity – This is another splurge that costs us $100/year but it means that our Tesla has a lot of additional features such as streaming music (Spotify!), live traffic, satellite-view maps, live sentry mode cameras, and when we are parked, we can watch video streaming services (with separate subscription) like Netflix, Hulu, and YouTube.
I’m pretty quick to drop services that I don’t think are worth the money, and I know what I would drop if we needed to find a little more room in the budget. If you’re curious to learn any more about these services, I’m happy to share why we like them!
Learn About My Job
If you’re curious about what I’m thinking about at work, three recent videos will help give you a taste.
The first one is a presentation by my manager at the Open Compute Project Global Summit. He talked about how AI training data centers cause massive and rapid power fluctuations which are problematic for electrical grids and introduced the shared approach taken by Microsoft, Nvidia, and OpenAI to solve this.
The second one is Satya. He talks about the development of the Fairwater 2 data center and the path to Artificial General Intelligence (AGI). While his scope is obviously way bigger than my team’s, we are closely involved in the projects he discusses.
Satya says that this AI revolution might just be the biggest thing since the industrial revolution. It’s an amazing time to be in this industry and I’m super thankful to have a behind-the-scenes seat for it!
Mark Russinovich is the CTO of Azure. He’s one of the smartest people around and when he gives talks, it’s usually worth a listen. At the recent Ignite conference, he talked about recent Azure innovations architecture and a lot of these (especially the ones dealing with compute resources) are in my part of the company. This one is definitely the most technical of the three videos that I’ve shared here.
PC Part Prices
In 2020, I built a PC right before COVID hit and all the prices went sky high. This year I built a PC and… prices are going sky high (but thankfully no global pandemic yet.) The PC that I built in September was right around $1500 but now those same parts would cost me over $2500! I knew I was getting a great deal on the video card, but the real shocker is how much memory prices have increased. I paid $240 for two sticks of 32 GB DDR5-6000 memory. That same purchase now would cost $880! RAM prices started increasing almost immediately after my purchase and haven’t stopped.
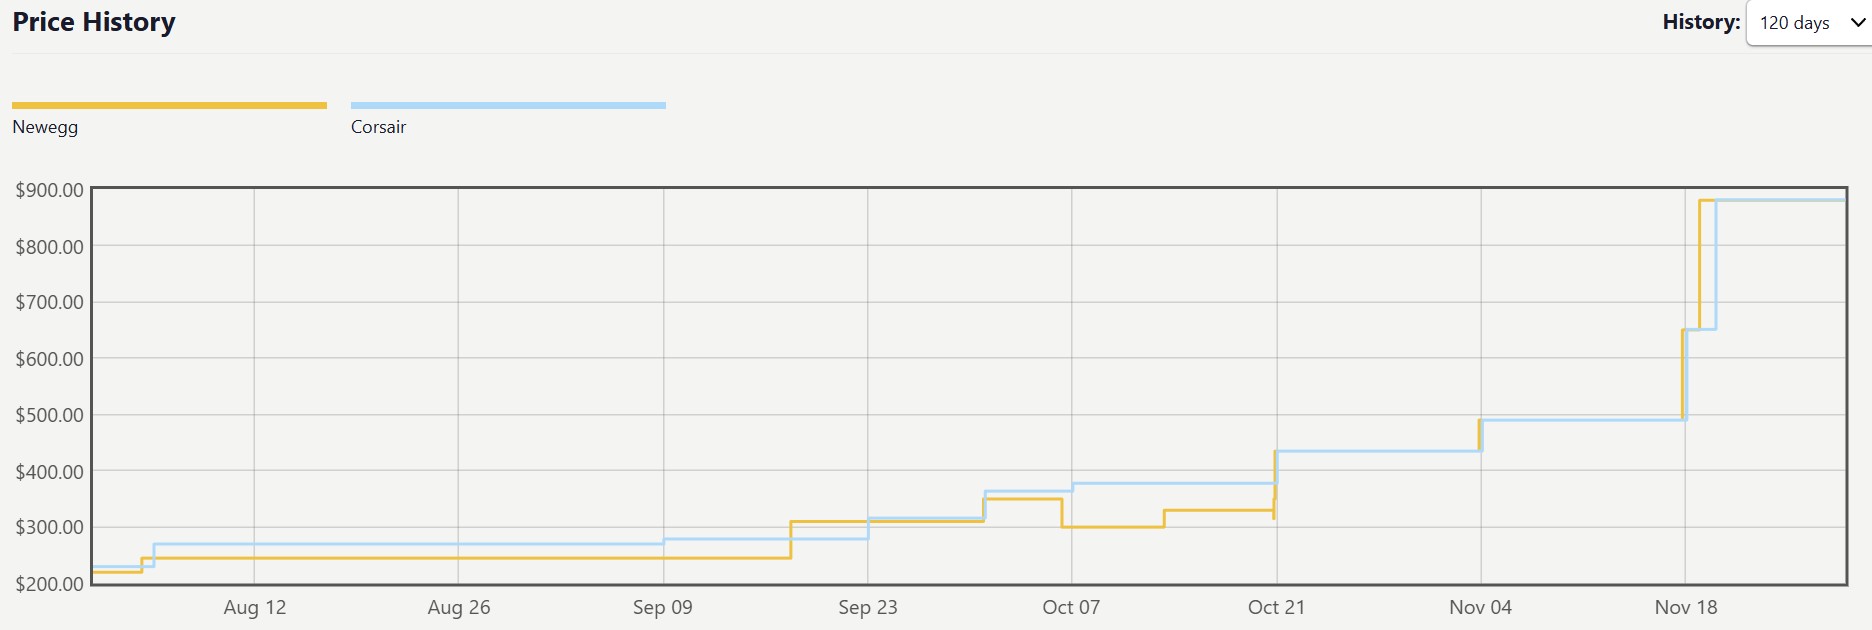
Prices are climbing because the memory and storage market has been hit with a perfect storm. Manufacturers have cut back on consumer production while shifting more of their supply toward enterprise customers who are trying to meet the massive AI demand spike. At the same time, consumers started increasing demand for new parts.
It will be interesting to see how long it takes for this issue to get resolved, but I’m thankful to be writing this on a brand new machine that was bought literally days before the price increases started!