
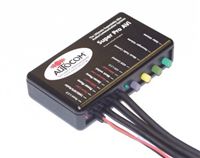
 I know I said I was going to wait a bit before buying the communications system for the bike, but I decided it was worth it and the numbers worked out in the budget. So yesterday an AutoCom Super Pro Avi arrived in the mail. I immediately dug into the bike to install it.
The installation wasn’t too difficult. Kawasaki provides accessory power leads from the rear of the bike. I soldered some bullet connectors onto the leads from the AutoCom and got it plugged in. The unit is mounted under the seat, but I really wanted to have my MP3 player in the glove box at the front of the tank. I took the time to dismantle the bike and get the wire routed cleanly up under the gas tank and inside the front fairings. I was a bit nervous when I started unbolting the gas tank but it all worked out just fine. The end of the audio lead now pokes out from inside the glove box. The rider headset lead comes out between the front of the seat and the tank, and the passenger headset lead comes out under the left hand grab bar in the rear.
The helmet install takes a bit to get right. The ear pads need to be placed directly over the ear and preferably behind the padding of the helmet. The microphones need to be touching the center of your lips. There is also a wind sensor that detects the ambient noise.
That wind sensor is really what makes this unit so nice. As your speed increases, it detects more noise and cranks up the volume. It’s also tied to the level of sound needed to activate the microphone. This means that you can talk at a normal voice at any speed and the mic will activate as you’d expect. When the mic is activated, the music quiets to 50% volume.
I probably could have opted for one of the cheaper models but I ended up with the top of the line model. It has a lot of expandability. For example, I can buy an adapter to connect to my phone via Bluetooth. I can also plug in an FRS radio for bike-to-bike communications.
All in all, I was very happy with the install and my test ride. I look forward to getting on the bike with Tyla and trying out the chat feature.
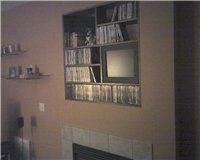 On Sunday I took the shelves down from above the fireplace. I removed the fish tank about 6 weeks ago and the large gap has remained unfilled. I decided to rotate the shelves 180 degrees to move the hole up to the top left corner. It's not so bad up there because it's higher and you can't see through the shelves to the mess of wires behind. I'll fill it with big books or a plant or something like that.