Studio711.com – Ben Martens

windows10

Adjust Web Cam Settings In Any App

Working from home means that I regularly have calls on Zoom, Teams, and GoToMeeting from a variety of web cams. Some apps and cameras are better video settings than others, but thankfully I found some instructions about how to get the camera properties app to show up even when I’m in a call no matter what app I’m using. This is a bit on the geeky side so consider yourself warned.

  1. Install ffmpeg.
  2. Open a command prompt to the folder with ffmpeg and run this to figure out the name of your camera:
    ffmpeg -list_devices true -f dshow -i dummy -hide_banner
  3. Create a desktop shortcut with “Start In” set to the folder where ffmpeg lives and “Target” set to the following but be sure to change the file path as necessary and adjust the name of your video camera.
    “C:\Program Files\ffmpeg\bin\ffmpeg.exe” -f dshow -show_video_device_dialog true -i video=”USB Live camera”

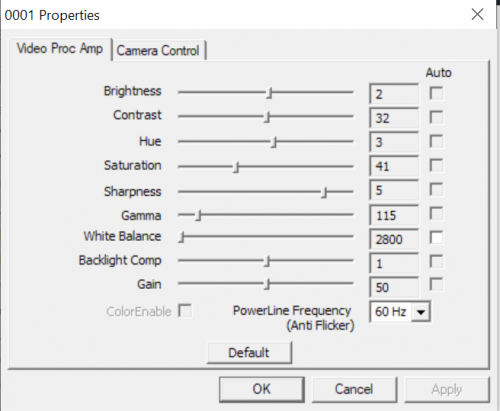
Now when you execute the shortcut, you should get this screen:

Windows 10 Photo Viewer

WindowsPhotoViewerI’m not a fan of the new photo viewer in Windows 10. Specifically I have troubles rapidly flipping through a bunch of files in a folder and I’ve seen some stuff online showing it’s poor rendering capabilities. The old Windows photo viewer was simple and perfect. Why change?

The good news is that you can get it back, but it requires a few registry edits. I’m not going to explain how that works. Ask a geek in your life to help you out if you don’t know. It’s not generally something you should ever do. That being said, here are your instructions: http://www.tenforums.com/software-apps/8550-unable-replace-photos-app-photo-viewer-default-10240-a-2.html?s=30e1f367ee6f758b05431dc82f25b765

Once that’s done, right click on a JPG and choose Open With. Select the old Windows Photo Viewer and check the box to always open with that app.