The Seahawks faltered again this week. In five games, they have yet to regain their dominance from last season. Forget about the Super Bowl repeat. Let’s make it through the first round of the playoffs. Here are some of the big changes I see from last season:
- Opposing teams are getting too many yards of the catch. Last year, guys might catch a short pass but they’d be immediately met by the Legion of Boom to pay for their catch.
- Where are the turnovers and the sacks? So many opposing red zone drives ended in interceptions last year that it was almost expected. This year the team is almost last in the league in sacks and turnovers.
- People attending the games say it’s still loud, but have there been ANY false starts by the opposition in Seattle yet?
- On the flip side, the Seahawks have a flood of pre-snap penalties.
- The secondary is starting to look like Swiss cheese. They’re pulling up players from the practice squad just to field a complete team.
- Last year, the Seahawks made a big improvement in their third down defense and it was a major factor in their championship run. This year they are 6th worst in the league.
Ok, enough moaning about a team that still has a 4-2 record. There was big news in our league: Tim lost! Jim finally beat him, but Tim still has sole possession of first place. Jim and Luke are tied for second, I’m in fourth and then everyone else is tied at 2-4 for fifth place. Our longest league winning and losing streaks were broken this week too.
Now on to the weekly awards.
- Highest Team Score
- This Week: Austin had 137.67
- Season: In Week 5, Jim had 160.52
- All-Time: In 2013, Tim had 195.50
- Lowest Team Score
- This Week: Andy had 78.04
- Season: In Week 3, Luke had 55.04
- All-Time: In 2011, Luke had 47.01
- Biggest Blowout
- This Week: Austin beat Andy by 59.63
- Season: In week 5, Tim beat Dad by 81.60
- All-Time: In 2010, Luke beat Andy by 113.02
- Closest Win
- This Week: Luke beat Logan by 18.17
- Season: In Week 2, Austin beat Ben by 1.7
- All-Time: In 2012, Jim beat Ben by 0.12
- Highest Scoring Player
- This Week: Joe Flacco had 42.24 as a free agent!
- Season: Previous record was in Week 3, Andrew Luck had 40.30 for Ben
- All-Time: In 2013, Peyton Manning scored 60.28 for Andy
- Longest Winning Streaks:
- Active: Jim has a 3 game winning streak
- Season: Tim had a 5 game winning streak
- All-Time: In 2011, Micah had an 8 game winning streak
- Longest Losing Streaks:
- Active: Dad and Andy have 2 game losing streaks
- Season: Austin had a 3 game losing streak
- All-Time: In 2011, Kyle had a 14 game losing streak
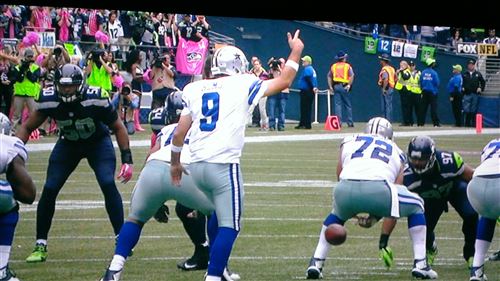
Tony Romo was pretty happy for most of the game as he led his team to the win, but I had to chuckle at this screen grab. He’s got his hand in the air making a pistol motion presumably for an audible, but he already stamped his foot for the ball. What followed was reminiscent of Peyton Manning’s missed snap in the Super Bowl. Without plays like this and the blocked punt, the game would have been a blowout.

 I’ve been getting a few Visa/AmEx/Mastercard gift cards for various things like rebates. They’re nice in that you can use them anywhere, but it’s a struggle for me to remember how much money is left and it’s not always easy to pay use the remainder of the gift card and then put the rest on another card. That’s when I realized that I could just take these gift cards, buy
 The fun part of Legos for me was usually putting them together. Grabbing random pieces and building from your imagination is fun, but building an actual kit was always special. There’s a great service that I just learned about called
  It’s no secret that I love Amazon Prime. For relatively urgent items, the free 2-day shipping is good enough to save me a trip to the store. But for some items, I’m really not in a rush at all and I can wait a week. Amazon used to offer a $1 credit for Amazon movies, but since I never buy Amazon digital movies, I didn’t care. They have switched and are now offering a $1 credit towards books or ebooks. Now THAT’s a deal I’ll use! The downside is that these credits expire after about three months. Still, I expect to opt for the slower shipping quite a bit more often now.
 Mike Rowe has a new show coming out and it’s called Somebody’s Gotta Do It. There is an
  My entry into the RC flying hobby has been quite slow. It started a year ago, but I took most of the summer off while I worked on the yard and other projects. And even when I’m not working on projects, I don’t have much time to actually get out and fly.


Bing Street View
This summer, I spotted the Bing street view vehicle a couple of times in our area. One of the times, I was out on a walk with Elijah.
The car also drove past our house in the middle of our yard project so the side yard looks oh so beautiful.
But Tim wins for the picture they took driving past his house.