Studio711.com – Ben Martens

Geek

RetroPie

I’ve played around with classic gaming system emulators in the past. There was the time I bought an old Asteroids machine and stuffed a computer inside, and I also modified an original Xbox to run old Nintendo games. Classic games are still fun for me and I thought the simpler games might be a way to introduce Elijah to video games as a super rainy weekend special activity kind of thing. Or at least that was my excuse.

It’s a lot easier to get a system up and running now. Here’s a shopping list:

Things you might have already:

Now you’re ready to follow the instructions (Lifehacker has a good guide too) and get gaming!

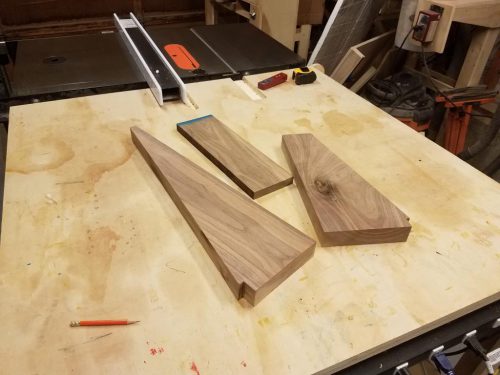
That only took me a couple hours to put together. I wasn’t thrilled with all the cables and pieces laying around so I decided to build a nice box for it. I have done some bandsaw boxes but I don’t recall doing any nice small wooden boxes with a lid. This seemed like a good excuse. I started with some walnut scraps from the side table build.
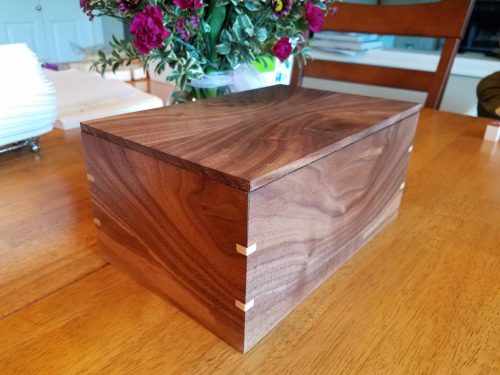
For the top, I found part of the wood with nice grain and tried a bookmatch. That just means that you use the bandsaw to cut down the middle of the board (the thin way) and lay it open like a book. The grain ends up as (almost) a mirror image. I was really happy with how it looked though in the final product I did goof it up a bit. I think I flipped one of the boards end for end.Because I was using scraps, I couldn’t quite get a continuous grain all the way around the box, but I did pay a little attention to it and some of the corners look pretty cool. I put in some small maple splines to reinforce the corners. The box walls were thin so the splines are pretty tiny. I finished it off with a couple coats of shellac.

I’m happy with it for a first attempt. Everything fits inside so that’s a win and the grain is pretty to look at. I want to try another box soon to use what i learned. Crosscut Hardwoods is selling small pieces of curly maple and I picked up some of that to try on the next box.

Online Personality Tests

I’ve never been a big fan of the online personality tests (e.g. “What kind of tractor/hairdo/sandwich are you?” but they are clearly a fad that won’t go away. And the other day I finally heard a compelling argument explaining why so many of them exist: many of those tests are created to build personality profiles about you and people like you. That stuff feeds into how advertisers target your demographic or even how politicians speak to you. Creepy, right?

There’s no free lunch. If you can’t figure out how a website is making money, you are probably the product.

OBDII Trip Reports

OBDII is the standard for the diagnostics plug that is somewhere around the drivers side footwell of your car. For many years I’ve enjoyed having a ScanGauge in my car, and then for my birthday this year, Tyla got me an Automatic OBDII reader. That has been plugged into my truck for a few months, happily uploading data to the cloud.

I finally got around to playing with their API. I wrote an app that runs twice a day on my computer. It calls their API and pulls down any recent trips that I’ve made. It looks for a few places that I’ve labeled (Home, Work, Safeway, etc) and looks for trips that start and end in a named place. If it finds one, it looks how that trip ranks in terms of fuel usage and time. Then I get an email showing me my “score”. It’s a fun way to see if my fast trip to work really was my fastest trip ever, or how that extra bad stop and go traffic affected my fuel usage.

The email is pretty simple right now. I keep thinking that I’ll make it fancier with some charts, additional stats, etc but so far this has been good enough. I think the next thing that I will add as I get more data is a breakdown to show the score for all time, the current month, the day of the week, etc.

Look Ma, No Server!

Serverless computing is all the rage in cloud computing. When cloud computing first began, people thought about how to move their local servers to servers in the cloud. They would end up with a Windows or Linux machine hosted by Azure, etc. That was much better than operating your own data center, but technology is progressing and even managing your own machine in the cloud isn’t really necessary now. There are so many services available that simply take your code and run it for you. Don’t worry about where it’s running or what machine it’s running on. This lets you focus almost 100% of your time on the core business logic in your application and let someone else handle Windows Updates, disaster recovery, backups, etc.

I like to play around with all this stuff and this website is one way for me to do it. Quite a few years ago, I moved this web application to Azure Websites, but I still had a virtual machine running MySQL on it. Now that Azure offers MySQL, I don’t have to run my own VM anymore.

The only other thing I had running on that VM was a little timer job that records the number of customers of my power company who don’t have power. I like to run that from Azure so that I can track power outages even when they affect me. Running a scheduled task on a dedicated VM is extreme overkill so I migrated the code to an Azure Function. I literally pasted C# code into the Azure portal, told it to run the code every 5 minutes and voila! It costs fractions of a penny every time it runs and I don’t have to even think about what machine it’s actually running on.

There’s so much of this great cloud computing geek stuff to get excited about these days.

Recover Deleted Files

I’m super careful with files on my computer. Careful almost to the point of obsession. After having a hard drive crash and losing a bunch of data 15+ years ago, I made sure it would never happen again. But recently I broke one of my own rules and ended up in a bit of a mess. The rule is: get your files off of SD cards as soon as possible.

There are bunch of good reasons for this but a few are:

  • SD cards are easy to lose
  • SD cards are easy to damage
  • SD cards are easily corrupted

None of those bit me. The problem that bit me was user error. I left files on the SD card for a couple weeks because I was too lazy to put the card in the computer and copy them over. The exact sequence of mistakes is probably boring to read, but the bottom line is that I thought all of the old photos on the card had already been transferred off but only about 80% of them had. There were a bunch of “first day of school” photos that I hadn’t transferred off right away and I didn’t notice that fact before deleting them.

As soon as it happened, I realized what I had done and my stomach twisted into a knot. I just lost files not because of a software/hardware problem but because I was an idiot.

I immediately ejected the SD card from my computer and slid the lock lever over to prevent any further stupidity. Next it was time to find something to recover the files. When a computer deletes a file, it doesn’t actually overwrite the file, it just removes the entry from the “card catalog” that points to the actual file locations. So if you can carefully scan the disk and you know what the binary header of your file looked like, you can still read the old data.

If you search around for “recover lost files” there are tons of programs available and I believe two things are generally true:

  1. They’re going to cost quite a bit of money because they know you’re panicked.
  2. It’s a great way for hackers to get you to install spyware/viruses. You’re in a hurry and you click away without really checking the validity of the site.

I ended up using PhotoRec which is free, open source, and hopefully safe. It’s not very user friendly, but that was fine with me.

The tool worked ok, but it didn’t find any files on my first scan. I had only saved .CR2 (Cannon Raw) files and the tool didn’t have a scanner for those files included out of the box. Thankfully they allow you to add your own file signatures, so I whipped open a hex editor, figured out what the header of a CR2 file looks like and added a new signature.

After that it quickly plowed through my SD card and found the “deleted” files. It didn’t get 100% of them, but because I took about 100 pictures of Elijah in ~4 different poses, I still had plenty of good photos to choose from. The day was saved.

But this is one of those lessons that I’ll never forget. When you walk in the door with new pictures on your SD card, immediately copy them to your computer and get them backed up to cloud storage. And whenever I buy my next camera body, I’ll probably be buying one that has built-in WiFi syncing available. I might even check out those WiFi SD cards to see if they’re worth it.

Storage Closet Cleanup

We have a fairly big closet at the top of our stairs that holds a bunch of stuff that doesn’t otherwise have a home: sleeping bags, board games, wrapping paper, vacuum cleaner, folding chairs, etc. It’s a mess. That’s not terrible except that we have to leave the door open because it is also the closet where I had the electrician run all my network jacks. That closet has a whole bunch of networking gear and two computers that are on 24/7. It gets way too hot if the door is closed. Some day I might build a ventilation system in there, but regardless of whether I do that, I knew I needed to build some storage that was better than our old wire frame shelves.To kick things off, I cleaned out the closet, took down the wire shelves and then patched all the old screw holes from those shelves. I even sprayed on some new wall texture to hide the patches. I had a leftover half gallon of the same brown color that is used in many other places in our house and it was the perfect amount to paint the closet.

The real improvement will come from some new storage cabinets, but first I needed a solution for the mess of computer wires. It had to just sit on the floor while I was painting and I needed it out of the way for the cabinet project. So the first build in this project was a very simple set of shelves to hold the computers, routers, battery backups and other miscellaneous gear. The shelves were a quick one day build (with Elijah helping) out of a sheet of 3/4″ plywood, some poplar to hide the exposed plywood edges on the front, and a bunch of pocket screws.
It’s not fancy, but the bulk of this will be hidden by the new closets along the same side wall anyway. And for me, this is glorious. It’s going to be so much easier to diagnose problems and I finally have all of the network jacks in our entire house connected at the same time. Nerdvana.

Now it’s time to build some big cabinets…

ISS Transiting The Eclipse

Destin Sandlin has one of the best YouTube channels in existence: Smarter Every Day. I don’t know how he keeps upping his game, but he has managed to do it again. He found his way onto the perfect tiny little patch of earth where he could watch the eclipse AND see the International Space Station transit across the sun during the eclipse. The math is bonkers. He got a bit lucky because they periodically adjust the height of the space station (it slowly falls to earth) and the last adjustment put the viewing location on some reservation land that is very difficult to get to. It all worked out and he has a great video about it. He wins the eclipse.

CrashPlan Service Changes

I’ve been an enthusiastic CrashPlan cloud backup user for well over 6 years. The small fee that I paid for their service saved me a ton of time trying to hack together my own solution. Unfortunately, yesterday I got an email saying that they are going to stop offering CrashPlan Home and focus on the business market. The transition plan sounds very smooth and they’ll continue honoring all of the time that I’ve prepaid for, but of course it means that I need to start thinking about what to do when my service runs out in a little over a year.

There are a few options to consider:

  1. CrashPlan is officially recommending Carbonite (who was a competitor until CrashPlan exited the home market). Their service is $60/year which is very similar to CrashPlan. The only downside is that I have to re-upload my ~4TB of data. That’s not horrible except that Comcast silently added a 1TB/month cap to my plan.
  2. Stick with CrashPlan and use their Small Business offering. While they are offering existing users a nice discount for the first 12 months, eventually it will cost me $120/year. It’s roughly double what I was paying, but maybe it’s still worth it since I don’t have to change anything.
  3. Go back to rolling my own solution. It’s not too hard to encrypt the data myself and then upload it to Azure blob storage. This would be kind of fun to piece together but it’s not going to be cheaper than Carbonite or Crash Plan Small Business. They set their prices for the amount of data a normal human uses and clearly I’m not that.

Thankfully I don’t have to make this decision any time soon. My contract runs through Oct 2018. However, if you’re thinking about starting to use cloud backup (and I recommend it!), you should be looking at providers like Carbonite or Mozy.

Revenue Per Employee

Microsoft recently announced quarterly results and they were very good. I started thinking about how much the revenue has increased over the years and how many more employees there are. How has the revenue per employee changed?

Some quick searching revealed that this is a pretty common metric to track when investing, but I couldn’t find good, free data going back far enough to satisfy me. So I pulled the data together myself. This is NOT very reliable or accurate! Specifically, many of the employee count numbers were estimated from a chart image. Don’t make any investment decisions from this chart. That being said… it’s interesting to see that when you factor in inflation, Microsoft gets roughly the same amount of revenue per employee every year. Toss in a bunch of new employees and print more money. It’s a pretty good setup!


How does this stack up against other companies? Credit to zerohedge.com for the chart below:

This Visual Capitalist infographic shows revenue per employee for various sectors and companies you probably recognize.

I wonder what would happen if you walked into HR with these numbers in hand to talk about your salary? Good luck with that.

25 Free Throws A Day

This summer I challenged myself to shoot 25 free throws a day. It’s a good excuse to get outside, enjoy the longer days, chat with neighbors, and I also wanted to see how good I could get if I did it every day. Well of course I haven’t actually done it every day, but I’ve come pretty close. And of course I tracked all the data in a spreadsheet…

I’ve tracked 700 shots this summer and the biggest change I’ve noticed is that I’m more consistent than I was in the beginning. For example, my first four scores were 16, 9, 17 and 8. Now I hover much closer to 17 with a couple really good rounds mixed in. My record is 22 and I feel like it will be a long time before I beat that, but I’ll keep going and see what happens. The trend is going up, but if you take out those first four rounds, the slope of the line is still positive but much shallower.I don’t have data for this, but it feels like I usually get better as the round of 25 goes on. So would my average go up if I did more in each round? I might mess with the experiment a little bit too and change to either “how many shots does it take to make 25” or just “how many did I make out of 50”.

Mentally I’ve been comparing this to trap shooting. Both use rounds of 25 and both have a big mental factor once you learn the basic physical skills. At this point, I’d say that free throw shooting is harder than trap shooting which seems crazy to me thinking about the physics of it. But the number of free throws shot over my life is dramatically higher than the number of clay birds I’ve broken and yet, my trap shooting scores are generally better than my free throw scores. I also believe that if you look at professional trap shooters, they have higher success percentages than professional basketball players shooting free throws.

Maybe I think too much about going outside to enjoy the sunshine…