 I posted a couple weeks back about the amazing paint job that Tim did on my cornhole boards. Yes, that’s really paint, not a decal!
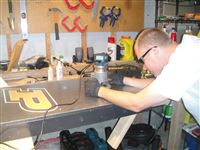
The paint didn’t adhere real well to the MDF and we were concerned that it would scrape off as soon as we started playing. So when Dad was here over the weekend, we bought some sheets of acrylic and applied them to the top of the boards. That involved securing the sheet to the boards with screws (countersunk so the bags wouldn’t catch), trimming the sheets to match the size of the boards and then cutting out new holes to match the existing holes. We weren’t sure how we’d do the trimming and cutting but after experimenting with a Dremel, we switched to the router and it worked remarkably well! I had a bit with a bearing on the bottom the same diameter as the cutting blade. That rode along the edge of the wood while the blade cut the acrylic. We were able to quickly cut an exact match for the boards!
The other concern with this plan was that the boards would end up being way too slippery, but surprisingly they were LESS slippery than before due to the static from the protective plastic that was on the acrylic. I think that will wear off over time and once the boards got a little dusty, they played very close to the original, unpainted boards.
The only downside to this approach was that as the boards heated up in the direct sunlight, the acrylic started to warp a bit. It doesn’t expand at the same rate as the wood underneath. That wasn’t a huge deal though so hopefully this will be the final solution.
Eventually the acrylic will get scuffed up but it should be a pretty quick job to replace them and keep the boards looking like new!


Cornhole Boards Update
The paint didn’t adhere real well to the MDF and we were concerned that it would scrape off as soon as we started playing. So when Dad was here over the weekend, we bought some sheets of acrylic and applied them to the top of the boards. That involved securing the sheet to the boards with screws (countersunk so the bags wouldn’t catch), trimming the sheets to match the size of the boards and then cutting out new holes to match the existing holes. We weren’t sure how we’d do the trimming and cutting but after experimenting with a Dremel, we switched to the router and it worked remarkably well! I had a bit with a bearing on the bottom the same diameter as the cutting blade. That rode along the edge of the wood while the blade cut the acrylic. We were able to quickly cut an exact match for the boards!
The other concern with this plan was that the boards would end up being way too slippery, but surprisingly they were LESS slippery than before due to the static from the protective plastic that was on the acrylic. I think that will wear off over time and once the boards got a little dusty, they played very close to the original, unpainted boards.
The only downside to this approach was that as the boards heated up in the direct sunlight, the acrylic started to warp a bit. It doesn’t expand at the same rate as the wood underneath. That wasn’t a huge deal though so hopefully this will be the final solution.
Eventually the acrylic will get scuffed up but it should be a pretty quick job to replace them and keep the boards looking like new!