(Somehow I forgot to blog about this project from December of 2020 so I’ll make up for it now…)
I often walked past our guest bedroom and thought that it was kind of a wasted room or at least a luxury. We had entire room of our house that got used maybe a week out of the year. Then COVID hit and it was clear that we weren’t even going to have house guests for even that one week of the year. We decided it was a good time to put in a murphy bed.
It’s not a cheap project though. First I had to buy a hardware kit. There are a number of similar items on the Rockler website, but I chose the Vertical Deluxe Murphy Bed Hardware Kit. I chose that one largely because it had a tension adjustment so that the spring could be tuned for the weight of our specific mattress. There was a lot of wood to buy for the project too, but since it was going to be painted, we saved some money with pine plywood and poplar for the trim.
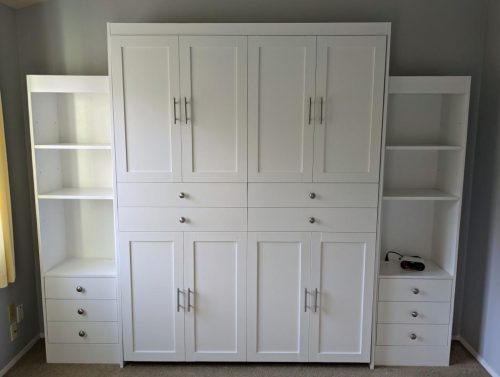
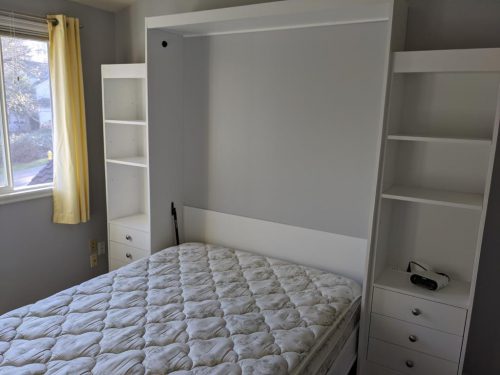
I looked at a few designs around the web and we liked having bookcases and drawers on each side of the bed along with some extra trim and hardware on the front to disguise it a bit.
For the bed itself, I used the plans that came with the kit. I didn’t want to mess with that at all as the pivot points need to be very exact for everything to fit. For the side pieces, I mostly used some plans from a different murphy bed kit on Rockler’s site. It was a big build but nothing was too complicated. It was a bunch of boxes inside of other boxes, but I suppose most woodworking projects could be described that way.
I usually use random paint from the big box store, but this time I decided to try an water based acrylic alkyd paint from Sherwin Williams. You can read up on that kind of paint yourself, but it was supposed to give a nicer finish than a standard latex paint. The weather was too cool to paint in the garage which meant our bonus room got turned into a painting zone. I laid out drop cloths and painted as many pieces at once as I could fit. It probably would have been even nicer if I could spray it on, but it looked great even brushing it.
I had a difficult time getting the rectangle around the bed to be square (the part that stays upright.) I could hide the gap difference with the trim on the front/bottom of the bed, but it was very obvious when I put the bookshelves next to the bed. I ended up caulking the gap and voila, problem solved.
The bed and the shelves cover up an outlet so I added some recessed power strips to the bed-height shelf on each side. They have two power plugs and two USB plugs each which should be enough for people who are charging their phones at night. We’ll add a small lamp to each side as well, but we haven’t gotten around to that yet.
After painting everything and attaching the pieces to the wall so they wouldn’t tip, I moved on to the trim pieces. Everything on the face of that bed is fake. The whole bed folds down as one piece, but the trim and extra hardware pieces make it look more like cabinets and less like a murphy bed.
Elijah slept on it one night and declared it a success, but otherwise, the bed has remained folded up and we’ve been enjoying the extra space. It’s our Room of Requirement! Most often it has been used for puzzles so we can easily close the door and keep the cats away when we’re not in there.
This was a big project but I knocked it off in just a few weeks. I had a lot of vacation time to use up at the end of 2020 so this project kept me busy and made me feel like I wasn’t just wasting my vacation away.