Studio711.com – Ben Martens

Search Results

Train Track Fail

I’ve had a lot of projects go really well lately, but there’s one that has continued to haunt me and I’m officially tossing the idea. I give up.

Tyla found some motorized Thomas the Tank Engine trains for Elijah. They aren’t the size of the standard wood tracks, but they do make plastic tracks. I thought it would be fun to make my own tracks because then we could have whatever pieces we wanted and it could exactly fit on his play table.

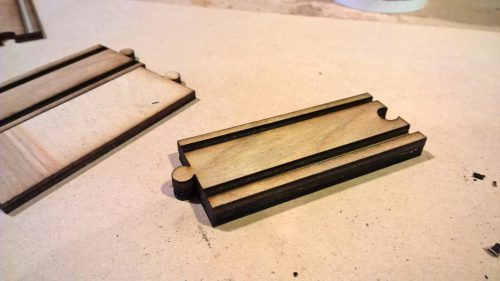
The first few attempts involved etching the wood repeatedly to burn in the tracks. I tried multiple times and finally got the interlocking knobs to fit properly, the curves to be big enough that the train could make the turn, and the rails to be the right width. The problem was that they were never deep enough to hold the train in place. When you’re etching wood, you can only take so much off at a time before it starts the wood on fire, so these attemps amounted to hours and hours in front of the laser cutter watching it slowly take away material. Here’s one of my best attempts with that method. It was rare for a train to make an entire circuit around the track without falling off and I eventually tossed these in the trash.

I gave up for a couple months and then had the idea that maybe I was approaching the problem backward. Instead of trying a reductive process of burning away material, why not do an additive process? I cut one piece that formed the bottom of the track segment and then the top segment was made of three pieces: the middle and then the two outer edges. The “rails” were left blank on that top piece. So the whole segment was two thicknesses high but the rails were only one thickness high. These were very quick to cut and it didn’t take too long to glue everything together. I thought for sure this would work but… the bottom of the train drags on the middle piece and the wheels can’t get to the bottom of the groove to push the train along. Fail. In the trash it goes.

thomastrackslaser

If I spent enough time I could probably figure out the right way to do this, but this project has ceased to be fun and if I decide that I really want Elijah to have tracks, I’ll spend the $26 on Amazon so he can have tracks that actually work.

It wasn’t a complete bust because I learned a lot about the laser cutter and fine tuning designs, but it stinks that I don’t have anything physically complete to show for all that time.

Getting Started With Woodworking

jigsawObviously I’m loving woodworking right now. It’s a very relaxing and satisfying hobby, and it’s a great one for me right now because I can easily do it in the garage when I have a few spare minutes. Any new hobby can seem intimidating at first, but woodworking doesn’t require a huge investment or training course to get started.
Theoretically you could do a lot with just a handsaw, but you’ll probably want some sore of power tools to get started. One of the best initial purchases is a jig saw. It’s small, easy to control, relatively safe, and best of all: cheap! There are plenty of options, but I have a $40 Black and Decker that still serves me well. Toss in some wood glue and sandpaper and you’re pretty much off to the races. From there just check to see what your specific project requires. You might need to add in a hammer and nails or a screwdriver and screws. You may end up wishing for a drill and drill bits too. Even if you bought all that stuff, you would have spent less than $150 to pick up a brand new hobby.

Now, what should you build? The best projects are ones that fill a need. Maybe you want something to organize clutter on your desk, a toy for your kid, or a place to hang your coats. If you want some more guidance, there are tons of great YouTube channels. I’ve covered many of them before, but specifically, check out Steve Ramsey’s list of videos for projects that require limited tools.

Making things with your hands is a wonderful experience whether you’re doing woodworking or some other kind of craft. Just try it out! The worst that will probably happen is that you waste some wood and you learn something.

[UPDATE] Great timing! Steve recently posted a video showing how to build a bed with just a couple basic tools. No fancy workshop required!

Flite Test Electrohub Spider Quad Build

A little over a year ago, I started off in the RC hobby with the intent on flying a quadcopter carrying a camera. I quickly learned that this is a difficult place to start so I fired up a flight simulator, built some extremely cheap foam board airplanes and then flew some nicer airplanes (Bixler 2 and UMX F4 Corsair.) I also picked up a Nano QX quadcopter to fly around the house and learn a bit about flying quads. I’m not a pro by any means, but I learned a LOT about RC flight and about the electronics that are part of the hobby.

I decided to take the plunge and get a real quad. There are lots of options out there. The most popular ones you see in the stores and in the news are things like the DJI Phantom, but they are pricey. For example, the Phantoms start around $500 and go over $1000. And you know what happens when you crash? You shell out more money for the custom replacement parts. No thanks.

Instead, I bought a kit from Flite Test for their ElectroHub and also bought the accompanying electronics kit from Ready To Fly Quads. The whole thing, including tax, was under $230 and that includes some spare parts that I know I will break (props, landing gear, etc.) Building it from scratch takes a bit more work, but now I understand every piece of the puzzle and when something breaks, I can fix it with off the shelf parts that are cheap and easily available. FliteTest has a full build video showing all the steps.

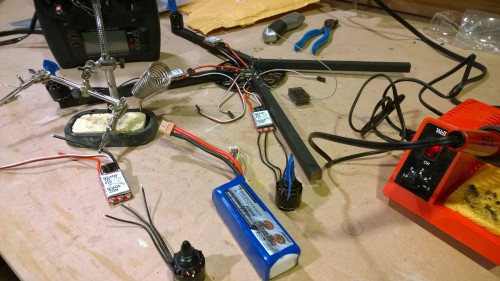
electrohub_buildThe FliteTest guys say it takes them a couple hours to put one together. It probably took me 5-6 because I was learning a lot and going very slowly and I also spread that out over a few days. Basically the steps are to assemble the arms, solder the wires for the speed controller to the motors, solder the speed controllers to the power distribution board, wire up the computer board and the receiver, triple check everything and then give it a shot.

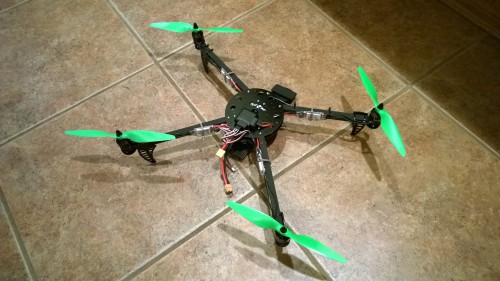
electrohub_completeMy first flight attempt was out on the back patio near dusk. I just wanted to lift off the ground and then land it to prove that everything was connected correctly. Unfortunately, it didn’t even get a foot off the ground before it flipped over and crashed. D’oh! Thankfully nothing was damaged but I did lose the spinner that holds the prop on.

That ended up being the key to diagnosing the crash (with the help of some friendly community members on the FliteTest forums.) The best guess is that the prop fell off when I took off because it wasn’t on tight enough and that, of course, caused the computer to freak out and flip over. I pulled a 5mm nut off my workbench, reattached the prop and I was ready to fly again!

By this time it was dark so I pulled the cars out of the garage and tried again. It worked! I hovered for about five minutes and landed safely multiple times in that period. A video of that is included at the end of the post.

Next steps are to wire up some LED lights (to help with orientation and to look cool), get the nerve to load a GoPro onto the camera tray, and also see if the board has any other cool features like auto hover, altitude hold, etc. The board is a modified Arduino and the sketch files are provided so you could theoretically do whatever you want. I’ll leave that to the pros though and just buy the finished product.

This was a huge victory for me though. Now I need to work on my piloting skills and be able to fly this safely. One big advantage of the quad is that I can work on this in the back yard, the cul-de-sac, or even in the garage! I don’t have to drive anywhere to learn more of the basic skills.

By the way, you might have noticed that this isn’t a perfect X configuration. That’s why this is called a “spider” configuration (or a “dead cat.”) The front arms get spread out a bit farther so that you can get a good field of view from your camera on the front.

It’s awesome that you can learn a seemingly complicated hobby like this using only YouTube and forums. Thank you to all the friendly people at FliteTest!

Thankful

Thanksgiving seems like a good time to give an update on our Little Man who isn’t so little anymore. Elijah is now 17 months old. When he’s awake, he’s jabbering almost non-stop. We can’t understand 99% of what he’s saying but that doesn’t deter him. We can pick out a few words like woof, car, quack, daddy, etc. His best one is probably “thank you.” He’s really gotten the hang of this and even says it at the appropriate times. For example, if you take him to the grocery store, he says thank you every time the bagger puts a bag in our cart.

He walks quite fast now and can almost keep up a normal/slow adult pace for brief periods. He stops not because he gets tired, but because there are so many interesting things to see. Every plane that crossed the sky requires him to stop and point. We live in the normal landing pattern for SeaTac so this happens every few minutes.

He still hasn’t slept through the night and only has slept for more than 4 hours straight a couple times in his life. We go through periods where he wakes up between 5 and 5:30. Nighttime has probably been the toughest part of being a parent for me. I’m awesome at sleeping so I don’t know who he inherited this from.

Coming home is a treat for me as Elijah now recognizes the sound of the garage door and usually comes  running to the door to great me with a big smile! I love you, Little Man! And I love you too, Tyla. We’re raising an awesome kid!

Bixler 2 Review

My entry into the RC flying hobby has been quite slow. It started a year ago, but I took most of the summer off while I worked on the yard and other projects. And even when I’m not working on projects, I don’t have much time to actually get out and fly.

I started by building my own planes out of foam board with lots of help from the guys at FliteTest.com. That was a low-cost entry into the hobby. When I crashed (and I crashed A LOT), fixing the plane meant a short trip to the dollar store. But in the evenings I was always looking around to figure out what my first “real” plane would be.

I ended up setting my sights on the Bixler 2 (named after one of the hosts at FliteTest), and I was thrilled when Tyla got it for me for my birthday! I took quite a while to get it put together and along the way, I made some modifications to account for common problems that people have with the plane. The biggest one is adjusting the way that the wings are held together. I added some 3M hooks and a rubber band through the fuselage. That doesn’t look quite as pretty but it’s a lot easier to use and doesn’t affect the flight characteristics.

The other change was adding flaps to it. The plane comes with flaps but does not include the electronics for it. Wiring it up was easy, but because of the way they have the cutouts for the servos, it took a lot of fancy transmitter programming to get them to function right. (Basically you need to set up a mix between your Gear switch and your AUX1 switch so that they both operate together but opposite which moves both flaps down.)

Blah blah blah how does it FLY!? Honestly, part of the reason I took so long to fly it is because I was afraid of crashing it. Pretty much every plane I’ve built up to this point has had a first flight of about 5 seconds. It inevitably crashes into the ground in a spectacular manner. Thankfully, this one flew amazingly. Takeoff is a little bit tough as you have to hand launch, and, because of the way the pusher prop is mounted, the plane wants to dive a little under full power. But I succeeded on my first attempt and after about 30 seconds, the butt clenching disappeared and I was just having FUN.

Thinking back over the best flights I’ve had with my hand built planes over the last year, this one trumped them all. It was all trimmed out perfectly and I could take my hands off the transmitter and not lose control. Here are some of my favorite parts of that first flight:

  • It glides like a dream. In fact, I had a lot of fun just climbing up to altitude and then shutting off the power.
  • I put a 2200mah 3 cell in it and after 16 minutes of throttle time (plus more time gliding around), I still had 37% battery left. My little foam planes were lucky to get 7 minutes per flight. I think I’ll be able to comfortable set the timer at 20 minutes for this plane.
  • The flaps were a great addition. There’s no landing gear on it. A belly landing without flaps would be possible, but the flaps slow it down to a crawl and it only slides for 3-4 feet before stopping. Engaging the flaps gives quite an abrupt elevation increase though so I might end up mixing in some down elevator with the flaps in my transmitter.
  • It’s a little hard to explain but it was the closest thing I’ve felt to flying in the RC flight simulator program. In that program, everything is so smooth and controllable. My previous foam board planes were often a handful and I never got that relaxed feeling with them.

I feel so comfortable flying this plane that I’m already thinking about putting a GoPro on it. This is a very popular plane for aerial footage and people do a lot of FPV (First Person View) flying through video goggles with it too. I don’t have gear for that but it might be an option down the road.

In case you couldn’t tell, I’m really happy with this plane. It’s definitely still in the trainer category, but it’s the fanciest and best thing I’ve flown yet. While the little foam board planes were frustrating at times, I think it’s good that I started with them instead of this “real” plane. My first flight with it would certainly not have gone as well.

Throwback Thursday – Baseball 1997

I just realized that this photo was taken halfway between my birth and today. Wow. Anyway, now that I feel old, here’s a shot from my Junior year of high school baseball. This was the best team I’ve ever played on. Our coaches were awesome and our team was really good. That’s me in the #12 jersey in the middle of the back row.

I dug up the stats sheet from that year:

  • We were ranked 10th in the state and finished 21-6.
  • I had a 1.55 ERA.
  • I set the school record for picking the most people off base. The exact stat isn’t in there, but I’m pretty sure it was 16. As far as I know, that record still stands.
  • My batting average? 0.00. Yep. They usually DH’d for me, but I had 14 at bats and never got a hit. It’s a good thing I could pitch because I was terrible at batting. Pretty much they only time they put me at the plate was when they needed a bunt because I could do that reasonably well.
  • I made the All-District team and the Academic All-State team… What’s academic all-state? Well, you’re not THAT good, but you’re a geek too so we’ll give you some extra credit and make a special team for you.

By now you should hear Bruce belting out Glory Days loud and clear.

Recording Public Events

After my last post on Friday about the new camcorder I use for recording at church, it dawned on me that I’ve never written up some of my learnings from recording public events. I’m far from an expert, but I’ve made enough mistakes that I have some things to share.

  • Get there early. If you’ve never recorded at the venue, go there days ahead of when you’ll actually need to record. Figure out where all the gear will go and where the action will be taking place. But even if you’ve recorded at the same place many times, you can’t arrive too early. There’s always something that needs extra attention.
  • Don’t try to do this without a good video editing package that you’re familiar with. I like Adobe Premiere Elements. Whatever you use, you need (at a minimum) to have the ability to sync individual audio and video tracks and then cut between them.
  • Unless you are going to have a completely stationary camera, you’ll need at least two cameras. Leave one at a wide angle capturing everything and then do your zooming with the other camera. You can cut to the wide angle while you’re adjusting/zooming the second camera and then switch back to the zoomed view once you’ve got it all set up properly.
  • Have at least one backup for everything. So if you’re using the two camera setup described above, make sure you have at least three cameras in the process. For the audio, hopefully you can record straight off the sound mixer, but also set a little portable audio recorder up near the action to use as a last resort. I can’t count the number of times that I’ve been saved by what I thought was just an extra device.
  • Plan for people getting in your way. If all of your cameras are clustered in the same spot, one person walking in front of you can ruin all of the angles at the same time. Scatter your cameras around the building.
  • Start recording early. Don’t try to hit record right as the action starts. Figure out what time it’s scheduled and then walk around hitting record about 5 minutes early. This gives you time to fix any last minute issues, and then you’ll be comfortable behind your main camera well before anything exciting happens.
  • The most time consuming part of this for me is always syncing up the various audio/video tracks. If you can pull it off, walk into the view of all the cameras and clap your hands together. (Or if you’re fancy, use one of the clap boards like they do in the movies.) That’s almost never feasible for me so I have to revert to other tricks. Sometimes I’ll cough really loud after turning on all the equipment. Other times I’ll just do my best to work with some other noise/visual that most of the gear picked up. Inevitably I spend a ton of time moving clips back and forth frame by frame trying to get them all lined up.

The more I do it, the more I learn because I keep finding new ways to screw up! If you want to check out my work, a lot of it ends up on the church’s YouTube page.

Speedy Caterpillars

Last spring I wrote about a YouTube channel called Smarter Every Day. It continues to be one of the best web video series that I’ve found. The last episode about caterpillars was pretty incredible. Imagine you’re a caterpillar and you want to move as quickly as possible. There’s only so fast that you can walk by yourself, but what if 100 of your friends are walking to the same spot? How could you walk faster as a group than as an individual?

Watch the episode to find out:

And while you’re at it, I also recommend the Minute Physics channel. In each video he very quickly breaks down a complicated physics topic.

Babymoon On Orcas Island

Tyla and I decided to take one last vacation before our son arrives in June. After going through a lot of options, we settled on Rosario Resort and Spa on Orcas Island. Orcas Island is part of the San Juan Islands and it’s about 100 miles away including a 17 mile, one hour ferry ride.

The resort was beautiful. The main building is the former home of Robert Moran. He moved to Seattle from New York in 1875 at the age of 18 with a dime in his pocket. From that point, he built up a fortune as a shipbuilder and also became the mayor of Seattle. The great fire of Seattle happened while he was mayor, but he still got reelected. His company then got a bunch of the contracts for rebuilding Seattle which helped increase his fortune. (How convenient…) He owned a big portion of the most scenic parts of the island and donated about 5000 acres of land to the state for Moran State Park where we camped back in 2009. The mansion now houses a museum, restaurant and spa (complete with original indoor pool.)

The resort and the entire island were pretty empty since it wasn’t peak season, but that also meant that the prices were low and we didn’t have to fight for parking or dinner reservations. We used our time to explore the island, examine tide pools, swim, and do lots of reading. Our room had a balcony that hung out over the water. It was so nice to hear the waves lapping on the shore!

We ate a simple breakfast in our room each morning and then headed out each day for lunch and dinner. Here’s a summary of the places we ate along with our reviews:

Madrona Bar and Grill
This restaurant/bar sits in a beautiful location right on the waterfront. We got a seat right by the window and had some delicious food. Tyla had the salmon fettucine and loved that it wasn’t just the standard dish but instead had a nice mustard sauce. I had the fish and chips and enjoyed a big mug of Mac & Jacks. We’d love to go back!

Rose’s Bakery & Café
This café was full of great employees. It seemed like the type of place that Lauren and Andy might start some day. My sandwich and Tyla’s soup were delicious but a little pricey. We finished it off with some warmed up cobbler and incredible buttermilk ice cream.

Lower Tavern
This bar walks the line between local dive bar and family restaurant. I think it could go either way depending on the crowd. On our night it was full of locals enjoying themselves but not being very rowdy. They say they have the best burgers on the island. Ours were good, not the best we’ve ever had but they probably are the best on the island. The meat was average but the toppings were great.

Enzo’s Italian Café
This café is quite a bit smaller than Rose’s but it includes crepe, espresso and gelato stands in addition to the sandwiches and desserts. Tyla loved her ham and cheese Panini and I had one of the best slices of chicken pizza that I’ve ever had! After walking around town for a bit, we came back and got a slice of cherry pound cake.

Agave Restaurant and Tequila Bar
Our final stop was the Agave restaurant. Being the off season, we were the only people in the entire restaurant for most of our meal! That’s ok though because Tyla got to sit right next to the fire. The food was ok but not spectacular. There are a few other Mexican restaurants on the island so I’d probably try one of those next time.

My favorite stop on the food tour was Madrona and I think Tyla’s was Enzo’s. Those would be two great stops for lunch and dinner on your day trip to Orcas Island.

Photos from our trip can be found in the photo gallery but I’ve also included a few of my favorites below.

Using the GoPro, I also made a timelapse from our balcony. It’s not terribly exciting but you can watch the clouds move and see the tide go in and out.

Potholes Timelapse Video

Yesterday I posted a timelapse video where the main feature was the GPS points on the topo map. When we drove back from Potholes a few weeks ago, I focused more on the images. I taped a USB webcam to the rear view mirror and had it connected to the laptop which was running an app to capture an image every two seconds. That worked great except that there was a problem with the inverter and the laptop battery died before we even made it back over the pass.

I took the images that we were able to snag, combined them with the GPS data and created another timelapse video. It’s all done with a custom C# program so if you geeks out there have any questions, let me know. Basically it’s a WinForms app with a web browser that loads the Bing maps and then I use Win32API calls to capture an image of the app. I have another app that combines all the image files into a WMV file.

The next thing I want to try is using the little HD video camera to record the images/video and see how that works. I have a suction cup camera mount that should make it easier to mount in the car and using the video camera means that I won’t need to have the laptop running. I plan to give it another try when we drive out to the coast in a couple weeks.

The video is embedded below, but again, it works best when you view in full screen HD quality. The GPS wasn’t able to get a lock on the signal for a while so it starts out with just images and then the location data kicks in. I wasn’t intentionally trying to keep our camping spot a secret since you could just watch the images and figure out where we were.