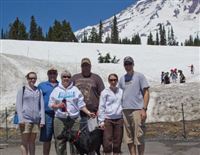
I headed out with the Brandt family to Alder Lake State Park for the Fourth of July weekend. It wasn’t our first choice since we got a late start on reservations, but the campground actually was pretty nice. The biggest downside was that it was close to Hwy 7 which is the western entrance to Mt. Rainier, but the traffic died down a bit at night and the fan in the camper drowned out the noise.
Our campsite was just a short walk from a boat launch into Alder Lake and Oskar made good use of that with a lot of swimming. Tyla and I even joined him for a bit. The water is pretty cold since it flows straight off the Nisqually glacier on Rainier, but we had a good time.
On Saturday, we braved the crowds and headed up to the Paradise visitors center on the south side of Rainier. It was pretty easy to spot the extra dirty snow on the Nisqually glacier from a big rock slide they had last week. (Video is posted on YouTube from hikers.)
On Sunday night we headed up the road to Eatonville to check out their fireworks display. After a couple conversations with the police, we ended up getting booted off the school grounds viewing area because pets were not allowed. We watched from the parking lot, had a great view, and beat all the traffic leaving town.
All in all it was a great trip. We couldn’t have asked for better weather and camping was a great way to celebrate one of the first weekends that has really felt like summer!
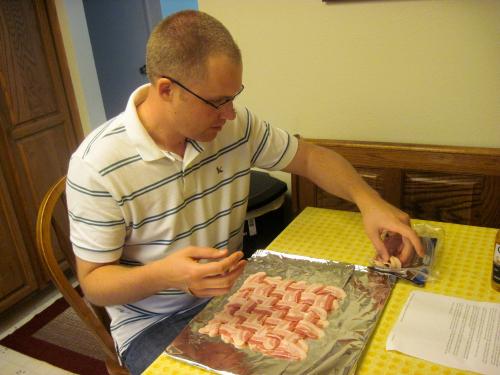
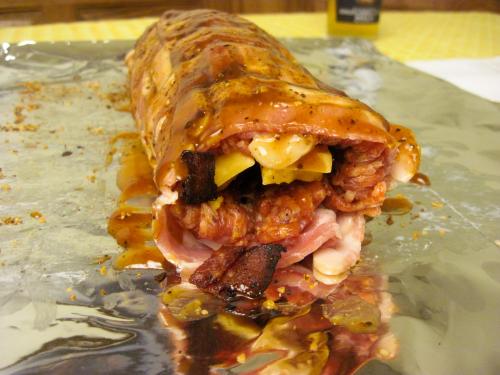
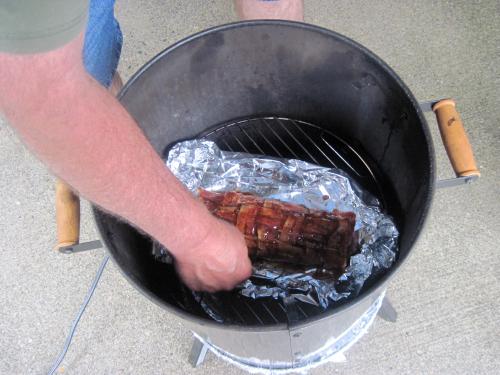
For Father’s Day, I brought the ingredients for a bacon log over to Don’s house and we set to work. This time we added crumbled, cooked bacon in the middle of the log and a rub on the outside of the log. The real improvement was that Don cooked it for three hours in his smoker. We placed the log on top of aluminum foil and poked holes in the foil for the grease to drain out. The last time we made this, the log boiled in the grease and made it soggy. The end result was delicious!
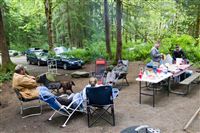
We have had quite a few new young couples join our church recently, so we decided to put together a camping trip. Unfortunately I picked a weekend when not a lot of the new people could join us, but we still did get a good crew together for a fun weekend.
Logan, Megan, Micah, Tim, Chelsea, Tyla and I headed south to Kanaskat Palmer State Park. You may remember that I camped there about three years ago. This time we got two sites to hold all the tents.
Camping this time of year is a bit risky because of the weather, but thankfully the rain held off for the most part. It broke up our Friday night fire around 1am, but we were probably overdue for bed anyway. Saturday was spent exploring the campground, playing ladder golf and generally being lazy.
Photos are posted in the photo gallery. Check the dates on the pictures to see where this trip stops and the last trip photos begin.
This game goes by many names. Here are all the names I found for it as I looked around:
Norwegian Horseshoes, Laddergolf, Snakes, Hillbilly Golf, Polish Golf, Horseballs, Tower Ball, Bolo Golf, Gladiator, Bola, Snake Toss, BlongoBall, Ladder Toss, Bolo, Rodeo Golf, Dingle Balls, Bolo Polo, Cowboy Golf, Redneck Golf, Pocca Bolo, The Snake Game, Willy Ball, Ladder Ball, Slither, Zing-Ball, Snakes & Ladders, Hillbilly Horseshoes, Flingy Ball, Top Toss, Norwegian Golf, Monkey Bars Golf, Swedish Golf, Polish Horsehoes, Dandy Golf, Montana Golf, Lasso Golf, Australian Horseshoes, Ladder Game, Monkey Balls, Rattlerail Toss, Golfball Horseshoes, Arizona Golf Balls, Spin-It, Ball Dangle, Bolo Ball, Poor Mans Golf, Bolo Toss, and Testicle Toss
Whatever you call it, Tim and I made a couple sets the other weekend. We both love cornhole but it’s pretty big and heavy to carry around. The hope was that this would be easier to haul with us and just as fun.
While Tim worked on the PVC piping, I tried to figure out how to drill holes in golffballs without a drill press. I made one set with 6 Purdue golf balls that I got as a thank you gift from KenC at least 15 years ago if not more. I never used them for real golf because I didn’t want to lose them. They are now the coolest set of bolos ever!
We tried out the game on our camping trip this past weekend. I don’t think I like the game quite as much as cornhole, and it wasn’t as easy to transport as I had hoped, but we still had a lot of fun playing. I envision someday having a barbeque in our backyard with cornhole, ladder golf, and washers games going on. Maybe we need some sort of backyard Olympics event!
It inevitably rains in the Puget Sound area over Memorial Day, so this year we decided to head east of the mountains. For those of you unfamiliar with Washington geography, the Cascade Mountains run down the state and create two very different environments. The west side is dominated by the ocean weather so it’s very mild year round with lots of rain. The east side of the mountains is a certified desert with extreme temperatures. You’re almost guaranteed to get sunshine. So with that knowledge in hand, we looked into a trip to the Grand Coulee Dam.
Unfortunately Tyla and I came up with this plan with her family very late and only had a couple camp sites to pick from. I picked a spot at Sun Banks Resort mostly at random. You know how you have that one horribly wet camping trip that will forever make you say “well it least this trip isn’t as wet as THAT one”? I now have a similar comparison for loud and tiny campsites. Our site was maybe twice as big as their camper. Our fire pit was about 8 feet from our (thankfully friendly) neighbors. And the rest of the campground was populated by college kids drinking and partying nearly around the clock with brief breaks for vomiting. I’ve never seen that many beer bottles laying around a campground. The only good thing is that we were on the end of the campground in a group of sites that were a little bit separated from the main party and we bordered the lake. That being said, I felt pretty dumb for picking the site but it could have been worse.
On Saturday we checked out the dam and the Visitors Center there. We found a spot for Oskar to swim and basked in the sunshine. We capped off the day with a short drive back to the dam to watch the laser light show. You should probably see it once but be warned that it’s 40+ minutes long. We were all fighting sleep by the end.
We started off Sunday with a trip back to the dam to take a tour. There are a lot of restrictions post-9/11, but we went down into the third powerplant and they drove us across the top of the dam. I’ll probably make a second post full of the facts we learned on that trip. It’s an incredible piece of construction!
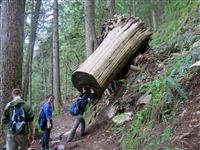
After lunch on Saturday, we headed out on a hike that I picked off the web. At 4 miles and 600 feet of elevation gain, it seemed pretty simple once you got past the “0.15 miles of rock scramble.” Once I saw the hike, I should have turned us around. That first bit was pretty treacherous, often requiring getting down on all fours to make it up the sandy and rocky “path.” Nancy and Logan made it up the first part and then turned around. The rest of us continued on but turned around before making it to the top as we were running out of water and energy. Plus we knew that going down would be even harder than coming up. Unfortunately that was very true.
We had barely started back down the trail when Tyla took a tumble. The squeamish among you should skip this paragraph. She caught her thumb nail on a rock and bent it back about halfway down the nail ripping the nail off the nail bed. Blood ensued as I whipped out my first aid kit and tried to remember the class Tim and I took. I got her bandaged up but then we had to get all the way down the trail and she had lost use of one hand. Thankfully we made it down without any more serious injuries.
Bear Grylls says that a very bad day is a series of small mistakes that you ignore. I was tired of ignoring small mistakes so I decided to put an end to it by taking Tyla to the doctor. If we were at home we might have tried to clean it up ourselves, but we didn’t have many supplies. The only doctor in the small town that was open on Sunday was the ER so that’s where we ended up. They cleaned it out well for her, gave her tips on keeping the pain away, and were very nice in the whole process. Thankfully there was no line so we got through pretty quickly. After hearing what they had to say about it, we probably could have skipped that trip, but I was happy to have finally erred on the side of caution for once and we both felt better knowing that nothing more serious had happened.
So I have to give a huge thanks to the Brandt family for hauling their camper halfway across the state, feeding us, and putting up with my bad choices! If I ever get to pick another campground, I’ll try to find a bigger/quieter one and you can bet that the next hike will be something we can all do without major risk of injury. Thank you all for being so nice about the whole weekend!
This post is already getting pretty long so I’ll save the pictures for another day. However, on the way out there I did mount the Kodak Zx3 to the windshield and make a timelapse video. I wanted to show everyone who quickly the weather and environment can change! In an hour or two, I can drive from wet, cool weather, over a mountain pass through snow and down into a desert complete with tumbleweed!
A few friends are thinking about getting their motorcycle licenses so there have been quite a few chats about safety floating around the lunch table. I decided to do some research and figure out just what the statistics tell us about riding a motorcycle.
It’s difficult to collect unbiased statistics and get recent figures, but the key fact seems to be that motorcycles have a fatality rate 35 times greater per mile travelled than passenger cars. If that seems excessively dangerous to you, consider the motorcycle fatality rate is only about twice that of the bicycle rate. Any time you’re on the street without a big metal cage around you, you’re more vulnerable.
What causes most of the accidents? Unsurprisingly to most motorcycle riders, three fourths of accidents involve a car. Of those accidents, two thirds are because the other driver violated the right of way of the motorcycle. Failure of car drivers to recognize motorcycles is one of the most common dangers I face. (That’s why I installed the air horn on my bike!) Intersections are the most likely location for accidents.
So which types of riders are most likely to have accidents and what can you do to improve your odds?
Riders between 16 and 24 are over-represented in the statistics and ages 30 to 50 are under represented and female riders are significantly over represented.
Craftsmen, laborers, and students comprise most of the accident-involved motorcycle riders. Professionals, sales workers, and craftsmen are under represented and laborers, students and unemployed are over- represented in the accidents.
Motorcycle riders with previous recent traffic citations and accidents are over represented in the accident data.
The motorcycle riders involved in accidents are essentially without training; 92% were self-taught or learned from family or friends.
More than half of the accident-involved motorcycle riders had less than 5 months experience on the accident motorcycle, although the total street riding experience was almost 3 years. Motorcycle riders with dirt bike experience are significantly under represented in the accident data
Almost half of the fatal accidents show alcohol involvement.
Motorcycles equipped with fairings and windshields are under represented in accidents
Motorcycle riders in these accidents were significantly without motorcycle license, without any license, or with license revoked
Seventy-three percent of the accident-involved motorcycle riders used no eye protection
Sixty percent of the motorcyclists were not wearing safety helmets at the time of the accident
Less than 10% of the motorcycle riders involved in these accidents had insurance of any kind to provide medical care or replace property
Which of those have causal relationships to accidents is unclear, but it is clear that you can do a few very important things to dramatically reduce your odds of getting in an accident:
Take it slow and easy as you put the first few thousand miles under your belt and always ride within your limits now matter how long you’ve been on the road.
Don’t drink and drive. This is a no-brainer at any time, but even more so on the motorcycle. When I got my license, I decided that if I rode my motorcycle somewhere, I’d never have even one drink.
Wear a helmet.
These all seem completely obvious, but if you start dong the math, you’ll see that a vast majority of the accident pie is made up of people who didn’t follow some or all of these four guidelines. Riding a motorcycle is inherently dangerous and it will never be a completely safe activity, but for your own sake, and for the sake of those who love you, use your head while you’re out enjoying yourself!
If you want to read more, check out the Harry Hurt investigation report from 2006. Much of the information in this post comes from that report. Don’t forget to read other sources though since we all know how statistics can be manipulated!
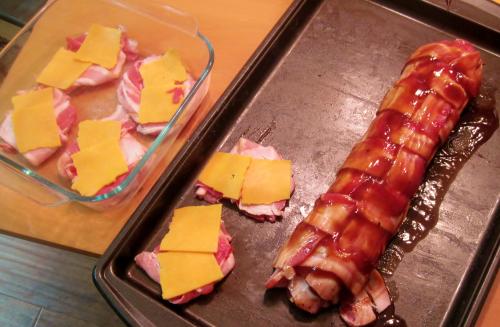
The Bacon Explosion recipe has been on my list for a long time. This weekend, I finally witnessed its splendor in person. After a long hike on Saturday, we all ended up back at Tim and Chelsea’s house. Stephanie created some bacon and cheese patties to top the burgers and I made a smaller version of the Bacon Explosion.
I started by creating a bacon weave. In the middle of that, I flattened about 2/3 pound of mild Italian sausage and then placed three slices of cheddar on top of the sausage. I rolled it all together, covered it in BBQ sauce and put it in the oven. The recipe says 225 for 3 hours but we didn’t have that long so we attempted to cook it at 375 for about an hour. The internal temps got well over the 165 they recommend so we called it done and chowed down.
Delicious. I’m pretty confident that if any human ate the entire thing, they would die within 7 minutes of their last bite.
Do NOT bake this on a flat cookie sheet. You’re going to end up with a LOT of grease in the pan! The next time I make this (and there will be a next time), I’ll cover the pan in aluminum foil. I think we might have ruined one of Chelsea’s pans in the process. Secondly, I’d see if I could put some sort of rack on top of the foil-covered pan so that the log isn’t cooking right in the grease.
And since I’m sure someone will comment about this if I don’t put it right in the post, yes, this actually made me drool. Chelsea was watching me as I pulled it out of the oven. I carefully cut it with the knife and a big ball of drool dropped out of my mouth onto the pan. (Luckily it was right on the edge away from all the food.) What can I say? It looked delicious!
The recipe I linked to in the first paragraph has a lot better pictures than the ones I took so feel free to peruse there if you need some more bacon in your jpeg.
At the end of last week, Tim, Andy, Stephanie, Micah and I cobbled together a plan to go hiking on Saturday. Tim suggested Lake Serene up by his house so we grabbed our gear and set forth. This one is hike #35 in your textbooks.
The day was a bit wet and chilly, but we dressed and packed appropriately. The first mile and a half are a gentile incline up to the base of Bridal Veil Falls. The river comes down over 1000 feet in less than half a mile and the trail snakes right below the last free fall section. Somehow Tucker ended up swimming that pool for a bit, but even the misty spray was enough to suck the heat out of my body.
From there the trail started climbing steeper and it was quite rocky and wet in many spots. There have been a lot of blowdowns and slides along the trail but they were almost all moved out of the way by volunteers. Because of the steepness of the second half of the trail, there are endless switchbacks and stairs built into the hillside. This trail gets a lot of traffic in the summer. If those stairs weren’t there I imagine you’d have a big muddy mess.
We reached the snow with about half a mile left in the hike. It was 3-4 feet deep in places, but the path was well tracked so we didn’t sink in very far. We arrived at the lake to find it frozen as expected. It will be fun to do this again in the summer and see how different it looks. Mt. Index rises from the opposite side of the lake and adds a very imposing backdrop to the lake.
All in all it’s about 7.5 miles and 2200 feet of elevation gain. Poles aren’t required but were a big help in the muddy and snowy sections. Both hiking books that we looked at rated the difficulty as 3 out of 5.
I didn’t want to risk the nice camera in the heavy mist/rain, but I did bring the little point and shoot to document the trip. Photos are in the gallery tagged with “Lake Serene.”
There won’t be a lot of hikes available for the next couple months as the snow melts so we’re stuck in the lowlands trying to avoid the crowds. A couple weeks ago, Tyla, Micah and I headed out to Squak Mountain. For those of you following along in your textbooks, this is hike #5. The hike winds around the least crowded of the Issaquah Alps and covers a lot of the estate of the founder of the KING broadcasting company. In fact, part of the hike goes right past the foundation of the old house and the large fireplace is still standing. The hike wasn’t that memorable, but it was nice to get out on a beautiful day and stretch the legs a little bit.
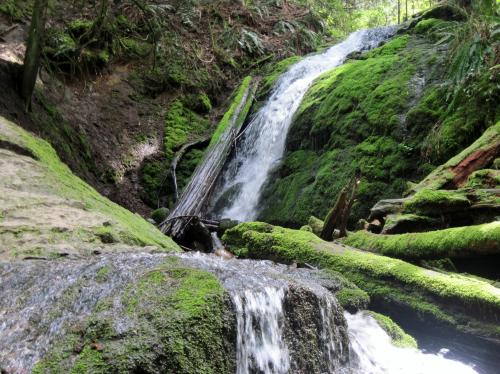
This past weekend, the three of us headed out again to hike along the De Leo Wall on Cougar Mountain. This one is hike #2 in the book and it was a bit more interesting than the previous hike. The trailhead was swamped with people but we left them all behind pretty quickly and found a bit of solitude. We never made it to the viewpoint because of some confusing signage and text in the book, but we did find the waterfall.
All in all these were decent hikes for early in the season but I won’t be itching to do either one again. The Squak Mountain hike was notable for some very bad guidance from the book. It usually does a good job of leading you along the trail, but Squak and Cougar are so riddled with a maze of trails that it can get pretty tricky.
Hopefully we’ll get some warmer weather soon to get that snow melting up in the mountains! There is still 10-20 feet of snow in most places up there.
The Skagit Valley Tulip Festival is a pretty big shin dig in these parts. Imagine 100,000 of your closest friends driving up I-5 and then getting off on some tiny exit to sit in traffic in fields. Usually Tyla and I head up there on the motorcycle with ~100 other riders for the annual Tulip Ride, but we missed it this year because it fell on our one year anniversary. So this year we headed up there with Tim and Chelsea and had a blast! When we’re there on the bikes, we’re going on a prearranged date and we have a schedule to stick to. This time we waited for a glorious sunny day and took our time.
While I’ve seen the fields before and it’s not really anything new, I was very excited to take the camera out for a spin. I still wonder how many spectacular pictures I’m missing, but I do feel like I’m getting a few more keepers as the weeks go on.
You can view them in the photo gallery under Tulip Festival. The six newest photos are from this trip. I’ll spoil the surprise and add my favorite one to this post, but head into the photo gallery to see the rest.
PS. If you have an eye for photography and have suggestions about how I could have improved any of these photos, please let me know! Don’t worry about offending me. Whether it’s bad composition, post-processing, or anything else, I want to know!

 I headed out with the Brandt family to Alder Lake State Park for the Fourth of July weekend. It wasn’t our first choice since we got a late start on reservations, but the campground actually was pretty nice. The biggest downside was that it was close to Hwy 7 which is the western entrance to Mt. Rainier, but the traffic died down a bit at night and the fan in the camper drowned out the noise.
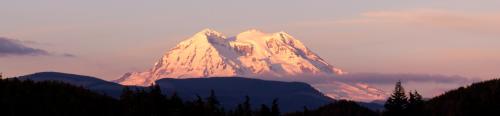
 We have had quite a few new young couples join our church recently, so we decided to put together a camping trip. Unfortunately I picked a weekend when not a lot of the new people could join us, but we still did get a good crew together for a fun weekend.
 It inevitably rains in the Puget Sound area over Memorial Day, so this year we decided to head east of the mountains. For those of you unfamiliar with Washington geography, the Cascade Mountains run down the state and create two very different environments. The west side is dominated by the ocean weather so it’s very mild year round with lots of rain. The east side of the mountains is a certified desert with extreme temperatures. You’re almost guaranteed to get sunshine. So with that knowledge in hand, we looked into a trip to the Grand Coulee Dam.
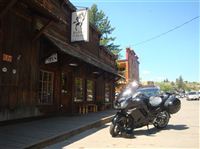 A few friends are thinking about getting their motorcycle licenses so there have been quite a few chats about safety floating around the lunch table. I decided to do some research and figure out just what the statistics tell us about riding a motorcycle.
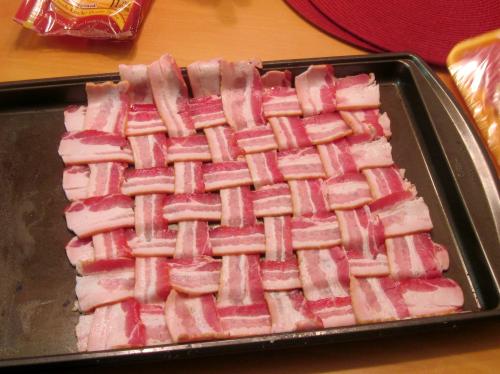
 At the end of last week, Tim, Andy, Stephanie, Micah and I cobbled together a plan to go hiking on Saturday. Tim suggested Lake Serene up by his house so we grabbed our gear and set forth. This one is hike #35 in your
 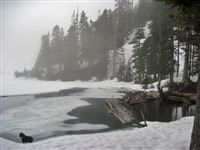 We reached the snow with about half a mile left in the hike. It was 3-4 feet deep in places, but the path was well tracked so we didn’t sink in very far. We arrived at the lake to find it frozen as expected. It will be fun to do this again in the summer and see how different it looks. Mt. Index rises from the opposite side of the lake and adds a very imposing backdrop to the lake.
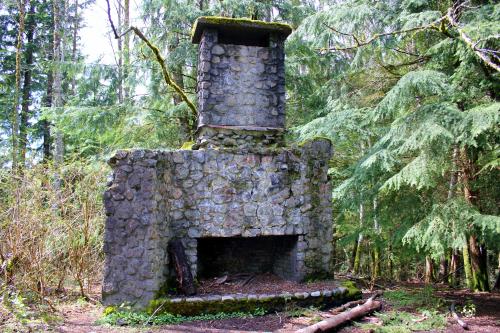
 The Skagit Valley Tulip Festival is a pretty big shin dig in these parts. Imagine 100,000 of your closest friends driving up I-5 and then getting off on some tiny exit to sit in traffic in fields. Usually Tyla and I head up there on the motorcycle with ~100 other riders for the annual Tulip Ride, but we missed it this year because it fell on our one year anniversary. So this year we headed up there with Tim and Chelsea and had a blast! When we’re there on the bikes, we’re going on a prearranged date and we have a schedule to stick to. This time we waited for a glorious sunny day and took our time.
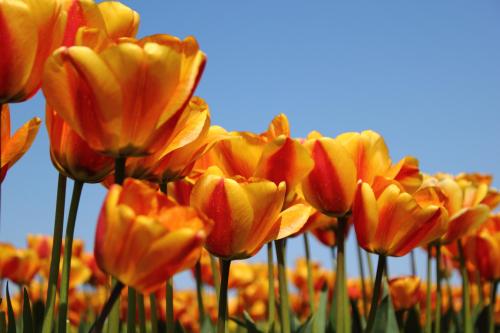
Ladder Golf
This game goes by many names. Here are all the names I found for it as I looked around:
Whatever you call it, Tim and I made a couple sets the other weekend. We both love cornhole but it’s pretty big and heavy to carry around. The hope was that this would be easier to haul with us and just as fun.
While Tim worked on the PVC piping, I tried to figure out how to drill holes in golffballs without a drill press. I made one set with 6 Purdue golf balls that I got as a thank you gift from KenC at least 15 years ago if not more. I never used them for real golf because I didn’t want to lose them. They are now the coolest set of bolos ever!
We tried out the game on our camping trip this past weekend. I don’t think I like the game quite as much as cornhole, and it wasn’t as easy to transport as I had hoped, but we still had a lot of fun playing. I envision someday having a barbeque in our backyard with cornhole, ladder golf, and washers games going on. Maybe we need some sort of backyard Olympics event!