
It has been a long road and this will be a long post, but Tim and I are finally done with the back yard. I got the two gates built, installed and stained and on Saturday at noon, I declared the project done. “Done” here means that all the big pieces are completed and the yard can be locked up again. There are still plenty of smaller items like making one final dump run, adding bark chips, etc but those aren’t as urgent and I’ll just work them into my normal home improvement projects. The front yard is still a mess too, but that will sit for a couple months until Tim is available again. The front yard should be a lot smaller project too. So with all those caveats, I’m done!
When I show people photos of the finished project, it’s kind of anti-climactic. They look at the before photo and wonder why we changed anything. So let me go back and list out the reasons why we weren’t thrilled with our old back yard:
- Any time it rained, the yard was muddy. Drainage was horrible/non-existent and water would sit in the yard for days after a heavy rain. From roughly November through May the grassy area was pretty much unusable.
- The cedar swing was nice but it took up a big chunk of our yard. We only used it once or twice for photos because it was a giant spider web. As I started tearing it down, I also learned that it was very rotten and probably would have caused some serious injury before too much longer.
- The fence was rotten and falling over. I had propped it up with some extra supports but those weren’t enough to hold it anymore.
- The pine trees (arbor vitae) along the fence were getting close to the end of their life and were starting to brown. The thundercloud plum in the corner was disaster. Please don’t ever plant one of these trees.
- Most of the bushes in the back yard were not pruned well by the previous owner and were overgrown.
- The “retaining wall” appeared to be constructed with old concrete from the patio that was there before the new one was put in. It was about two feet high and I can’t tell you how many times it crumbled underneath me. We would have constantly been pulling Elijah back from it as he toddled around (if he could even make it there in the mud.)
So yes, on the surface it looked ok, but as we got more familiar with the yard, we knew it’s time had come. Now we have a beautiful new yard!
 [UPDATE: These links are broken now, but I’ll leave the text] I made a Photosynth of the back yard in it’s current state. If you forgot what it looked like before, you can check out this previous Photosynth. Honestly I do like the way the old yard looked like it had been lived in and wasn’t brand new. This new one has so much more space though and it will grow in like the old one did (but without getting out of control!)
It should come as no surprise that I was collecting a lot of data about this project as we went. Here are some facts:
- Major features completed: French drains, irrigation, retaining wall, and fence
- Square feet of grass before: 475. Square feet of grass after: 1175
- Number of retaining wall blocks: 441
- Linear feet of fence: 152
- Gates: 2
- Posts: 21
- Cedar fence panels: 332
- Gallons of stain: 13.5
- Nails: 2200
- Yards of dirt added: 34
- Home Depot Transactions: 32
- Project calendar duration: 44 days
- Actual days spent working: 41 days (only 3 days with no progress!)
- Days affected by rain: 1
- Estimated savings by doing it ourselves1: 58%
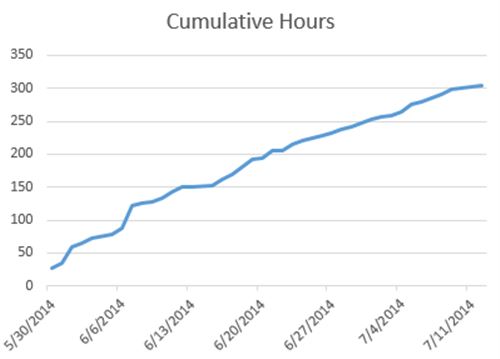
- Total Hours spent: 310
1 This calculation was done using a standard contractor markup for materials and then assuming that professional labor would work 30% faster than we did (except for Tim.)
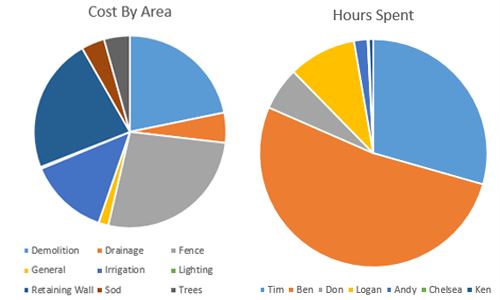
Here are a couple charts breaking down the cost by feature of the yard and then another one showing how much time each helper put into the yard. Thank you everyone! The cumulative hours chart shows that we kept the rapid pace up for the whole project. I don’t think we could have done it quicker without taking more vacation or hiring more help. Nearly every available hour was spent working on the yard.
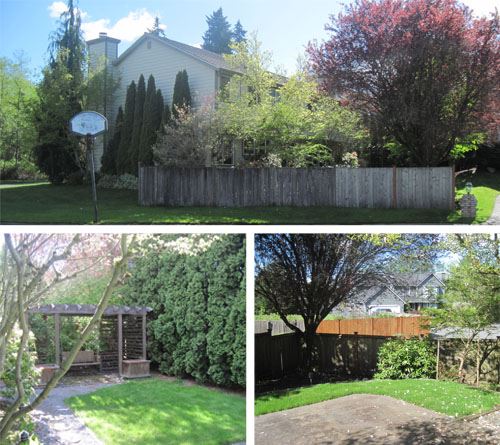
And finally, here are some photos, starting with before:
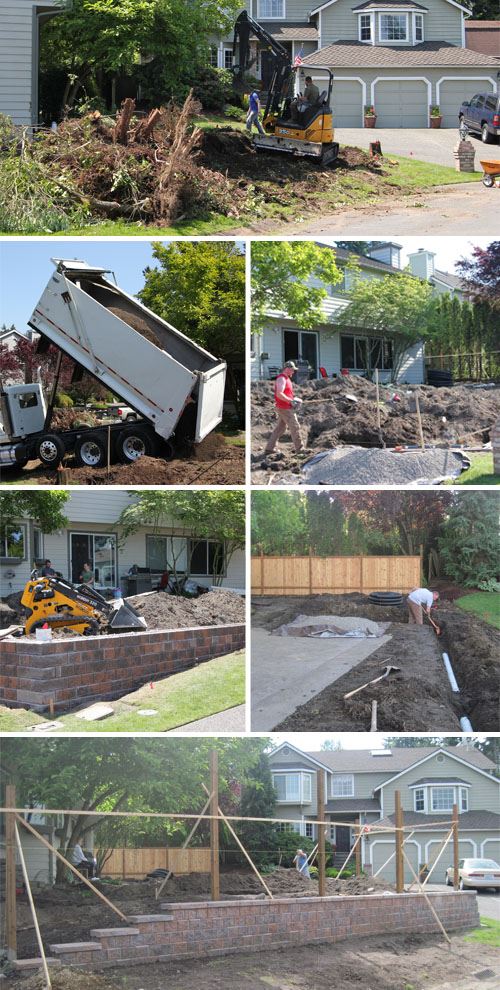
During:
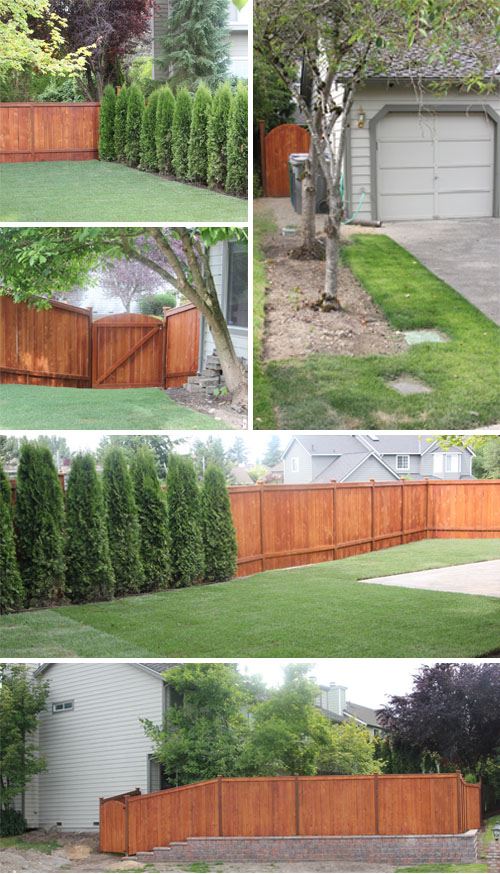
After:
And finally, here’s a complete list of all the timelapses I made along the way.
- Tree Removal Timelapse
- Yard Demolition Timelapse
- Building A Fence Timelapse
- Fence Staining Timelapse
- Sod Timelapse
This is the last you’ll see of the yard updates for a couple months until we start on the front yard. Until then you’ll find me in the back yard admiring our work with meat on the grill and a beer in my hand.
Links to previous updates 1, 2 , 3, 4, 5, 6 and 7
UPDATE: The front yard is done now too!