I love collecting data. Temperature is especially interesting to me and my Ecobee thermostat has three satellite temperature sensors spread around the house. I collect all that data in a database, but I’ve always been curious about having a couple more. Sure, I could just buy the extra sensors when they are on sale and have them automatically connect into the infrastructure I already have, but wouldn’t it be so much more work to design one from scratch? Let’s do it!
This is conceptually a v2 of the pool sensor that I built for Dad and Mom last year. While not without its issues, that sensor is now in a state where it works pretty well. It’s good for monitoring water temperature but I wanted something simpler for measuring air temperature and I didn’t want to do any soldering.
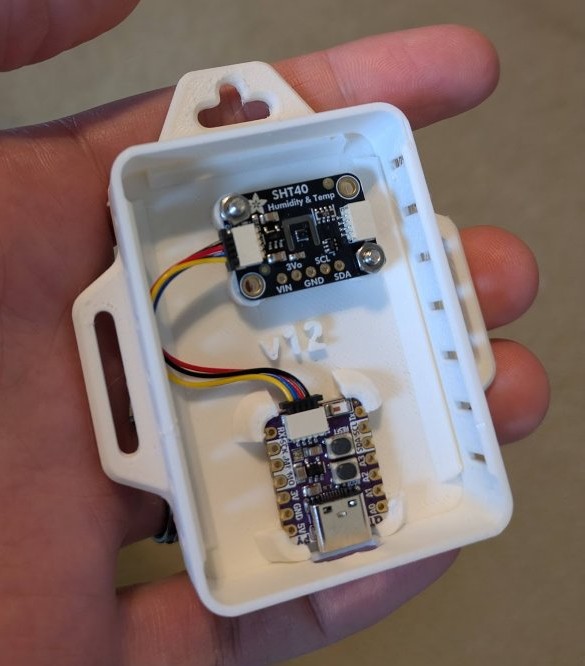
Those search parameters led me to the Circuit Python devices (specifically the QT Py ESP32-S2) from Adafruit and SHT40 temperature sensors. Those two easily connect with a Stemma QT cable. So that puts the total price of each device at around $20 plus tax/shipping. That’s much more expensive than this project needs to be, but I was shooting for assembly simplicity.
The code was largely written by GitHub Copilot. It’s very straightforward but the code ended up being fancier since I didn’t have to write it all by hand. Specifically the color changing LED is very informative to help give feedback about what is going on with the device.
Starting with a published 3D model, I modified it heavily to design my own custom 3D printed case for it and voila! I had a working (mostly) device! The image below is with the front cover off so you can see how everything press fits perfectly and there is a cutout for the USB adapter which provides power.
Problems I’ve had so far:
- Connecting to WiFi was very unreliable during development. I think the tiny WiFi antennas on these devices are very sensitive to having too much or too little power. I added a config setting for adjusting the power levels that helped a bit, but I also built one that had an external antenna. This raised the cost but seems to work more reliably than my other versions.
- I’m currently battling some mystery errors. Sometimes I’ll walk by and the light will just be solid red which indicates an unknown error. I’ve had trouble figuring out what this is, but I suspect it’s related to the internet connection. I recently added some code to reboot the devices after being in this state for a while. I’ve mitigated this by updating my data collection app to alert me if there haven’t been any new readings in the last 6 hours. When I get that, I just go power cycle the devices. Not ideal but at least I know when it happens.
- There was a significant learning curve in flashing the firmware and switching between Python mode and Arduino mode. I’ve got it all documented now but there was a lot of frustration involved with that part. One great thing about Python mode is that the device is recognized by Windows as a filesystem over USB so it’s simple to update the code and config files. The downside is that the code itself can’t log to the file system when it is in this mode which makes debugging much harder.
So in the end I spent hours of my life and more money than if I had just bought more Ecobee sensors. But I learned something. Yay?