Our new 2013 Escape SEL is full of gizmos and gadgets. Now that we’ve had about a month with the car, I figured I’d review some of the technology in the car.
There are three versions of Ford’s interior computer system: 1) SYNC 2) MyFord Touch 3) Navigation. If you pick a higher number, you get the lower numbers too. So for example, you can’t get a navigation system without also getting SYNC and MyFord Touch. Sync is the part of the system that is responsible for voice prompts and listening when you talk to the car. You can tell it to play music, read you the news, get the latest weather, give you audio based turn by turn directions, or read and reply to text messages over your phone. It’s mostly done via audio though you might also get a simple one or two line display on your radio.
MyFord Touch adds a visual touchscreen to Sync. The functionality is roughly the same except now you can do everything either via voice or with the touch screen. It also adds internet connectivity. If you have a USB mobile broadband modem from your cell phone carrier, you can plug it into the car and your car turns into a rolling Wi-Fi hotspot. When the navigation upgrade is added into the MyFord Touch system you get an on-screen display for route guidance. It will come as no surprise that our Escape has the fanciest tech package we could get, but how well does it work?
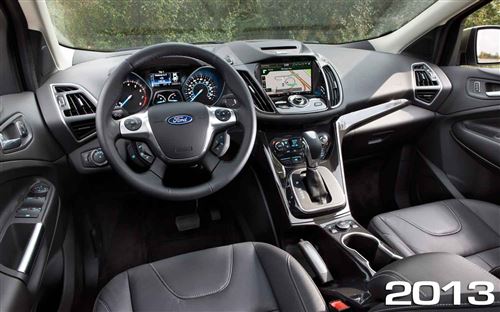
It’s a bit overwhelming when you first get into the driver’s seat. There’s an 8” touch screen in the center of the dashboard drawing your attention to play around with climate settings, entertainment options, navigation or cell phone connections. And then there is an LCD screen in the center of the dashboard between the speedo and the tach. It can show you a ton of different info light miles per gallon, distance to empty, a little flower showing how efficiently you’re driving, which wheels are currently receiving power from the engine, etc. and it is controlled with buttons on the steering wheel. Once you get used to it, it’s really handy, but while you’re getting used to it, you really need to remind yourself to focus on the road!
There is a plethora of ways to connect audio to the (very nice!) sound system: HD radio, CD, Sirius satellite radio, USB, SD card, RCA jack for audio and video, and Bluetooth audio from cell phones. It’s nice to have so many choices! It’s the first time I’ve ever heard HD radio and it really is impressive, though I’d never pay extra for it since I rarely listen to the radio. We bought the world’s tiniest 16 GB USB stick, loaded it up with MP3s and that will stay in the car. Tyla’s Zune is connected to the car via the RCA jacks because it’s actually easier to control using the Zune itself than going through the car menus plus for some reason it kept trying to re-index the music on the Zune. It’s our first time with Sirius and that has some great channels. Unfortunately reception cuts out as soon as you get into the threes (like Hwy 522 up to Monroe or out in the San Juan Islands.) I’m guessing it’s because we’re on the edge of the country out hear in Seattle. It’s annoying enough that we probably won’t keep paying for it after the free 6 months are up.
The voice part of SYNC is the part that has taken us the longest to figure out. There are a lot of things you can say, but it’s not anywhere close to a full natural language interface, When you speak, you’re navigating through a series of menus and if you don’t know ahead of time what you can say, you have to listen to it read out all the options. That’s pretty ineffective. I found a button on the touchscreen which will display the various things you can say when you push the voice prompt button and that has been helpful in the learning process. I don’t think we’ll use voice too often, but there are times when you really do need to use it. For example, when the car is moving more than 5mph, many of the touchscreen functionality is disabled. So if you need to do something like navigate to an address, you need to do that with the voice commands (or pull over and use the touch screen.) You can do silly things with the voice system like control the temperature in the car, but I don’t know why you’d do that instead of reaching down and using the physical button (and yes, it’s on the touch screen too.) I feel like the voice system could be really cool, but I’m not that impressed at this point.
Car features are kind of like cable TV. You pay for some specific features you really want and then get a bunch of other stuff bundled in. Here are some gizmos that we didn’t specifically seek out but came bundled in our car:
- You can pick from a variety of colors for the ambient lights that show up in the foot wells, inside the cup holders, and behind the door handles. Tyla loves this because her car glows purple.
- There’s a 110v power outlet in the back seat which cranks out about 150 watts.
- There are three memory settings for the driver’s seat and side mirrors. This is way more awesome than I thought it would be considering the height difference between Tyla and me.
- The car came with remote start. Since it rarely gets below 35-40 degrees, I don’t know if we’ll use this but it’s there.
- There are three buttons on the visor that can be programmed to control garage door openers. We have three garage doors so this fits us perfectly.
- It’s the first time I’ve owned a car with automatic climate control. It’s so convenient! I now get annoyed driving my Subaru and fiddling with the fan and temperature controls.
- The ignition is just a push button that will activate whenever the key fob is present. Likewise if you walk up to the car with the key fob, the doors unlock when you reach for the handle. It’s handy, especially for Tyla who doesn’t have to dig through her purse to get in the car or start the engine. Shortly after getting the car she asked if I could make our house doors do that too!
- The power tailgate is another feature that is more useful than I expected. You can raise the tailgate with a button on the dash, a button on the key fob, or in the hand grip under the license plate. Likewise there are about three buttons you could press to close the tailgate. You can also set the maximum height that the gate will open in case you have a low garage.
- Lots of cars have that power tailgate, but Ford took it to the next level with a foot sensor. You just walk up to the rear of the car with the key fob in your pocket and wave your foot under the bumper. It took a little practice to figure out the location of the sensor but now it works great. Walk out with bags of groceries in your hands, kick your car in the butt and watch the tailgate open.
- The rear bumper has sensors that beep if you’re backing up into something.
Believe it or not, even with all the tech we got in the car, there are a bunch of features that we didn’t get. For example, there’s an option that will automatically parallel park the for you!
For a non-techy, I think this could all be a bit overwhelming. I was a bit nervous putting Tyla in a car like that but I think she’s getting it figured out and enjoying the various features on the car. It will never replace the love she felt for that Beetle, but I think it’s growing on her.
Personally I love the form factor. It’s big enough that I can fold the seats down and get some good utility out of it, it has a roof rack that will carry skis or the box, it has their fancy four wheel drive system that activates automatically only when you need it and it gets 30 mpg on the highway thanks to the EcoBoost engine technology. Plus, on the invoice it says “FORD TRUCK”. I told Tim I finally owned a truck and he replied, “Yeah, but it has purple lights inside.”

 In an earlier post, I explained that my new skis were partially paid for by my company with a new part of our benefits package. You only get the credit if you decline the gym membership, and since the gym membership is quite a bit more money than the credit, I think HR wants more people to pick this credit. They recently contacted me (and some other people) about doing a short video on us and sending it out in a newsletter to all the employees. That in itself seemed pretty cool to me, but they also said they would send us GoPros to capture footage of us using whatever athletic equipment we bought with the credit.
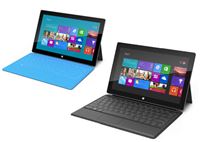 Tyla and I have had the Surface RT for a few weeks now. I’ve been putting off this review, but I’ll explain that later. First off, the device is great. If you want to step into the world of tablets, I have no trouble recommending this. It’s competitively priced and it has some strong differentiators.
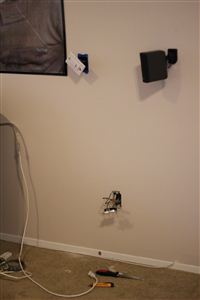 We like to eat dinner while we watch movies in the theater room. For some movies the light bouncing off the screen is enough to illuminate our food, but for darker movies, it can be a challenge to scoop up those tricky peas.
 Every night since moving in, I have been doing battle with the external light timer. The previous owner left instructions, and I found the manual online, but no matter what I did, I couldn’t get them to work correctly. Even when I set the program, the timer drifted and would be wrong by the next day.
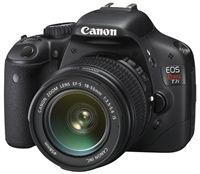 I’ve been longingly reading dSLR reviews for the past year, and it all paid off because Tyla and I got one for our Christmas gift to each other. The hardest part of the whole thing was deciding between Nikon and Canon. I got a lot of recommendations for both sides, but we ended up going with the Canon T2i. To me, this camera is the leading candidate in the $700-800 range. The picture quality is impressive and the video features beat most of the competition. That being said, you can’t really go wrong either way.


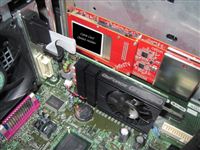 I’ve always been intrigued by the beauty of Windows Media Center. It comes with virtually every SKU of Windows now, but how can I get my cable TV hooked up to it? There have been various methods for the past few years, but nothing was good enough for me to take the plunge of killing the Tivo and switching to Media Center. I’m planning a couple posts about this project, but the first one will be on the hardware side of things.