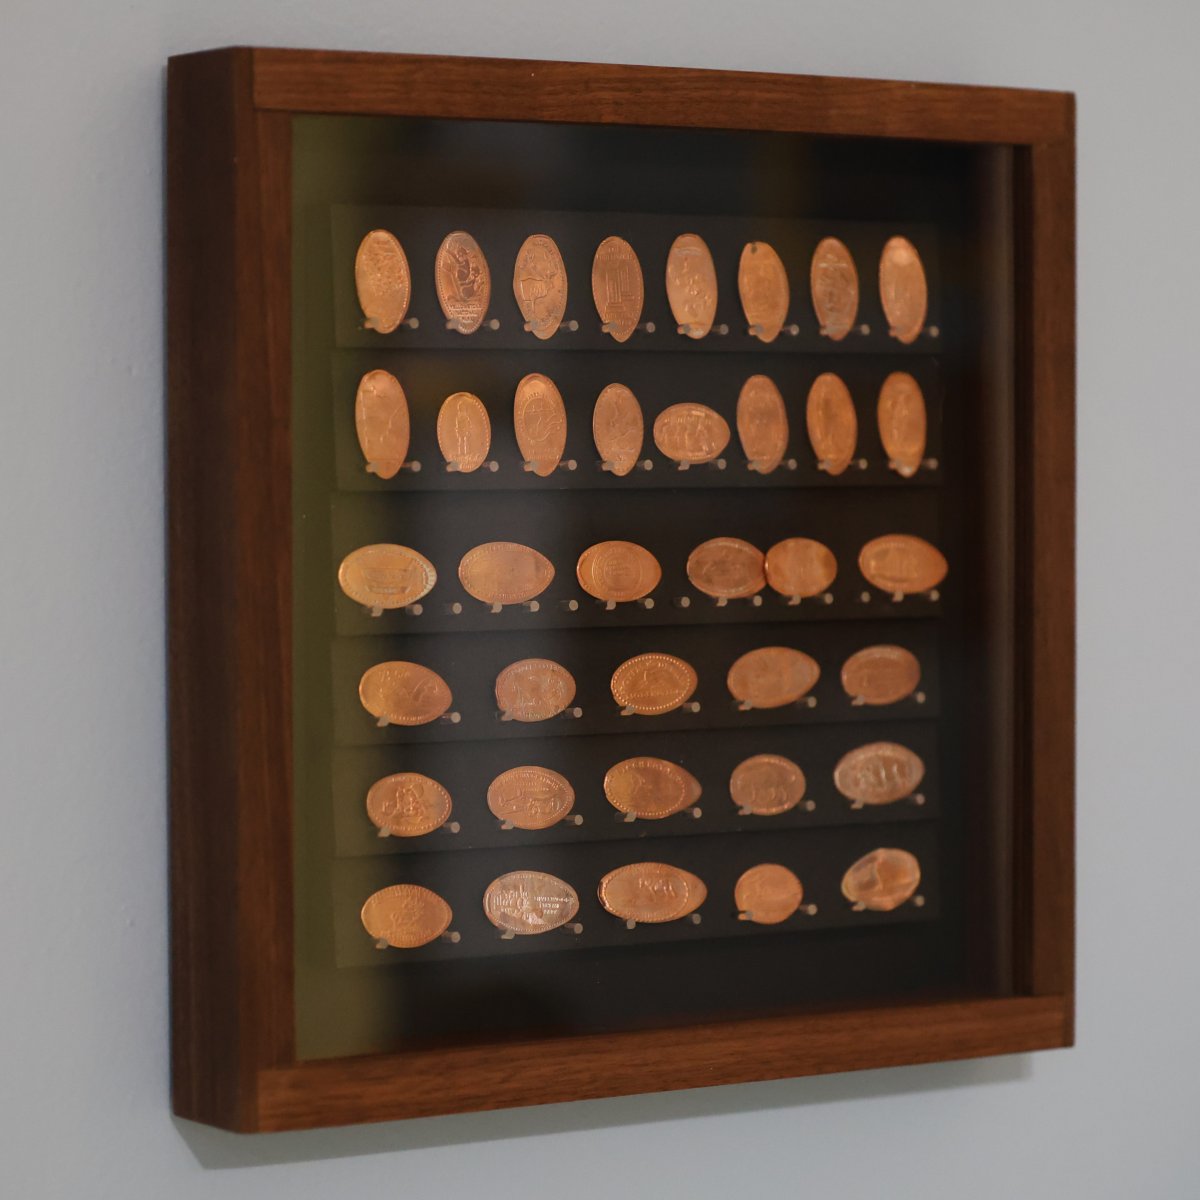
Studio711.com – Ben Martens

Woodworking

Eagle Sign

For my birthday, my parents tried to buy me a kit from CIC Workshop to make an American Flag Eagle sign. The kit was out of stock so that set me on my path of making the American flag in the shape of the United States and then the Martin Luther College sign. As I was ordering a bit more material to make that MLC sign, I realized that the original eagle kit was back in stock so I picked that up.

The kit comes with all of the raw materials cut to size. The HDPE material is pricey so it is helpful to only buy what you need. It also comes with the digital files in a variety of formats and even a legal release allowing you to sell the result.

It was fun to cut it out and assemble it, and since the material is very fast to cut, I was done pretty quickly. Basically when you look at this, each color is its own piece except for the white which is the color underneath the black. Everything fits into its place and is held in with special glue that works with HDPE. I added a keyhole slot in the back so I could hang it on a screw and now it proudly overlooks my workshop.

This exploration into HDPE has been interesting but I’m looking forward to getting back to a more traditional woodworking project. I still have some HDPE material leftover though so this probably won’t be the last project I ever do with it.

Custom MLC Sign

After making the flag shaped like the United States, I wanted to do a couple more projects with that HDPE material. Since I had some red/white/red left over, I bought a sheet of black/white/black and pulled out my vector drawing of the Martin Luther College athletics logo. It was a relatively easy job to set up except that I was trying to maximize my use of a scrap piece, and since the material is so expensive, I didn’t have any extra. Any error would scrap the whole project.

Thankfully it all came out smoothly. Gluing the two pieces together was tricky because almost nothing adheres to this, but I did find an epoxy that works pretty well. It’s not an unbreakable bond, but I think it will be ok for a sign hanging on the wall.

I have one more HDPE project planned, but you’ll have to check back later to see that. You can also follow my woodworking Instagram account @martenswoodworks. Feel free to leave angry comments about how this is not a woodworking project.

Nativity Set

Back in 2022, a teacher at Elijah’s school approached me with a special project opportunity. The old wooden cross on the school property had fallen over. She had saved a chunk of it and wondered if I could make something from it.

The piece she saved was an 8×8 that was maybe 15″ long. I finally landed on the idea of making a nativity set out of it and I based the design on a set that Mom always put up around our house while I was growing up.

I carefully sliced the wood into ~3/4″ pieces. Then I drew the whole thing on the computer first and used the CNC to cut out all the parts. (That turned out to be a good move since I ended up making more of them.) I cut it out of regular pine first to refine the design and then nervously used up the reclaimed wood to make a set. The final step (after endless hand sanding) was applying 5 colors of stain to the various pieces and gluing them together. I made a quick video of the process so the school could use it as marketing for their upcoming fundraiser/auction.

The set made from the school cross sold for over $700 at auction! Since I had another complete set made from regular pine, I finished that one as well and gave it to my parents as a Christmas gift.

Fast forward a couple years and I keep thinking about this project and how it would be nice to have our own set so I pulled out the files and cut another one. Most of the effort is in the hand sanding and the staining. I didn’t sand this one quite as much as the others partly because I’m lazy and partly because I wondered if a slightly more rustic look would look good. I think it came out well and it will be fun to have it up around our house at Christmas.

I might revisit this in the future. I think it would be fun to make a fancier version that uses five different species of wood and no stain. I’m curious if that would look good or if the quality of the wood would detract from the simple design.

HDPE Flag

High-density polyethylene is that super slick plastic that is used to make things like cutting boards, milk jugs, and gas cans. It’s also a very interesting material to use on the CNC because they make it with layers of colors. So for example, you can buy a sheet of red/white/red or blue/white/blue and that’s just what I did. I got the blue in 1/4″ and the red in 1/2″. I also picked up two special bits called O-flute bits which have a single large flute and a special coating to help turn the plastic into chips instead of a big melted mess.

My first project was an attempt at making an United States flag in the shape of the continental US. All CNC projects start with a lot of computer time and to help decrease the effort required, I bought an SVG file of that from Etsy. But as I started working with it, I realized that the flag was not accurate. I use an online calculator when I make flags and I was quickly able to verify so many problems that I ended up redrawing the flag from scratch. I was still able to make use of the US outline but that required work too to decrease the detail enough that it could be cut out cleanly but not so much that it looked like too simple.

I began with the blue/white/blue sheet and nervously cut out the stars. I had looked up some feeds and speeds for cutting this material with my new bits and thankfully it worked well. I used an 1/8″ bit to remove most of the material and a 1/16″ bit to clean up the fine detail. The star below the cutout was my first test and then I left off the two inside the cutout because they wouldn’t be seen in the end anyway.

On the thicker red/white/red sheet, I pocketed out an area for the union to sit into and then also carved off the top red layer on all the white stripes.

Gluing the union onto the base flag was a challenge because nothing sticks to this, but I found some epoxy that worked. Apparently there is also some super glue that you can use if you have the right additional chemical to help it bond to HDPE.

After the epoxy had set, I nervously started the program to cut out the shape of the US.

After that it was just a little cleanup to remove the tabs of material that I left so that the piece wouldn’t fly out when it was cut all the way through.

I love the way it turned out and it’s neat to be done with a project at this point instead of having to apply finish. If I did it again, I think I would smooth out the US outline more and shift the flag image to the left so the ratio of blue to red/white looks a little better.

I’m not really in the business of selling stuff, but this is a fun project that I’d like to do more of. If you want one, let’s chat. The material cost is high, but I think I could make them for about $75 each.

A Coaster Journey

I’ve always been intrigued by wood inlays on the CNC. I’ve tried a few times in the past but I could neve get the precision I needed to make it happen. For Christmas, I received a BitSetter for my CNC which lets me change bits in the middle of the job and zero the height of the new bit to exactly the same as the previous one. When doing inlays, you need to first use a regular bit with a flat end to carve out the big areas and then you use a “v bit” to make the angled sides. If those two bits aren’t zeroed exactly the same, you won’t end up with a precise piece. After that you have to cut the plug to fit into it going through the same bit change process.

I chose to use the Martin Luther College logo since Tyla and I have been doing some much work with them and because it seemed like a good medium-detail goal to shoot for. And I’ve been shooting for that goal for months and months. Granted this is very much a start/stop project as I try to find 30 minutes here and there throughout the week or on the weekend to make progress.

I learned so many things along the way. This post would be absurdly long if I wrote it all out in detail but here is a quick summary of the learnings and improvements I made in the process:

  • Holding the work pieces down is difficult when making coasters. Pretty early on, I made a jig out of MDF that would perfectly hold the coaster but still have finger holes on the outside so I could extract the coaster.
  • The jig worked well but the coasters would spin so then I started cutting my coaster blanks with a little nub that fit into one of the finger holes so that it wouldn’t spin. I could easily cut that off at the end.
  • I messed around with different angles of bits: 60, 30, and 11. The sharpest bit didn’t work because the remaining slivers of wood were too fragile. The 60 degree bit was ok, but ultimately I liked the 30 degree best because it let me cut deeper even in areas of fine detail.
  • To remove any inconsistencies, I would spend time running a program to face each piece before cutting it to make sure it was perfectly level.
  • You have to glue EVERYTHING when you’re putting the plug into the base. I would use a tiny brush to carefully get glue everywhere on both faces but going fast so the glue didn’t start to set up.
  • I thought of various ways to remove the extra part of the plug, but eventually I just put it back on the CNC in my jig and let the CNC cut it off.
  • Glue would inevitably seep into the fibers in the top of the wood so I expanded my cut path just a tiny bit. Since I was make an angled cut, this meant I could remove the top couple hundredths of the coaster to perfectly remove any extra glue marks.

I had about 12 steps to the process of making a single coaster and it took me hours to complete one. And in the end… I could never get it good enough to satisfy me. There were always some little gaps between various parts of the logo. I tried using brown glue to make the gaps less obvious and I tried filling them with superglue and then jamming sawdust into the cracks. The superglue trick got me the closest but it’s still not something I’m proud of. So I did something I rarely do: I gave up on it. For now. Below you can see all of my numerous attempts as well as a solo shot of the closest I could get.

But I didn’t totally give up. I decided to scale back my dreams and instead of inlaying one type of wood into another, I would pour tinted epoxy resin into the logo that I had carved out. Despite being the first time I had ever worked with epoxy, this was almost an instant success! Not only did it look amazing but it also took me only about a third of the time (except for the 24 hours of cure time.)

There were still learnings to go through with the epoxy like dealing with bubbles that come to the surface as it cures, figuring out how the walnut soaks up extra epoxy around the logo pocket, keeping sawdust out as it cures, etc, but those were much simpler and I’m very happy with the result. I was even able to switch the logo and get a decent coaster on my first attempt.

After working on this so long, I’m kind of stuck in this mindset so I think I’m going to make a bigger jig and try to batch some of these out. They will make nice gifts and I’m sure I’ll experiment with other woods and other logos. I’m also interested to try doing a multi color pour. That would involve cutting part of the logo, pouring a color, cutting another part of the logo, pouring another color, etc. It feels a little silly to spend so much of my year on this one project, but I’ll keep going as long as I’m enjoying it.

Walnut Desk Upgrade

When work sent us home in March 2020 but before all the COVID lockdowns were in place, I quickly pulled the trigger on a standing desk purchase that I had been considering for a while. I’m so thankful that I did since they were hard to find for a while and prices went up a lot. I’ve reviewed the functionality of my VertiDesk before, but after 5 years, it’s time to talk about aesthetics.

I initially slapped a 3/4″ piece of pine plywood on top with a little bit of edge banding and some light attempts at cable management. It worked fine but it was never what I wanted and as with most desk areas, the surface got cluttered and the cables procreated. It also doesn’t help that in addition to my desktop with two monitors, I also have a laptop with a docking station connected via KVM, but I also have a second laptop from work that gets used most days too.

When I built the nightstand, I carefully planned out the walnut plywood usage so that I’d have a piece leftover that was just about the desired size of my desk. I added some ~1/4″ strips of walnut as edge banding and used multiple coats of General Finishes Arm-R-Seal Oil Based Topcoat in semi-gloss to make it look real purdy. Then I had to let the whole project sit for about a month. The instructions on the can note that you shouldn’t set anything heavy on the finish until it fully cures in 30 days. I was busy anyway, so I decided to wait the full period.

As I removed everything from my desk, I was surprised to see the giant pile that it produced, but I was finally able to get it cleaned off and then attach the new desk. While I had it upside down, I mounted some power strips and a cable management solution from Flexispot. As I put everything back in place, I paid a lot of attention to what cables needed to run down to the floor and what could stay up on the desk. I even 3D printed a holder for my thunderbolt dock so I could keep it on the bottom of the desk surface.

When I built the desk, I also built a small platform for the center monitor and spent way too long designing custom honeycomb 3D printed risers that no one will ever see. This was the perfect height to hide the mess of cables associated with my KVM switch, SD card reader, etc. Now I just see the front of the switch poking out and I can easily click the button to switch back and forth between my machines.

I’m very happy with the end result. That Flexispot cable management system is a major upgrade. I can easily add more cables in the future and remove ones that are already in place. They hold a massive amount of wiring and even some power bricks as well. There is still a small pile of wires on the ground for the battery backup and network switch that I need to clean up, but this is one of those projects that will always have “one more thing” that I can improve.

Nightstand

Our bedroom furniture is a mishmash of stuff we had before we were married and while it still works fine, there’s not a lot of rhyme or reason to the setup. For example, somehow during those endless nights with Elijah as a baby, we ended up with a foldable TV tray table serving as Tyla’s nightstand. After ~11 years of this, I figured it was time to do something about it.

I landed on a set of plans from Wood Magazine since I find it significantly easier to work off existing plans than to build from scratch. I knew I wanted to build this out of walnut, but my first hurdle was the cost of the materials. The plans called for less than half a sheet of 3/4″ plywood and it needed to be good quality on both sides. A sheet of walnut plywood is not cheap and while I could theoretically buy half a sheet, the markup for having them only sell me a half almost makes it not worth it. I ended up buying a full sheet and made plans for what to do with the leftovers. (Stay tuned… hopefully that next project won’t take 11 years.)

The build itself was straightforward. The plans were ok but they’re very basic. There’s not much joinery. Everything is just a set of panels and pieces that get combined with biscuits. I was ok with the simpler build, but I wasn’t crazy about the biscuits. They’re great and I use them on various projects, but it felt like the glue up would be very complicated since the pieces could still slide laterally. I ended up doing everything with dowels instead and that worked out very well. I was able to dry assemble everything and then the glue-up was straightforward. But before the glue-up, I prefinished everything with General Finishes Arm-R-Seal Oil Based Topcoat in semi-gloss.

In keeping with the nature of the simple design, the drawer just sits in the opening, and it is a bit of a loose fit. It’s fine for a nightstand but that could be an area for improvement if you’re using the same plans.

I dream of replacing all the furniture in our house with stuff I’ve made, but at this rate I think I’d have to outlive Methusaleh.

Silverware Drawer

I don’t remember how long ago it was, but many years back I built a custom silverware organizer to fit inside of our drawer. I did it in solid walnut and box-jointed the edges. It has worked well and it makes me happy every time I grab a utensil.

Fast forward to more recent times and we bought new silverware. We went through a lot of options before finally landing on this set and everything was great about it except that the knives were just a tad bit too long for the organizer.

After just ignoring it for too long, I finally took action. The organizer originally had dadoes to hold all the slots in place but thankfully I hadn’t glued those in place. I took out the dividers, sort of filled in some of the dadoes as best I could, made new dividers that were the right size, and then glued and nailed them into place. It was a bit tricky to align everything without the dadoes and there were some mistakes that make me question how long this will stay together, but so far so good! I just repeated the original finish of rattle can lacquer.

Kids Bakery Sign

I was approached a few weeks back by a girl at church asking if I could make a sign for a kids craft fair/bake sale that she was entering. She quickly drew a picture of the logo she and her friend had designed. I’m frustrated that I can’t find the original drawing, but I took what she had and made a vector version of it on the computer. I actually started with Copilot to generate some similar ideas and then I combined all the ideas in Inkscape.

I ended up making two identical signs using round, pine blanks from Home Depot. I sprayed them with shellac and then covered them with Oramask the girls wanted to paint them after I was done.

The girls did a nice job painting the signs and it sounds like their bake sale was a hit! After learning a bit more, it sounds like lots of market setups have one day a year where the booths are run by kids. If you have a crafty kid, check for options in your area!

This is the third sign I’ve done on these round Home Depot blanks. They are a great size and relatively inexpensive so they’re a good option, but if you have a good source for other 3/4-1″ thick blanks in different shapes, please let me know. It would be fun to give people options of other shapes too.

Coat Rack

We generally use the entry door from the garage but there’s no easy place to hang up coats near that door. After more than 10 years of living in the house, I finally bought a cheap coat rack and screwed it to the wall. It worked but I wanted something a bit nicer.

While the design is almost exactly what you’ll see from many internet shops, the advantage of building it myself is that I can make it fit our space perfectly. For example, when the door opens, it hits the door stop just before it hits the wood. I was also able to put the mounts on the back directly in line with the studs but still have the shelf be centered in the wall.

The project went together very quickly. The white part is poplar with some rattle can white paint and then the top is walnut with David Picciuto’s experimental finish. On the back, I routed an insert for some metal keyhole hangers. The project was quick but it made use of a bunch of previous Christmas and birthday gifts such as dividers, self-centering drill bits, and plug cutters.

We’ve always had a photo hanging on that wall (a sunset from Camp Ticawa) and I can’t decide if it fits with the new coat rack. Perhaps a different frame would look better or maybe I need to move it completely.

I was happy that the rack installed level without any drama. I used a laser to make sure everything was aligned. Now we’ll see how it holds up to a school year full of heavy book bags!