Studio711.com – Ben Martens

Handlebar Mount And Helmet Locks

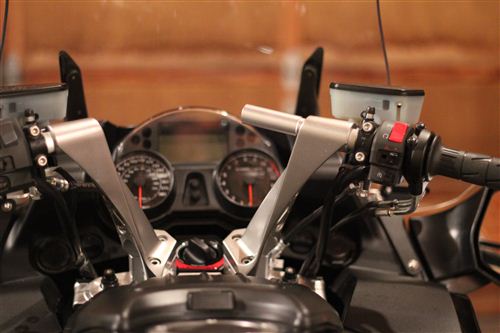
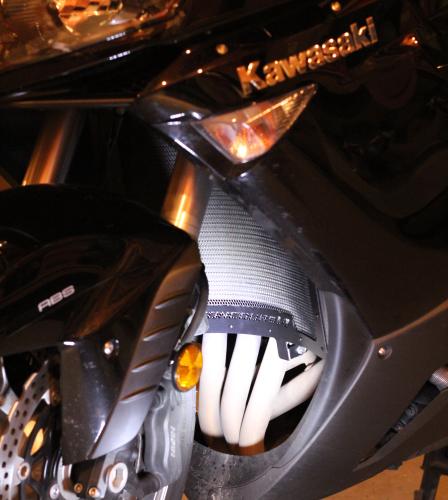
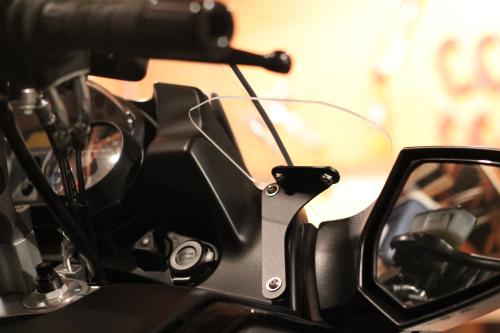
Along with the air deflectors and radiator guard, I picked up a handlebar mount and helmet locks from ProjektD. As with the previous install, these were quick and easy.

The handlebar mount is an extension to the handlebar that gives you a place to mount your GPS, cell phone, camera, etc. You can see it in the picture sticking out towards the center from the right handlebar. The install for this one requires you to remove the bolt holding the right handlebar on and replace it with a longer one. Monkeying with the handlebars always makes me a little nervous, but I used the torque wrench and applied some non-permanent locktite so I should be all set.

The helmet locks easily installed under the luggage rack in the rear. Usually when Tyla and I stop somewhere, her helmet can fit in one of the bags but then I end up carrying my helmet around. This should be much more convenient.

All in all I’m very happy with my ProjektD accessories. It’s nice having things that are made specifically for your bike because the installation instructions can be very specific and everything fits. Now I need to stay off their website for a while or I’ll find more things that I want to order!

Projector Screen

The next step in the home theater project was getting some sort of projector screen in place. I’ve been using a blank wall since we moved in, but this really isn’t a wonderful solution. There are a couple nail holes that screw up the picture, there is texture on the walls, and the paint isn’t pure white.

There are a number of articles online that describe various ways to create you own screen. After doing a lot of research, I decided to opt for a cheap pre-made screen instead. I purchased a 120” Elite Screens Sable Fixed Frame screen. One of the reasons this screen is less than one third of the cost of most screens is that it packs down into a reasonable size box for shipping. That translates to “some assembly required.”

It took me about 1.5 hours to get the screen put together, but I could probably cut that in half now that I know what I’m doing. You basically assemble the frame with a few screws and then methodically stretch the material with clips to provide a smooth flat surface. Tim and Chelsea came over to help mount it on to the wall and it took all four of us to get it on there.

I’m fairly pleased with the end result The black velvet border really sucks up any light from the projector that flows over the edge of the screen. That is important because it allows you to easily fill the whole screen with the picture. The screen does have some imperfections and a noticeable hot spot when the picture is a solid color. I’m playing around with a few ideas to minimize the appearance of the flaws, but for the price, this is still good deal.

Next up: mounting speakers on the wall and running speaker wire inside the walls.

Air Deflector and Radiator Guard

The motorcycle has seen more action now that it means a faster trip to work. I take the interstate a lot and motorcycles get to use the carpool lane. That can shave 10-15 minutes off my 25-30 minute commute. When the temps are down around 40, even a quick blast on the interstate will eat through my winter riding gloves and freeze my fingers.

I finally caved and purchased some air deflectors from ProjektD. They’re a French company that makes aftermarket parts specifically for Concours14 bikes. Just the air deflectors ended up being $45 in international shipping so I decided to pile a few more goodies into the box. There were a few other items but I haven’t installed them yet so I’ll just mention the radiator guard. The front tire can kick up rocks and damage the radiator so this shield take the brunt of the assault. I opted for the black powder coated version with the Concours14 logo cut into the bottom.

Both accessories were quick to install. The radiator guard looks good and the air deflectors function quite well. I was worried that they wouldn’t be tall enough since I have risers installed in my handlebars. The air just skims the top of my gloves. I could attempt to bend the deflector brackets a little or cut a different piece of plexiglass, but I think it will work as is.

Tying Trees

We have a row of arbor vitae trees in the backyard. They provide a nice visual block between us and the neighbors, but during the recent snow storm, they took quite a beating. The tops of the trees were bent down so far that I could hit them with a broom!

Thankfully they rebounded, but I thought I’d take a little action to hopefully help the situation next time. I purchased 100ft of 1 inch tree chainlock. That is now wrapped around all the trunks so that instead of individual trees, I now have one mass of trees that support each other.

While I was up there, I noticed that the previous owner had used some small rope to attempt the same thing on a couple of the trees. While those trees didn’t have quite as much trouble with the snow, the rope was really destroying the bark. In some places the tree had tried to grow around the rope and in others, the rope was rubbing the bark off. This plastic chain should do a better job and keep the trees healthy.

We’ll have to wait until the next snowstorm to see how well it works!

Projector Cables

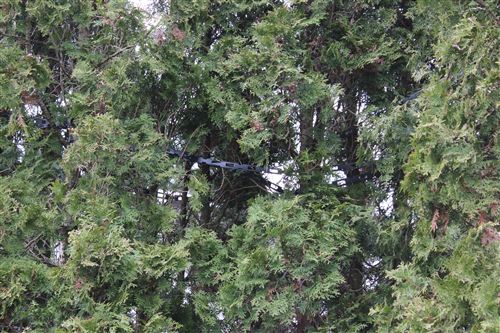
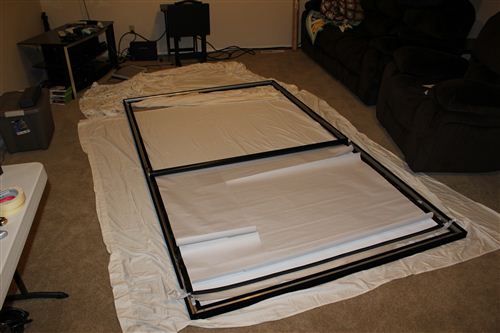
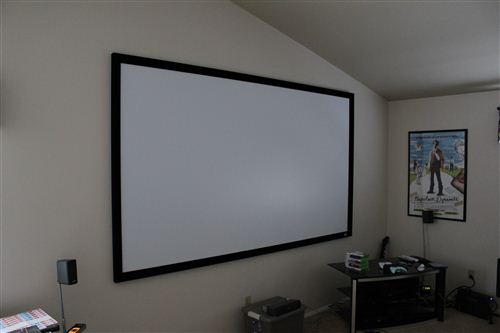
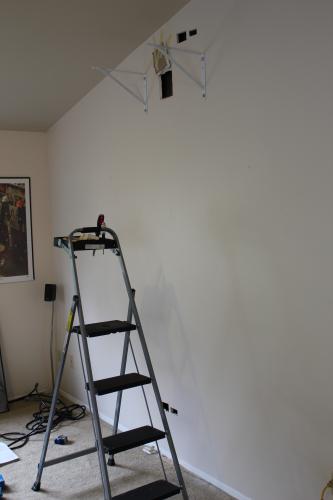
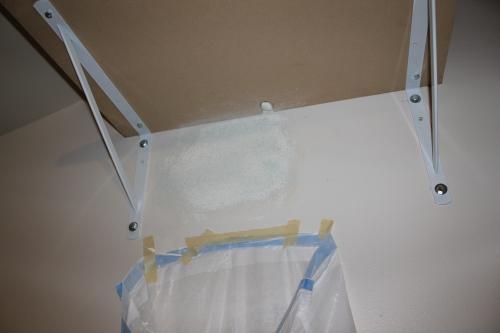
Very shortly after buying the projector, I built a simple shelf mount for it. It was easier and cheaper than hanging it from the ceiling and the Epson 8350 has awesome lens shift so I was still able to get the picture in the right spot. However, the cables were left dangling down the wall. I finally got around to fixing that this past weekend.

The key to the project was finding a good way to get power up to the projector. I didn’t just want to add an outlet up there, because I want the projector to run off the battery backup system in the AV rack. Enter the PowerBridge. It’s effectively two outlets connected by a piece of Romex. The special thing is that one outlet is male and the other is female. That means you can connect your extension cord to the outlet at the bottom and run it to whatever power source you want. There is also an opening for HDMI cables to come out. This is a great way to wall mount your TV without paying for an electrician! The kit had everything I needed except that I needed to buy more Romex because the included 6’ length wouldn’t reach up to the projector.

The other trick to this projector is mounted near the ceiling and this room has vaulted ceilings. That means that there is a ceiling joist between the projector and the floor. I had to cut an extra hole in the drywall just above the hole and drill through to feed the cables down to the floor.

The extra cut is the part that took the longest. I did a pumpkin cut on three sides, folded it back and then made my holes. After running the wires, I folded the drywall back in place and applied spackle and sanded until it matched nicely again. I sprayed on some orange peel wall texture and it’s almost as good as new. Obviously it needs a coat of paint to completely match, but I’ll do that later once the rest of the project is done.

Next up: mounting a projector screen.

In picture #3, the drywall wouldn’t quite stay flush so I applied a little glue and taped it in place until the glue dried. And in picture #4, yes, that’s a trash bag taped to the wall. I had it there to catch most of my sanding dust and any of the spackle that I might drop.

Remodeling

For the last couple years, I’ve been the property guy at church. Normally it’s just small tasks and general upkeep, but late last summer, I started a huge project. The church received a very large anonymous donation designated for remodeling the house that’s on the church property.

In the past, the house has been used as a place for our Pastor’s to live, a place for our teachers to live, and extra space for classes and events. It has been falling in to disrepair and that seems to have accelerated the last couple years since no one was living there.

I gathered a bunch of input from people who had lived there before and other congregation members, got bids from two contractors, and finally signed a contract. There’s way too much to cover here, but this is a small subset of the improvements we made:

  • New trim and doors throughout
  • Interior and exterior paint
  • Complete kitchen remodel and all new appliances (except the fridge)
  • Combine two bedrooms into one master bedroom with walk-in closet and move bathroom entry to be a master bathroom entry
  • Add four windows in various places
  • Remove existing exterior door from kitchen and replace with sliding glass door
  • Refinish hardwood floors and add new carpet in master bedroom
  • Reconfigured guest bathroom and added a full bathtub and shower.
  • Added a paved driveway

I was responsible for drawing up the basic plans and work item list, but from that point I handed over the reigns. Our general contractor was Jim Lawrence of Lawrence Construction Company and I highly recommend him. We’ll hopefully be giving him a call in the future for some work on our house. He finished the project quickly and did a lot of the interior design himself which removed a lot of decisions from my plate.

It would be much better if we had more “before” pictures, but here’s comparison of the old kitchen and the old kitchen to give you a little taste of the scope of this project.

Big Garage

One of my favorite rooms in this house is the garage. Coming from the extremely tiny garage in the condo, this one feels like a monstrous cavern. I’ve spent a lot of time wondering if I could drive in one bay and drive out another. Or could I do laps with my motorcycle? Watch the video below and find out! I did a lot of laps with the motorcycle but I was trying to make a full loop without putting my foot down. I finally did it in the last shot you see here in the video. I wonder what my neighbors thought?

Snowmaghetti

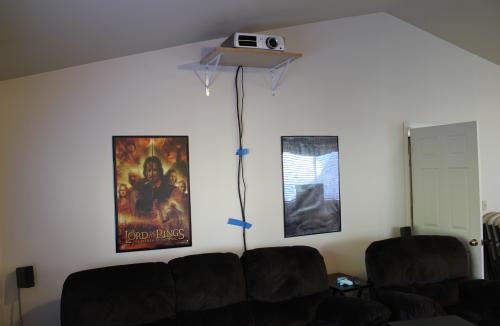
As our snowstorm dragged on last week, the pantry started getting thin. Thankfully we’re only a half mile walk from the grocery store, but what fun is that? I decided to invent some dinner. Since they were calling the storm “snowmaggedon”, I decided to call this “snowmaghetti.” The picture is atrocious, but that’s kind of the point. It doesn’t matter what it looks like as long as it tastes good and you can use what you already have in the pantry. So here’s how I made it, but when you make this, you’re required to experiment!

Ingredients

  • 1lb of ground beef
  • 1lb of chicken
  • 1 bag of frozen broccoli
  • 1 can of corn
  • 1 can of mushrooms
  • 1 can of cream of celery soup
  • 1 can of cream of mushroom soup
  • Cheddar cheese
  • 1 box of whole wheat elbow macaroni

Directions

  • Cook the meat until it’s done.
  • Coat 9×13 baking dish with nonstick spray and then put in the meat, veggies, and soup. Top with cheddar cheese.
  • Bake at 375 for about 20 minutes
  • Meanwhile, cook the macaroni according to the directions on the box
  • Let the dish cool for a few minutes after removing it from the oven so it’s not quite so soupy.
  • Serve the mixture on top of the macaroni.

It was surprisingly delicious! The one thing I’ll probably change next time is only using one kind of meat. I wanted to go straight chicken, but we only had one chicken breast in the house.

If you attempt something like this, let me know what you did to improve it. If you feel like Jake and Eddie from Earnest Goes to Camp then you’re doing it right!

Cistern at Gates Foundation

I’ve been pestering TimS with a lot of questions now that I actually have a yard. His landscaping expertise has already come in very handy. We were discussing various ways to improve water runoff from my roof. It tends to drain back down into the crawlspace making extra work for the sump pump and the previous owners already had a little bit of an issue down there. I think I’ll probably end up installing one of these dry wells, but we started talking about cisterns. He mentioned that The Bill and Melinda Gates Foundation headquarters here in Seattle has a 1 million gallon cistern that is used for flushing toilets and irrigation! The runoff from the paved areas and the roof of the building is collected there and reused.

I know it’s completely impractical for a lot as small as mine, but I can’t stop thinking about it. Sure I’d have to dig up most of my yard to fit a decent sized cistern in it. Sure I’d have to do a lot of work to get all of my downspouts to funnel into it. Sure it would cost orders of magnitude more money than I would save. But none of that means I don’t dream about it!

Baked Mac and Cheese

I tried making baked mac and cheese a few weeks ago and it turned out gross. I found a new recipe that was supposed to be healthier. We changed it a bit by using broccoli and tomatoes instead of spinach and it was fantastic! I’ve included that change in the recipe. You’re supposed to do a bread crumb topping, but I read that can get mushy if you refrigerate leftovers so I topped with some extra cheese instead.

Ingredients

  • 6 tablespoons plain dry breadcrumbs, (see Tip)
  • 2 teaspoon extra-virgin olive oil
  • 1/2 teaspoon paprika
  • 1 package of frozen broccoli thawed
  • 1 can of fire roasted diced tomatoes
  • 3 1/2 cups low-fat milk, divided
  • 6 tablespoons all-purpose flour
  • 4 cups shredded extra-sharp Cheddar cheese
  • 2 cup low-fat cottage cheese
  • 1/4 teaspoon ground nutmeg
  • 1/2 teaspoon salt
  • Freshly ground pepper, to taste
  • 16 ounces (4 cups) whole-wheat elbow macaroni, or penne

Directions

  • Put a large pot of water on to boil. Preheat oven to 450°F. Coat a 9×13-inch baking dish with cooking spray.
  • Mix breadcrumbs, oil and paprika in a small bowl.
  • Heat 3 cups milk in a large heavy saucepan over medium-high heat until steaming. Whisk remaining 1/2 cup milk and flour in a small bowl until smooth; add to the hot milk and cook, whisking constantly, until the sauce simmers and thickens, 2 to 3 minutes. Remove from heat and stir in Cheddar until melted. Stir in cottage cheese, nutmeg, salt and pepper.
  • Cook pasta for 4 minutes, or until not quite tender. (It will continue to cook during baking.) Drain and add to the cheese sauce; mix well. Spread half the pasta mixture in the prepared baking dish. Spoon the broccoli and tomatoes on top. Top with the remaining pasta; sprinkle with the breadcrumb mixture.
  • Bake the casserole until bubbly and golden, 25 to 30 minutes.