 It’s so nice to have contractors that you can trust. For any heating question, I call up Chelsea’s Dad who owns PMG Mechanical (206) 624-5040. When we bought the house, I asked him to come over and inspect our equipment. He recommended replacing the water heater immediately and said the furnace would last us through the winter but not much more. These recommendations lined up directly with what we heard from our inspector.
We already added a new tankless water heater and this summer it was time to replace the furnace. Beyond the question of what kind of furnace we should install, we also wrestled with the question of whether or not we should add air conditioning to the house. That might sound crazy to friends and family east of here, but very few homes around here have AC. it’s a luxury because you really only need it maybe a week out of the year. Temps rarely get above 85 degrees so fans and open windows are almost always enough. But on the flip side, we’re hoping to be in this house for a long time, so if we’re going to do AC, now is the time when we can get maximum enjoyment out if it.
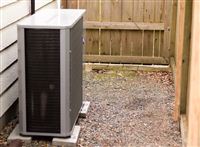
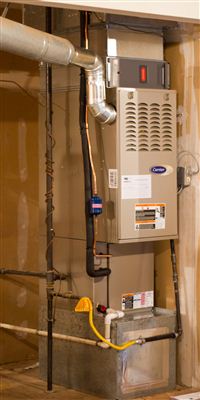 We ended up with a Carrier Infinity 80% efficient two stage furnace and a Carrier Infinity suitecase air conditioner. Brent recommended that we go with the 80% furnace over one of the high efficiency models because they just haven’t nailed the reliability of those models yet. The two stage furnace will give us a big boost because it only runs at partial power most of the time, but for the rare occasion when it gets really cold, the furnace kicks in full power. The fan is also incredibly efficient and costs almost nothing to run. The air conditioner is an extra small and quiet model that is normally installed in commercial locations where size and noise are a factor. In our case, it we only had about 5 feet to our property line and I wanted to still get yard waste bins and the lawn mower through. After it was installed, we still have 3 feet of clearance to the fence. It’s definitely a splurge but I’m betting we’ll think it was worth it as time goes on. Plus, we’ll be the party house when it’s hot outside! The final bit that we added to the bill was an electronic air cleaner. It increases air flow through the system, creates an allergy free environment, and is very easy to clean.
Thanks to Brent for getting this all installed for us! Normally when I do a job I call around to a bunch of different places and haggle for the best deal. It’s such a blessing to make one call and have it done!

 They say when you buy a house, the three most important things are location, location and location. I have about a five minute drive to Home Depot so I’d say our location is pretty great! The people there are starting to recognize me, and well they should. Here’s a breakdown of my transactions at Home Depot since we moved got the house at the beginning of October.
 We gave nephew David a kid sized Camelbak for his 6th birthday, and it reminded me of a post I’ve been meaning to do for a while on how to properly clean a hydration pack. Before I met Tyla, I don’t know if I cleaned mine more than once or twice. Turns out she doesn’t like drinking moldy water. Who knew? We now have quite a few of these bladders and I’ve gotten a lot better at keeping them sanitary.
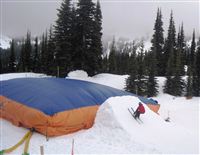 Crystal Mountain recently installed a giant air bag. They put it underneath a jump so that people much younger than me can practice their jumps without much fear of injury. I just had to know what it felt like so last weekend Tyla and I went down to Crystal along with a couple friends from work, Andy and Aim.

 For the first time in my life, I own dirt! Yard care is a chore for some people, but after years of living in apartments and the condo, I’m excited to have a chance at taking care of a yard. We’ll see long long that feeling lasts!


 I’ve gotten a few questions about my theater room and how much it costs to put something like this together. I know it’s impolite to talk about stuff like this in public, but on the flip side, I also want to point out that this might not be nearly as expensive as you think. Plus when I was putting this together, it was very helpful to read through other people’s build list. So I’ll just list out all the gear that I used and you can click the links if you want to look into buying it for yourself. I did this almost as cheaply as I could except that I splurged and spent a couple hundred extra to get a slightly better projector that had a lot of lens shift. That makes it a lot easier to mount it wherever is convenient and adjust the lens to hit the screen. And I suppose you could save some more money if you go for a 720p projector instead of 1080p, but if you can afford it at all, go for 1080p. At this size of a screen, you’ll notice the difference.
Kirkland 5k
Tyla’s company operates a booth every year at the Kirkland 5k and they encourage their employees to run. This year Tyla, Chelsea, Nancy and Megan all ran. Tim and I watched from the side of the road and snapped some photos.