
 When we bought our house, the master bathroom had carpeting and no door. Odd, yes. There is a separate toilet room at the end of the bathroom and that part did have a door, but it’s still a bit weird to have someone watch you in the shower.
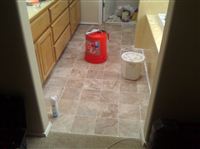
When we got our new carpet, I had them skip this room because we weren’t fans of carpet near the showers and tubs. Last weekend, I finally got around to installing a vinyl floor so we can use the bathroom.
One of my top priorities was going cheap on this project. We’re planning to gut the bathroom in a year or two and get rid of the ugly stuff in there now. I didn’t want to spend a lot of money on a floor that I knew would be going away, and I didn’t want to put anything fancy in because it probably would need to be modified. I had originally intended to find a remnant, but by ordering a new piece we got exactly what we wanted for a design and I was also able to get it in the newer “floating vinyl” style.
This floating vinyl has a pad on the back of it which keeps it from warping at the edges. It also provides a bit of a cushion as you walk on it. The big benefit is that you don’t have to cover your floor with adhesive which is hard to take up later. Instead, you cut the vinyl to fit and then place a few strips of double sided tape down to hold it in place. It’s meant to float around a bit as the floor expands and contracts.
This is the first time I can remember installing vinyl so I’m sure I made a lot of mistakes, but I’m happy to report that it’s at least functional. I’m not happy with the line along the tub and the shower. I had to fill that with caulk to keep water from getting underneath, but it’s a pretty thick line of white against the brown vinyl and yellow tub. Bleh. It remains to be seen whether I will live with that until we tear it out, or if I’ll try to come up with something better.
Next up: adding a door.
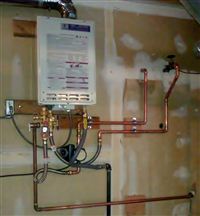 Our house came with a long list of appliances that needed to be replaced. Chelsea’s Dad, Brent, has a heating and cooling company (PMG Mechanical 206-624-5040) so I called him out to take a look at our water heater and furnace. His opinion about the water heater lined up with our inspector and a plumber that had been at the house: replace it soon. The furnace? That’s next year. Yeehaw.
 Back in 2007 I wrote about the
  Every night since moving in, I have been doing battle with the external light timer. The previous owner left instructions, and I found the manual online, but no matter what I did, I couldn’t get them to work correctly. Even when I set the program, the timer drifted and would be wrong by the next day.
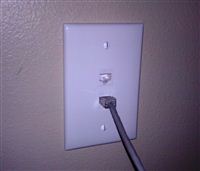 While I would love to have network cable installed in the entire house and run to a nice patch panel, realistically that’s either going to take me forever or cost a lot of money. So for now I’ve settled with running a couple wires from the family room to the theater room. The rooms sit on top of each other and share a wall in the garage, so it was a pretty simple job. I ran the cable out through the wall in the family room to the garage, up the other side of the wall, and then punched through into the theater room. It ended up looking really nice because all of the networking gear can stay upstairs in that room and the family room just gets the TV and a PC to drive it.
 Tyla thinks we bought this house so that we’d have more room, own some dirt, etc etc etc. Wrong. We bought this house so that I could have a projector again. Those of you who have been reading for a while may remember that back in Jersey, we had a little
 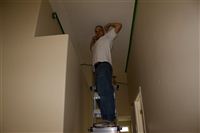 Last weekend we spent a lot more time at the house getting it prepped. We owe another huge thanks to Don, Nancy, Logan, Megan, Andy and Stephanie for coming over. We’ve gotten so much more done than I thought would ever be possible! The projects for this weekend were painting a weird bar in the master bedroom white, painting the hallway (vaulted ceilings), and cleaning out the pantry and painting it. We were home before dinner on both days which is a testament to how much help we had. The house is really looking great!
 We spent a lot of time painting this weekend, and before we got started, I knew I was going to need some ladders. I figured I would need a step ladder and an extension ladder, but being the geek I am, I found one ladder that does both. It’s available from a lot of places, but one of the cheapest is
 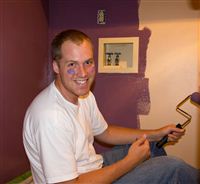 After a long and crazy journey, we finally closed on the house on Friday! We were very thankful to finally have the keys in hand and be the proud owners of a house that exceeded our dreams.