I’m finishing up the editing for blog volumes 2008 and 2009. The technical process is pretty quick because I have a tool that does the following:
Connect to the database behind the blog.
Pull down each post and figure out which categories it belongs to.
Append the post to an HTML file.
Load the single HTML file for the whole year into Word.
Apply a custom style to do 90% of the formatting.
Do a similar process for the moblog pictures and Twitter posts.
From there, it’s a lot of manual steps:
Convert all the pictures to grayscale (done with a macro I wrote)
Make sure pictures are the right size. Sometimes this means making the page-wide images just a bit smaller to fit more than one on a page.
All hyperlinks get a footnote on the page listing out the URL, but sometimes I’ll print the full URL as the text for the hyperlink in the post. I go through and manually remove the footnotes in those situations.
Check page breaks and reformat where possible to give a better layout.
Spelling and grammar check.
I debated for quite a while about the spelling and grammar check. This isn’t meant to be a literary work but rather a view of my life as I saw it at that time, and if I wrote with errors, shouldn’t I include them? I decided to fix everything except the Twitter updates. I hate seeing all those mistakes and seeing them in print is even worse. It’s amazing how many errors you guys let slide without making fun of me. Thank you.
Most of the time, the errors are just typos, but I do make on grammatical error fairly often: “more ____” vs adding “-er.” For example, which is correct: “riskier” or “more risky”? There are many pages on the web to cover this topic, but I have yet to find a quick answer. Maybe there isn’t one. Or maybe you teachers can help me out. For now, I take solace in the fact that many mistakes I thought I was making turn out to be correct after all.
I’m still very happy with lulu.com for publishing. 2008 is going to be about 700 pages long and it will cost me less than $30 to get a hardcover printed copy of it. I find that amazing!
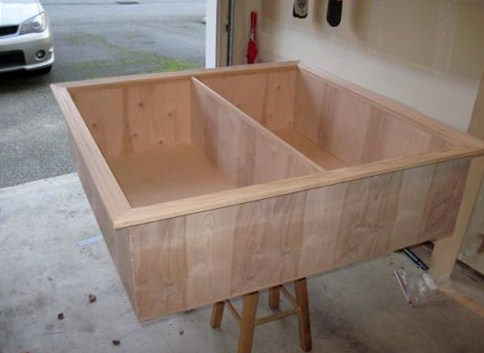
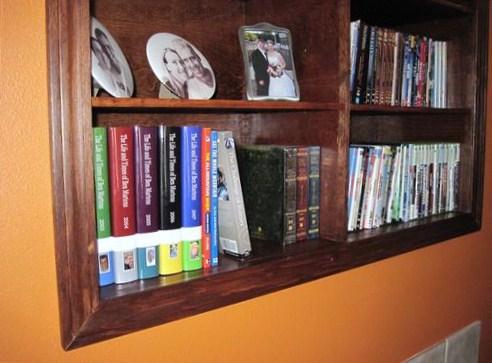
I’ve had the last 1.5 weeks off from work, and other than a three day trip for Christmas, I spent most of it at home. My project over the break was some new shelves to go above the fireplace. I was no longer happy with the look of the old ones, and with Tyla living here starting in April, I wanted something more versatile.
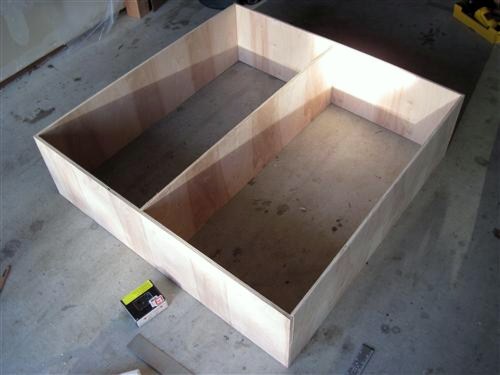
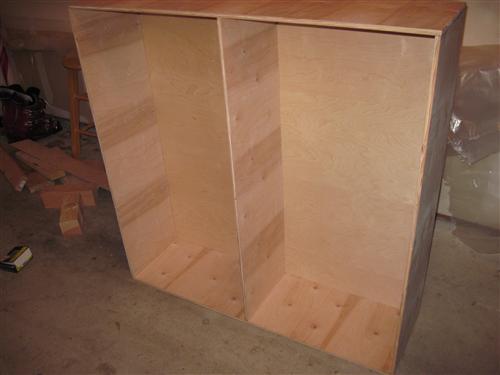
The project, of course, required about four trips to Home Depot, but all in all, I’m pretty happy with how it turned out. It’s a basic box design with a divider down the middle. The shelves are held up with adjustable pegs and there is molding around the edge of the box to make it look like the shelves are really built in. The end result looks nice, but when I look at it, I see a bunch of mistakes. I debated whether or not I should share them with you, but why not? By this point you know I have nothing to hide. Plus, it’s a good reminder for the next time I do a similar project.
I used plywood and then faced it with solid wood trim. I faced everything on the front side of the shelves, even the edges that are covered up with the molding. That last part turned out to be a mistake. I thought it would be simpler, but putting molding on top of the facing on top of the plywood wasn’t the best choice.
Trying to make a picture frame effect out of molding is TOUGH.
I forgot to glue some of the pieces. They are only held in with nails.
I used 1/2” plywood. Putting 1.5” finishing nails into plywood that thin was difficult for me. Too many times the end of the nail would pop out the side of the plywood. I know that’s a lack of skill on my part, but maybe I can use it as an excuse to buy a compressor and nail gun.
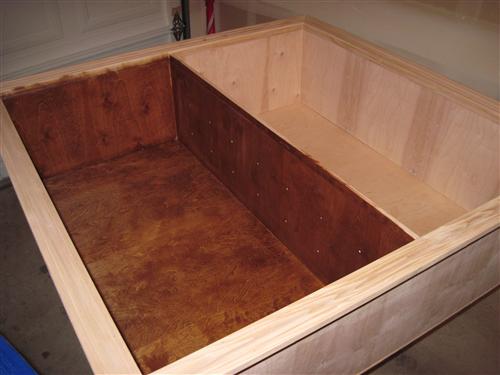
If I was doing it again, I wouldn’t put the divider down the middle. It meant twice as many peg holes and there are one or two holes that are off by a fraction of an inch. The end result is that the shelves on each side of the divider don’t always line up perfectly.
For some reason, the polyurethane on the back wall of the shelves never dried completely. It’s still a tiny bit tacky as I write this. I only put one coat on because I was afraid if I sanded the rest, I’d get dust drying into the back wall.
I missed some spots of glue when I was wiping it off. When you stain, those areas don’t take the stain as well and it really shows up.
I could probably continue, but you get the idea. As I sit across the room looking at the shelves, I really can’t see any of these problems so I’m still happy that I built them. I look forward to doing more projects like this and shortening my list of mistakes.
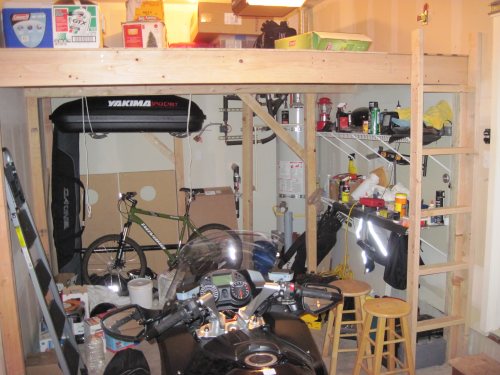
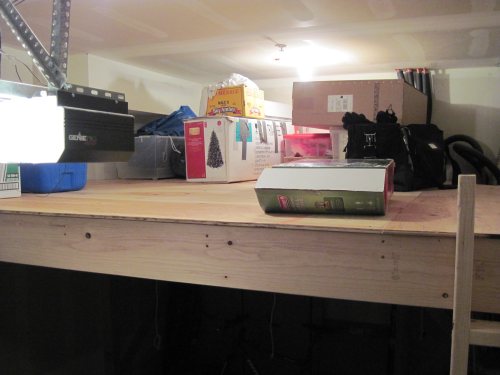
Ever since I did the first set of garage shelves, I’ve wanted to extend them. Tim came over and we were able to do just that.
We tripled the previous surface area and even added a ladder to make it a bit easier to get up there. The end result is enormous, but it really provides a lot of storage area for my little condo. I had a couple neighbors jealously look on and ask if I’d come do the same in their garage.
Thanks for the help Tim! I’d probably still be making trips to Home Depot for replacement pieces of wood if you weren’t there to help.
It’s a bit difficult to photograph the shelves, but this should give you an idea. There is about 90 square feet of space on top. I had to put a lot of stuff on the floor while I was building the new shelves and I clearly have cleanup work remaining.
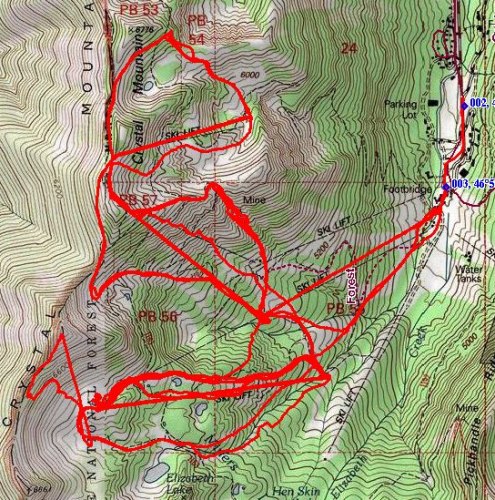
Somehow, every activity I participate in is turned into a geek project. Skiing is no different. This season, I have been carrying around the Garmin GPS that I purchased earlier in the year. It keeps a signal inside my coat and dutifully tracks my position every few seconds.
I can load this into my National Geographic topographical map program and get an interesting view, but I wanted more. I want to know my top speed, how much time I spent in the lift lines, how fast the lift was moving, which lifts I rode the most, etc.
To that end, I’ve started writing a program to analyze the GPS data. The raw statistics are fairly simple and I was able to get a display churned out pretty quickly. Lately I’ve been stuck on trying to automatically figure out when I was on a lift. On the surface, it seems easy: you’re on a lift when you’re going up. That’s not always true. Runs have rises in them and lifts have dips in them. So then I tried to say that any time I’m heading in the same direction for X miles and Y vertical feet then I’m on a lift. Even that has problems. What happens when you get off a lift and keep skiing straight down the backside of the hill? What happens when you get a couple errant GPS points that aren’t in line with the lift? There is enough drift in the data to make it very complicated. If I can’t get the automatic solution figure out, I’m going to have the user tell me where the lifts are the first time and then I’ll save that data. I want to move on to getting either a 2D or 3D map working next. After that I’ll work out a good way to display all the statistics about the day and each individual run.
If you’re interested in seeing the code and/or helping out, it’s all available on codeplex.
The picture below shows the track from my last ski day at Crystal Mt in the National Geographic software. My software will end up looking something like this but with more data and information on the screen.
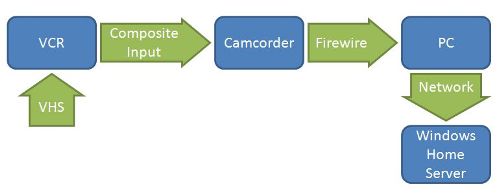
We never had a camcorder when I was growing up, but we have a couple dozen VHS tapes in my parents’ basement from various childhood events. I’ve always worried about losing those memories since VHS isn’t a very stable format. I was personally responsible for taping over at least a couple of them in the past.
The last time I was home, we sorted through them all and decided which ones we wanted to save. Mom shipped them out to me and I started the process of transferring them to the computer. As with my photo scanning project, I’d recommend that you pay someone to do this rather than doing it yourself, but if you only have a few to do, this isn’t a bad solution.
Here is the basic workflow:
Break the write tabs on the VHS tape to make sure I don’t screw it up. Insert it into the VCR.
The video out on the VCR was connected to the inputs on my camcorder. The camcorder was then connected to the PC via Firewire. The camcorder is just digitizing the signal for me. A capture card could have done the same job if I had one.
On the PC, I ran Windows Media Encoder. I pressed record on the PC and then play on the VCR.
Once the tape was finished, I’d stop recording on the PC. This left me with a fairly large WMV file.
Don’t stop there! The files aren’t much safer now than when they were on VHS tapes. To protect them, I copied them onto my Windows Home Server where a combination of software RAID and offsite backup will guard them.
My original plan was to make a big montage of the best moments from all the tapes, but it has been over a month and I haven’t even started that yet. There are some hilarious moments from my childhood, and one of these days I’ll get around to editing them all together.
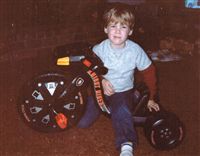
I finally finished up a project that has been on my mind for years. I scanned in most of the photo prints that I have collected in my life. Here are a few things I realized through the project:
Keeping photos in print form is extremely unreliable. Any number of things could damage the pictures. Now they are safe in digital form and stored on multiple hard drives.
I skipped a lot of photos of animals and places. The photos that I really considered valuable were of people.
I’ll never recommend this project to anyone. There are many companies on the internet that will scan in bulk qualities of photos for pennies per pictures. Pay for the highest resolution possible. You don’t want to do this twice.
Digital cameras have completely changed our lives. Looking through all these pictures brought back floods of memories about how careful I used to be with each picture. I ended up with a higher percentage of quality pictures, but I missed a LOT of moments.
All in all, I scanned in over 600 pictures. It’s done! I will still keep the shoeboxes with pictures, but now I’m not so nervous about them being damaged. Someday I’ll probably toss them.
Some of you have been hearing about this project for almost a year. For a long time, I’ve wanted to build my own arcade machine. Only this arcade machine is a little different than the one you’ll find at your local bowling alley. This one will play over 2000 different arcade games and Nintendo games!
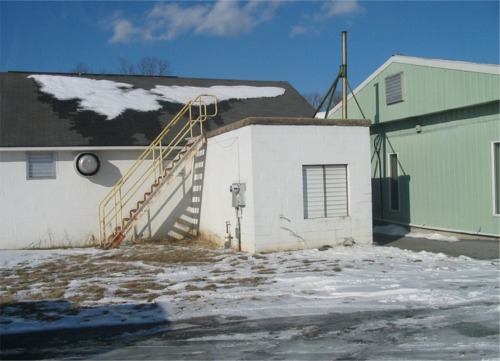
January 23, 2004 Swarna and I took a road trip out to Rheems, PA (about 100 miles away) to pick up an arcade cabinet from Discount Blowouts (www.discountblowouts.com). I found them on EBay and found out that they had a couple old cabinets they would sell me for pretty cheap. I rented a minivan and we were off. The journey was quite an adventure. We headed deep into farm country and finally found the buildings in the middle of a farm down a dirt road. Unfortunately I didn’t get any pictures of the inside of the buildings, but here are a few of the outside and the surrounding area:
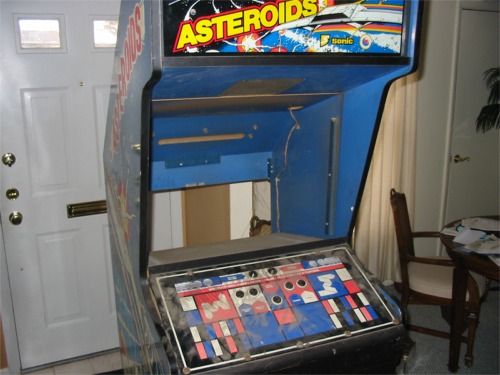
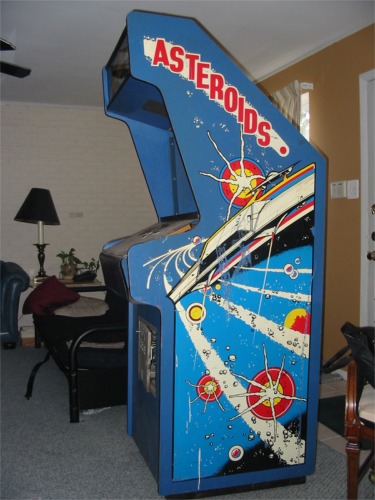
January 24, 2004 This morning, Tyler and I dragged the arcade machine into the house. You want old school? How’s this for old school… Asteroids! It doesn’t get much better than that!
I spent the rest of the day cleaning 24 years of dirt off the machine. I also went to Home Depot and picked up a new fluorescent light to put behind the marquee.
January 26, 2004 Tonight I mounted the power strip inside the coin door. Now I can just open the coin door, reach inside, flip the switch, and everything turns on. Right now “everything” is the marquee light, but eventually that switch will trigger the whole system. In other news, the I-PAC keyboard emulator shipped from England today.
January 27, 2004 There’s not much I can do until my two packages arrive. One is the keyboard encoder from England. That made it to NYC today so maybe I’ll get it tomorrow or Thursday. I was concerned about the joysticks and buttons I ordered from Happ Controls because I never received an order confirmation. But thanks to their website (big ups to retailers that allow you to check the status of recent orders), I found that my package had been shipped and got the tracking number. It’s currently in Addison, IL. UPS predicts a Friday delivery for that one. This means that I might be able to start hooking stuff up this weekend!
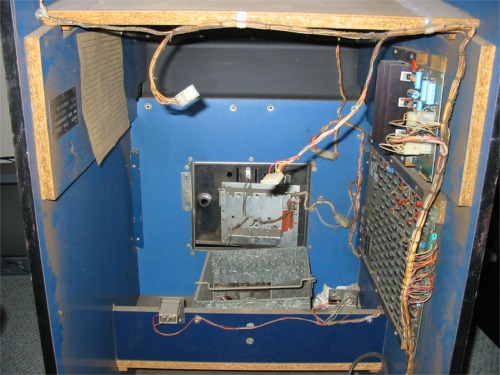
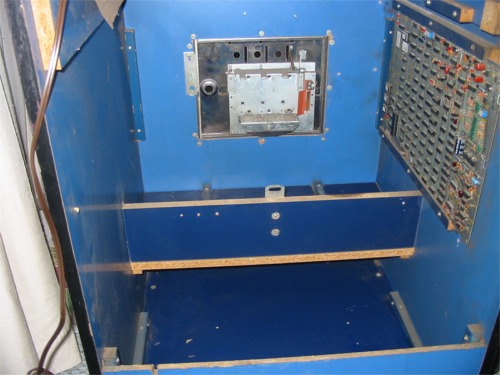
January 30, 2004 After two trips to Home Depot (and one to Top Dog), I ended up getting a lot done on the arcade machine. The buttons, joysticks, and keyboard encoder all got delivered. As you can see from the pictures, I did a lot of cleaning on the inside. I left one of the big circuit boards up on the side wall just for looks. While I was cleaning it out, I found a counter that read over 39,000. I’m hoping to find some way to hook it up to the start button. I also mounted a power strip just inside the coin door for easy access to the switch.
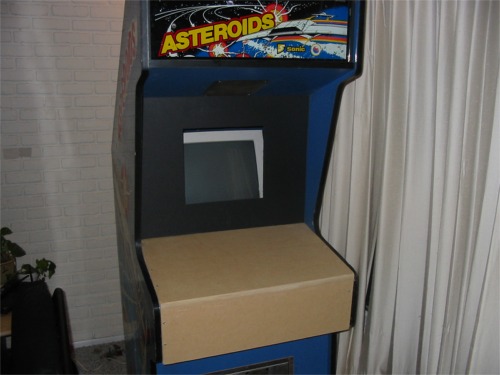
February 01, 2004 The project has hit a snag. I was hoping to drill new holes in the metal control surface for the new buttons and joysticks. Unfortunately, I can’t get through that metal with any of the tools I have. So I’m moving to plan B. I’m going to make the control surface out of MDF. I’ll paint it black and it should look almost as good. It would have been nice to have the more retro look of the original control surface, but at least this will work and look good.
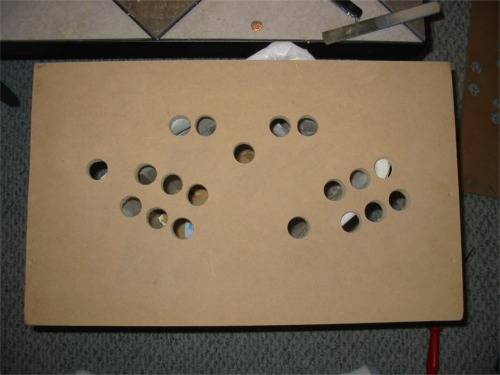
February 03, 2004 After finishing my homework (like a good boy), I did a little more on the arcade machine. I cut and sanded the MDF to fit into the area for the controls. I got the screws in and countersunk them so they are flush. Hopefully tomorrow I can get the holes drilled and get the first layer of paint on it.
February 04, 2004 I got the new control surface drilled with the holes for the buttons and joysticks. I also got the first coat of paint on. Tomorrow I’ll decide if I’m going to put another coat on or start putting on the polyurethane. It’s hard to wait for all this stuff to dry when I know I could be done with a couple hours of wiring! I was thinking that the house was going to smell really bad in the morning since I had the drying paint in the dining room, but Tyler’s dad (on the phone) suggested that we put it in the bathroom and leave the fan on. Hopefully that will help out a little.
February 05, 2004 Not much going on tonight. I just put another layer of black paint on. I was debating whether or not it needed it, but now I’m glad I did it. It looks much better. Tomorrow I’ll start the polyurethane.
February 06, 2004 I put on two coats of polyurethane on today and it looked fairly nice. After plans for the evening got cancelled, I decided to spend the night soldering. Seemed like a logical alternative to me. I started by putting all the buttons and joysticks on as well as the I-Pac keyboard encoder.
After that it was time to solder. One lead from each microswitch goes to the corresponding hole on the I-Pac. It really doesn’t matter where you put the wires on the I-Pac because it is reprogrammable, but if you follow the default markings it will work on MAME without reprogramming it. I used CAT5 network cable for the wires and it ended up being pretty slick. I used the leftover sheathing to clean up some of the cable mess and the color coding made it a little easier to keep the wires straight. The last step was running two common ground wires through all the microswitches. For that, I stripped long pieces of wire and then used CAT5 sheathing to keep it from shorting on other switches. (See Dad? I was paying attention after all. Ha ha) Here are is a shot of me in action and of the board all wired up.
Finally it was time for some testing to make sure it was all wired correctly. I’m not sure what Cory is testing. Below that, Tyler is pressing the buttons as they show up in notepad on the laptop.
Finally it was time to plug it all in and play some games!
It works great! I have some finishing touches to perform such as installing the 80 watt subwoofer and probably reprogramming some keys to make it a little easier to navigate windows. (You can also just pull the keyboard and mouse out through the coin door.) One other thing that is a little annoying is that the left joystick records a right movement very easily. I took it all apart and I know why it’s doing that, but I’m not sure how best to fix it yet. Eventually I’ll probably try to throw a larger monitor in as well. But for now, it works! It’s done! After a year of talk, I finally came through. The only thing left that I need are people to come over and play it. So what are you waiting for? Stop by and check it out!
I've finally finished the book project. All in all, I'd say it took about 40 hours to get these six books edited and published. These new books are pretty substantial and have 450-600 pages each.
If you're ever looking to publish any type of book, I have nothing but the highest praise for lulu.com. I don't know how they can provide a service like this for such a low price. These six books cost just under $150 and when you think about how difficult one-off custom printing like this is, that seems like a steal. The whole website and process of creating the books was smooth and ridiculously simple.
Hopefully they stick around for a while so that I can continue to publish books for the coming years.
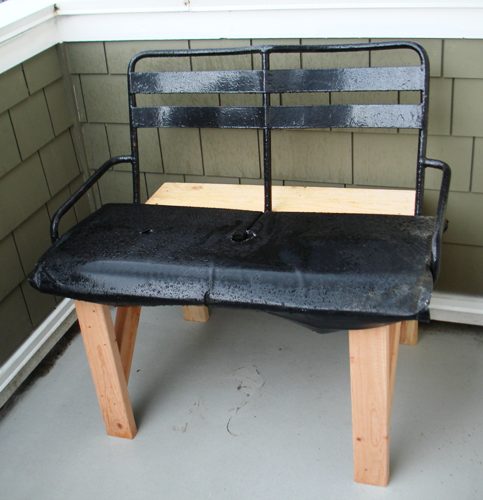
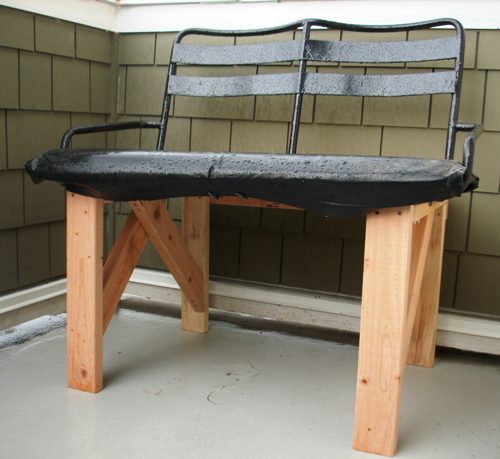
I headed to Home Depot this afternoon to pick up some wood to build a base for the lift chair. The project went relatively smoothly, and while it's not the prettiest bench in the world, it has a lot of meaning and I love it. The extra depth in the back is due to the balance of the chair. It is naturally weighted to be back heavy so it tilts back while hanging on the lift. This extra depth in my bench keeps it from flipping over. And thanks to a suggestion from Tim, the plywood on that extra depth makes a great place to set your beer. The bench is now sitting out on my deck and will be a nice place to sit while I'm cooking on the grill.
The vertical bar is stored safely in the back of my garage and will be reunited with the chair once I have a place to hang it.

 I’m finishing up the editing for blog volumes 2008 and 2009. The technical process is pretty quick because I have a tool that does the following:
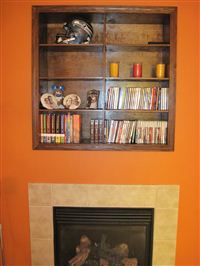 I’ve had the last 1.5 weeks off from work, and other than a three day trip for Christmas, I spent most of it at home. My project over the break was some new shelves to go above the fireplace. I was no longer happy with the look of the old ones, and with Tyla living here starting in April, I wanted something more versatile.
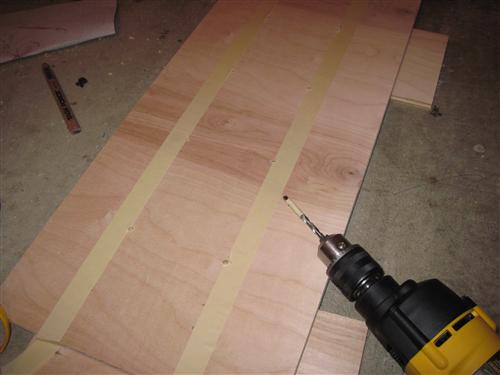
 I finally finished up a project that has been on my mind for years. I scanned in most of the photo prints that I have collected in my life. Here are a few things I realized through the project:


