Studio711.com – Ben Martens

Projects

Windows Media Center LCD Arduino Project

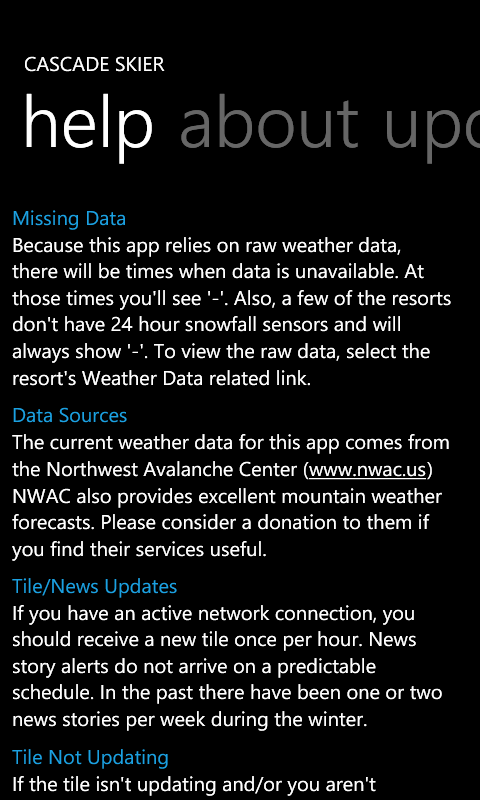
JimM got me interested in Arduinos. They are simple electronics boards that contain almost everything you need to get started with your project. When it arrived in the mail, I connected it to the computer via USB, opened up the development environment, uploaded a small program to the board and boom, I had a blinking light. Simple, yes, but the time to results was extremely low.

My overall plan was to build a display for the Media Center PC in our living room. I wanted to be able to easily see when it was recording something or when one of the tuners was being used by one of the extenders. There are some premade solutions that would have probably worked, but this seemed like a great starter Arduino project and I would end up with something that was completely customizable.

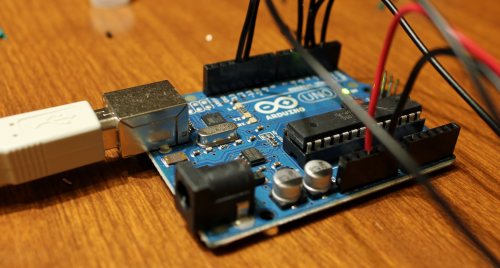
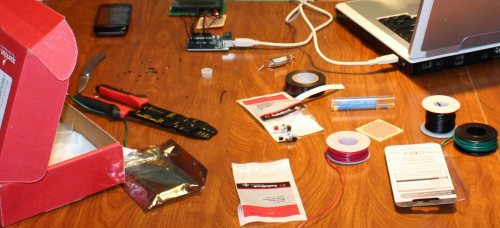
In addition to the Arduino, I got a 20×4 character LCD screen and some small supplies like resistors, wire, buttons, and a potentiometer. This is the point where I should show a schematic for the whole thing, but honestly I never drew one. I built little portions of it as I went and ended up with something that works and hasn’t burned down the house yet.

Basically, the Arduino Uno sends power to the LCD and a 10K potentiometer controls the contrast of the screen. The board also sends the text for the screen through four wires along with a couple extra wires for enabling the screen, etc. The board powers the backlight for the LCD but I hooked up a resistor there to dim the backlight a bit. I had originally planned to have the backlight be controllable from software but I gave up after a couple failures trying to get a transistor hooked into the circuit. There is also a simple button hooked in, but I haven’t needed to use that in the software yet.

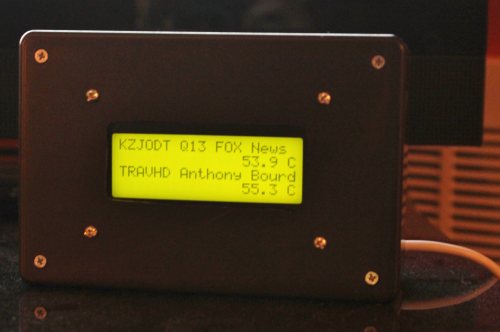
Once I got it all soldered together, I stuck it into a plastic hobby box from Radio Shack. I had to cut out a rectangular hole in the front for the LCD. That was done freehand with a Dremel and looks pretty bad when you get up close. Luckily it hides in the shadows and you can’t really tell. I have ideas to do that better next time.

The box now sits by the Media Center and is connected to the PC via USB. That cable provides power and communications. A C# application gathers status from the Ceton InfiniTV tuner and sets the display for the LCD in the box. (For the curious, there is a JSON interface to get to the InfiniTV status.) When a tuner is in use, the box displays the channel call sign and the name of the show that is being recorded. I get that info by mapping the channel number from the tuner to a call sign and then looking for the corresponding file in the Recorded TV folder. That file has the show name. When a tuner isn’t in use, it shows the temperature of that tuner. I’ll probably come up with something better for unused tuners in the future.

This was my first real electronics project so I learned quite a few things that are probably obvious to other people:

  • Use a bread board. Soldering everything to see if it worked was a pain.
  • Use header pins so you don’t have to solder directly to the LCD screen.
  • This whole thing could have been done in a couple minutes by buying a pre-made LCD shield that plugs in on top of the Arduino. I’m glad I did it manually the first time, but next time I’ll probably go for the shield.
  • Buy an introductory electronics book.
  • Take more pictures along the way! I was so excited to get this working that it somehow slipped my mind.

What’s next? I have quite a few project ideas but I think the one I’ll tackle next is making a tilt/pan mount for my camera that is controlled by an Arduino and will automatically take big panorama pictures. I’m also going to build an intervalometer into it for time lapse. This project will involve more buttons, motor control, and power from a battery.

My Windows Phone Applications

I now have seven applications in the Windows Phone marketplace so I thought I’d give you a quick rundown. You’ll see that it’s not quite as impressive as it sounds since some are sort of duplicates.


Cascade Skier
This is my most successful app, and by successful I mean that I have about 500 downloads. That’s not a lot, but I’m pretty happy. If you ski in the Pacific Northwest, you need this app. I have a whole page devoted to it’s features and it includes a YouTube demo. The short story is that you get hourly weather updates for all the local resorts and webcam images. It also makes use of the live tile feature of the Windows Phone platform to show current stats and the webcam in your live tile for your favorite resort. The webcam as part of the live tile is a recent addition and isn’t shown in this screenshot yet. http://cascadeskier.studio711.com/
[Screenshot 1] [Screenshot 2] [Screenshot 3] [Screenshot 4] [Screenshot 5] [Screenshot 6]
View in Marketplace
DiamondStats
The first app that I sent to the marketplace was DiamondStats. I didn’t really think anybody would buy it but I’ve sold about 15 copies. When I play rec league softball, I like to keep my stats, but I don’t like trying to remember them during the game because it takes my mind off what I should be doing. With this app, you come back into the dugout, easily mark what happened and you’re done. It keeps track of your total stats over various games. It’s nothing fancy but it was a good learning experience and something that I’ll use.
[Screenshot 1] [Screenshot 2]
View in Marketplace
Puzzle Toolkit
The idea for this one came from a couple guys at work who are very involved in PuzzleHunt. This app is one stop shopping for puzzle clue solving. It provides a variety of tools to help you solve clues related to braille, zodiac, Chinese zodiac, maritime signal flags, binary/hex/decimal/octal/roman numerals, ciphers (Vigenere, RotN, substitution, Atbash), resistor codes, semaphore flags, morse code (including ambiguous morse code with dictionary checking), and ascii conversion. While all the other apps are $0.99, this one is priced at $3.99. I split out individual parts of this toolkit and they’re available for $0.99 each as separate apps. There is a separate page for this application with a little more information and a YouTube demo video.
[Screenshot 1] [Screenshot 2] [Screenshot 3] [Screenshot 4] [Screenshot 5]
View in Marketplace
Ambiguous Morse
This is part of the Puzzle Toolkit. You can type in a serious of dots and dashes without spaces and the app will figure out all the possible translations of that series. Since that can get big quickly, you can filter just by words that are in the dictionary. a reference page helps you go from letters to morse.
[Screenshot 1] [Screenshot 2] [Screenshot 3] [Screenshot 4]
Ambiguous Morse
Braille Translator
This is part of the Puzzle Toolkit. As you start filling in the dots, it tells you what the current dot pattern represents and also tells you what other letters could be formed if you added more letters. A reference page helps you go from letters to Braille.
[Screenshot 1] [Screenshot 2] [Screenshot 3]
View in Marketplace
Ciphers
This is part of the Puzzle Toolkit. It will help you encode and decode Vigenere, RotN/Caesar, substitution, and Atbash ciphers.
[Screenshot 1] [Screenshot 2] [Screenshot 3] [Screenshot 4] [Screenshot 5]
View in Marketplace
Semaphore Flags
This is part of the Puzzle Toolkit. Set two arm positions and see what letter it represents. Set a single arm and you’ll see what letters can be formed with that position set. A reference page helps you go from letter to flags.
[Screenshot 1] [Screenshot 2] [Screenshot 3] [Screenshot 4]
View in Marketplace

Live Tile Web Cam
Take any web cam image and make it your live tile! If you know the URL to the image, this app will get it set up as your live tile and will automatically refresh it for your every hour or every day.

Note: The Windows Phone operating system will only support images that are JPG and PNG files that are less than 80KB in size.
[Screenshot 1]

View in Marketplace

Live Tile Web Cam 2
Take any web cam image and make it your live tile! If you know the URL to the image, this app will get it set up as your live tile and will automatically refresh it for your every hour or every day.

Note: The Windows Phone operating system will only support images that are JPG and PNG files that are less than 80KB in size.
[Screenshot 1]

View in Marketplace

Timelapse Calculator
Calculate how long it will take to capture your timelapse photos and the length of the resulting video.
[Screenshot 1]

View in Marketplace

Exposure Calculator
Quickly calculate the correct aperture or shutter speed based on the film speed (ISO) and lighting conditions.
[Screenshot 1] [Screenshot 2]

View in Marketplace

Your downloads and reviews are greatly appreciated! Feel free to contact me if you have bugs, comments, feature requests, or even app requests.

Ceton InfiniTV Media Center Demo

About a month ago, I wrote a post about the guts of my Media Center PC. But what does it really do? Why did I build it? Since you can’t all stop by and check it out in person, I’ve put together a demo video.

It’s dorky, I know. The various cameras aren’t calibrated the same and my shirt sleeve kept flipping up. But by the time I noticed all these things, I was too far in to start over. So enjoy this (amateur) video showing just a few of the reasons why I love my Windows Media Center PC.

If you’re running just about any version of Windows 7 or Vista, you have the Media Center app. You won’t be able to do the live TV portion, but everything else is available to you for free.

Ceton InfiniTV Media Center

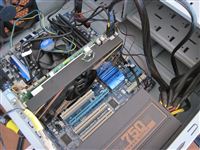
I’ve always been intrigued by the beauty of Windows Media Center. It comes with virtually every SKU of Windows now, but how can I get my cable TV hooked up to it? There have been various methods for the past few years, but nothing was good enough for me to take the plunge of killing the Tivo and switching to Media Center. I’m planning a couple posts about this project, but the first one will be on the hardware side of things.

The magic card that makes this all possible is the Ceton InfiniTV 4. It’s a PCIe card that accepts a cable card and records 4 HD streams simultaneously. One PCIe slot, one cable card, four TV streams. The cards came out towards the beginning of the summer and I watched as people worked through some of the early bugs. Ceton had trouble manufacturing enough cards to meet the demand. That meant that once I decided to take the plunge (8/31), I had to wait over two months for my card to arrive.

The next question was what hardware I needed around the Ceton. I had a four year old Core 2 Duo E6600 (2.4GHz) with 4GB of RAM. I didn’t really see how that could handle that much HD video processing, but I decided to start there and see what happened. The only upgrade I needed immediately was a new video card with HDMI out. The HDMI out would give me HDCP and multi channel audio.

I picked up the PowerColor Radeon HD 4350 512MB 64-bit DDR2 PCI HDCP Ready Video Card.  I thought I only had one PCIe slot which would be used for the Ceton card so this was one of the few PCI options. What a train wreck this ended up being. The PC would blue screen when I tried to install the drivers, and even when they were installed, I couldn’t play back live or recorded TV. After blowing an entire weekend trying to debug the thing, I shipped it back and headed to Fry’s to get something from the NVidia camp. I ended up with the Evga GeForce GT 430 1 GB DDR3 PCI-Ex card. Note that it’s a PCIe card. Stupid me, I had missed a PCIe slot because it was hidden behind/underneath some other junk in the PC. Once I removed it all, I had a clean shot to two PCIe slots which gave me a lot more options for the video card. The GT430 was super simple to install. Everything worked right away, and while it’s not passively cooled, it’s very quiet and the fan rarely runs.

The machine is an old Dell and the only fan is a VERY large fan at the front of the machine directing air over the CPU cooler. It runs very quietly but I was concerned about whether the video card and Ceton card would generate too much heat. I added an 80mm to the back of the case to pull air out, but it’s a bit noisy and I’m doing some testing to see if it’s really necessary.

The Ceton card was pleasantly simple to install. I called Comcast with a bit of dread, but that was very smooth. They asked directly if I was installing it into a Media Center or Tivo (an option I’ve never heard before) and then transferred me over to their Media Center guy. In theory there shouldn’t be any difference so maybe he’s also the Tivo guy. Either way, he was the most informed cable card guy I’ve talked to at Comcast. When it didn’t work the first time, I was able to give him precise feedback through the excellent Ceton diagnostic tool and he was able to debug/retry on his end. In about 15 minutes we had everything working beautifully.

The machine isn’t terribly loud, but the OS drive is the noisiest part. Since this is going to sit in the living room, noise matters. I ordered an Intel X25V 40 GB Solid State Drive to serve as the OS drive. It’s a bit slower than their top of the line SSD but it’s still faster than a platter drive and it will be perfectly silent. Plus, it’s just the OS so it’s not going to have a lot of writes other than the page file.

The last piece of the puzzle was hooking this thing up to my Harmony One remote. It’s the cornerstone of my whole setup so it needed to work with this PC. There are some “Media Center compatible” remote/IR receiver combos available, but you have to be careful because they don’t all support the RC6 Media Center standard. I ended up getting one of the original IR receivers that came with the Dell Media Center machines back in the day. I found it on eBay (first time I’ve used that site in YEARS) but it worked very well. I programmed the Harmony remote to think it was talking to one of the Linksys extenders. It works like a champ. When we drop out of the Media Center interface, I’ll use a regular wireless mouse and keyboard.

For now the machine is sitting in the computer room and we watch it via the Xbox360 in the living room. I’ve been running it through it’s paces and once I’m convinced that it performs well, I’ll swap out the Tivo. The only bug I’ve found so far is that when I record NFL football games on the local Fox affiliate, it will cut out every once in a while with a copy flag error. There’s a beta firmware available from Ceton that fixes this. I had a very good experience with Ceton support and was added to the beta. Hopefully this fixes my issues without adding too many other ones. Once I ditch the Tivo completely, I’ll be much less likely to get on betas or apply any other updates/patches to the machine. Windows Update is even turned off. I’ll do that myself at specific times after I’ve made a backup to my Windows Home Server.

As for whether or not the older machine could handle it, I have been very pleasantly surprised. Even at full load (recording 4 HD streams, playing back one locally and streaming another to the Xbox360 extender), it uses less than 40% of the CPU and there is plenty of memory overhead. Almost everything is happening at the hardware layer. Note that all of the video is on a single hard drive. The bandwidth required for four HD streams doesn’t come close to the overall throughput of the drive, but there are a lot of seeks going on. RAID seems like overkill at this point but it’s still on my radar if I hit little glitches. I’d definitely recommend putting the OS on a separate drive though.

That’s about it for the hardware side of the setup. Once I get a little farther along in the process, I’ll put together a post about what I can do with this that I couldn’t do before. The scenarios are pretty impressive if I can piece them all together well.

Harry Potter Newspaper

After doing the Halloween video, I decided to give special effects another try. This idea had been floating around in my head for a while and here is the result. It’s not perfect, but I thought it was good enough to share.

If you’re curious, the main effects I used in Premiere Elements 8 were lightning, crop and corner pin. The pinning was almost a frame by frame effort as I manually tracked the movement of the paper. If I had $700 for After Effects I could have used motion tracking and the result would have been much cleaner. I also used a combination of blur and coloring effects to try to match the look of the paper. The strange background in the inset video is the result of using chroma key for a background that wasn’t uniform. I did it as an accident but thought it fit the overall look pretty well.

It’s amazing what you can accomplish with a few hours at the computer. We’ve come a long way since the days that we used to sit in the dorm room with multiple VCRs and audio input sources cabled together to attempt to mix videos.

Windows Mobile Podcast Player

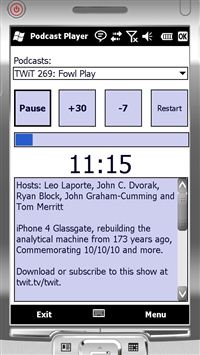
I have bad news. My 120GB Zune died. The original 30GB is still alive and well but Tyla uses that. My Zune got daily use in my car. I had all my music on there and I mostly used it to play the many podcasts that I listen to (TWiT, Car Talk, Home Theater Geeks, Windows Weekly, and Preston and Steve.)

I decided to use my phone (HTC Touch Pro 2) until I can get a new Windows 7 Phone which will double as my new Zune. The only problem with using Windows Mobile 6.5 as a podcast player is that the media player app doesn’t save your position when you stop listening. This is critical for podcasts which span multiple drives to work.

I fired up Visual Studio and started coding an app to do this. It’s a bit tricky to keep the phone from locking, but I got it all working. The UI is nothing fancy but I’ve been using it for a few weeks and it works quite well!

If you’re interested in running the app on your phone or getting the source code, it’s all available at http://podcastplayer.codeplex.com/ for free.

Stebel Nautilus Horn Installation

I received a Stebel Nautilus Compact Horn (ST-100) as a birthday gift from Mom and Dad. It’s a nice upgrade to the stock horn on my 2009 Kawasaki Concours 14 ABS. If you ride a motorcycle, you probably the feeling when somebody merges into you with their windows up and the radio blasting. You’re lucky if they can hear their horn. Now I won’t have that problem.

If I add up the entire project time, it is about 12 hours spread over two days. If I did it again I think I could pull it off in less than two hours. Much of the time was sucked up with 3 trips each to Home Depot and Radio Shack. This whole project was a bit over my head, but I’m very happy with how it turned out.

The step that took the longest was figuring out how to activate the horn. I wanted to replace the stock horn, but I couldn’t find a way to tie into the stock horn button without cutting the wiring harness. I finally gave in and did it, but it took a lot of time to convince myself it was the right move. I’m glad I did.

I’ve posted a series of photos showing the main steps to document the effort, but I’m not responsible if you use these to try it yourself. It’s important to note that I also had the wiring harness from Murphs’ Kits, but it’s not necessary, and if I was doing it again, I’d probably build my own. I would have used a bit thicker wire (is that “lower” gauge?) and shorter wires. But then again, if I didn’t have that harness I would have had a harder time knowing what I needed to do.

If my instructions don’t do it for you, check out the installation instructions for a different the Stebel HF-80/2 on the same bike. It’s smaller though so it gets mounted where the stock horn is. I couldn’t mount this one there because it would have hit the front fender if I compressed the front forks over a bump.

This first picture is the bike before any modifications. I installed the horn right below the flat lighter black plastic piece in this photo.

I’m not going to cover how to remove all the plastic bits. I relied heavily on a set of nine DVDs tailored for my bike. I can’t recommend these AngelRideVideos.com discs enough! This next shot shows all the plastics removed. Note that I also took the battery out since I’m messing with the electronics.

Follow the wire up from the stock horn and find where it goes into the main wiring harness. Take the plunge and snip the two wires. I made sure I had snipped the right wires by reconnecting the battery, firing it up and pressing the horn button. No noise. perfect.

The next two shots show the horn mounted in position. I’ve placed spade connectors onto the bare ends of the wiring harness and plugged into the harness from Murphs’ Kits. I got a strip of aluminum from Home Depot, drilled bigger holes, bent it, and cut it to hold the horn. I later added some zip ties to secure it even more.

The horn requires a relay since it draws so much power. I mounted that on the other side of the foam onto an existing bolt. Very convenient.

This shows the install location with the right fairing replaced. Once the top piece is in place, you can’t see the horn at all. I suppose there are other places that you could mount this for a slightly louder sound, but this is plenty good and it is easy to access.

The end result is impressive! I had no idea what to expect, and honestly, it’s not quite as ear bustingly loud as I thought it might be, but that’s probably good considering that my wife works at a hearing clinic. With a helmet on, it’s no problem to honk the horn, but working the garage right next the horn I put in ear plugs during testing. The real shock is hearing an air horn coming from a motorcycle. I took before and after video to show the difference, but you really have to hear it in person to appreciate it.

Computer Build

A couple weeks ago, I mentioned I was about ready to pull the trigger on the new computer. That day finally arrived and I carved out some time to put it together on Wednesday.

The final parts list looks close to what I said in that post.

Core i7-860
GigaByte P55A-UD3
PNY NVidia GTS250 1GB
Corsair XMS3 8GB DDR3 1600
Corsair TX CMPSU-750TX 750W
Nippon Labs Delux 3.5″ Internal All In One Card Reader/Writer
Antec Two Hundred Case

The only thing not in that list is the DVD drive which I took out of the old computer and the hard drives which I had laying around. The OS is on a 160GB drive and the two 250GB drives are in a RAID0 config. Since the whole computer is backed up daily to the Windows Home Server, I’m not concerned about the reduced reliability of RAID0.

The whole process took me about three hours to finish. I could easily do it again in less than an hour, but I was taking my sweet time to be careful not to destroy my ~$1000 worth of parts. I had about a 45 minute panic attack when it didn’t boot. The fans would spin, a couple lights came on and then it would die. It would continue to repeat that cycle until I shut the power off.

Finally I figured out that there was a second power plug that needed to go into the motherboard. Once I plugged that in, everything worked and I was in business!

I built this computer to handle HD video so while I was building it, I filmed the whole thing. Tonight I edited the video and it was fantastic. I wish I had a before and after demo for you, but previously I’d get maybe 1 frame every second or two and every time I started or paused the video it would take a few seconds to respond. With this computer, it plays back at regular speed and is extremely responsive. Rendering was also a breeze. What used to take a couple hours to render now takes about 20 minutes.

The real test, of course, is whether or not I’d try this again. Initially I would have said no but I think the nervousness has worn off and I might be willing to give it another shot. There was a definite cost savings over buying it prebuilt from Dell and I got higher quality parts.

And Ken, I should have listened to you and gotten a modular power supply. But even with that, I still would have a mess of cables running everywhere. I need to open it back up and break out the zip ties.

I sped up the video so the whole process takes less than 5 minutes. If you go to YouTube you can watch it in HD.

Lulu

Two years ago, I raved about Lulu.com as I finished publishing a hardcover book for each year of my blog going back to 2002. It’s time to give them another plug.

As you saw in the moblog, I just published volumes 2008 and 2009 of my blog book series. 2008 was by far the longest book yet (over 700 pages) and for 2009 I included all my Twitter updates in the appendix. Ridiculous? Why yes, it is. No I don’t expect anyone to buy any of these, but I love seeing them up on my shelf and I dream that some day I’ll have offspring that will enjoy flipping through them. If you want to look inside the books, check out my Lulu storefront. The PDFs are free.

I also used Lulu to create the guestbook for our wedding. It’s a 9”x7” hardcover photo book. There are photos spread throughout the book with lots of white space. We’re hoping that people will write comments/thoughts instead of simply signing their name. Or maybe it will just end up looking like a high school yearbook “Friends 4 EVA!”