
YouTube is an incredible resource for learning a new hobby (or expanding the horizons of your current hobby.) Case in point: Matt Cremona. He doesn’t just go to the lumber yard to buy wood for his projects. He walks through the woods, cuts down a tree, slabs it with a chainsaw mill, lets it dry and then takes it into his shop to finish milling it for a project. While this isn’t something that I’ll probably ever get to do, it’s really fun to see how it works. Check out this video demonstrating his chainsaw mill:
Table Saw Rehab
 While I’m thankful to Tim for the good deal he gave me on his old table saw, I was never a huge fan of it. But some changes I’ve made to it over the past 6 months have made it one of my favorite tools in my shop:
- The dust collection system that I built does a great job at trapping saw dust. Unfortunately since it sits far away from my shop vac, I rarely have it hooked up. When the box gets full, I have to pull one end off to suck all the dust out. I think I’m going to rebuild this to be just a box with a drawer that I can pull out. Still, this works way better than having nothing.
- I waxed the top of the table saw. After I was done, I was shocked at how much easier wood slid across the blade.
- I bought a new blade! I don’t know how old/dull that other one was. I probably could have had it sharpened but I decided to start fresh and then keep it maintained.
- I adjusted the measuring guage on the fence. It was always off by enough that I had to measure with a tape measure to make sure it was set properly. Now it’s EXACTLY right and I can skip the tape measure.
- I got a good set of push blocks for Christmas which make it a lot safer to use.
The saw is pretty much still the same as it always was, but these cheap tweaks have made a huge improvement in its usefulness.
Jewelry Box
Four years ago, I decided I was going to make Tyla a jewelry box, but after reading through the plans, I felt like it was way over my head. I got the bug again recently, found some plans, and this time I decided it would be a big stretch of my skills but probably within reach. (Turns out, I was looking at the same set of plans both times!)
There were so many first for me in this project: first time buying walnut, first time buying wood milled only on three sides, first time using a planer to thin the wood down, first time cutting dadoes and rabbets, etc etc etc. I started off with two hunks of walnut and ended up with a jewelry box that looks much better than I expected it to. All those “firsts” took a tool on the schedule though with the project taking 43 days from the time I picked up the wood until the time I finished though of course I wasn’t working on it even close to full time.
In the past I’ve always done bigger projects that went together with screws and nails. This one is held together with only glue and the cuts I made in the wood. It was really nice working this way because you can dry fit everything and have it stay assembled while you look at it. It was also a lot of fun to work with the walnut. When I work with pine, it’s so soft that it dents easily and it’s hard to get precise cuts. But with the walnut, I could get a piece that was exactly the right dimensions in all three axes.
The drawers and the backs of the door and the box are lined with velvet. There are 4 hooks on the inside of the door and four in the back of the box. There’s also a padded velvet ring bar at a 45 degree angle in the box. You can’t see it in the photos, but that ring bar has horizontal slits in it to hold rings in place.
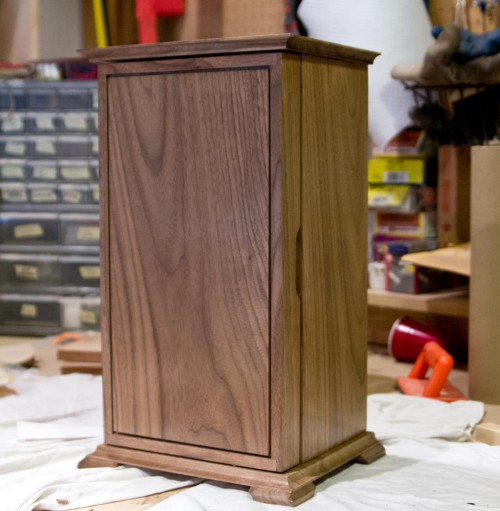

I’m glad that I attempted this project and that it turned out so well, but I’m also happy that it’s over. I want to queue up a couple easy projects to relax a bit.
Saw Blades
 Now that I finally have a shiny new saw, I decided that I started wondering how my old table saw would work if it had a nice new blade on it. Maybe I could get the old blade sharpened, but I kind of just want to start with a new blade and then take care of it properly from the beginning.
I started reading about saw blades and WOW, there are a lot of things to know about the blades. There are different diameters, different blade shapes, different angles for the teeth, different numbers of teeth, different thicknesses for the blade and the list goes on. This article from Rockler is one of the best ones I found for summarizing all the info but here is a quick summary of what I learned:
- My table saw and my circular saw use the same diameter blade so I can buy one blade and use it either place.
- Miter saws should generally have a higher tooth count since you are mostly doing cross cuts (~60-80 teeth) while table saw blades should have a lower tooth count since you are mostly doing rip cuts (~24-40 teeth.)
- If you have less than a three horsepower motor, consider using a thin kerf (thickness) blade. The tradeoff is that the blade might deflect more, but since you are removing less wood, your motor can power through the cuts easier. You’re also generating less dust!
- Most saw blades have a positive angle to the teeth meaning that they lean forward. Miter saws benefit from a slightly negative tooth angle. This gives you a more controllable cut and also helps to prevent the saw blade from pulling the back side of your wood up into the air.
The saw blade that came on my miter saw is probably better suited for my table saw so I’m hoping to move that over and then buy a higher tooth count blade for my miter saw.
Tool Safety
 A wood shop can be a dangerous place. There are blades spinning and cutting all over the place. One key part of staying safe is knowing what can be dangerous. A 2011 study from the National Electronic Injury Surveillance System lists these as the top injuries:
- Table Saw: 39,750 annual injuries
- Jointers, planers, shapers, and sanders: 10,930 annual injuries
- Miter Saw: 6800 annual injuries
- Band Saw: 3550 annual injuries
- Radial Arm Saw: 350 annual injuries
Now obviously these numbers are a bit skewed by which tools people use the most often. For example, the radial arm saw isn’t very popular anymore as people are using table saws with sleds for many of the same purposes.
Whenever I get a new tool, I like to do a bit of reading about common injuries and tips for staying safe. One thing I learned with this new sliding miter saw is that after making the cut, you should let the blade stop spinning before lifting it out of the wood. Otherwise you run the risk the cutoff piece catching the blade and flying around the room. It can also give you a cleaner cut since the spinning teeth only touch the wood once.
It’s also important to keep the wood clamped down when possible. When the blade in a miter saw goes through the wood, it pulls up on the back side. It’s not uncommon for it to catch on the wood and rip it up in the air. If the wood isn’t firmly held in place, this can be pretty bad news.
As someone who makes money with his fingers, these kinds of tips are extra important!
Cut List Generator
 One challenge with woodworking projects is figuring how to make the best use of the wood you have available. If you’re working with expensive wood, your decisions can have a dramatic impact on the total cost of your project. I did some quick searching around and found a few solutions, but my favorite (free) one so far is the Free Online Panel Cut Optimizer.
For the Adirondack chair project, I thought it took two 2″x6″x8′ boards and four 2″x8″x8′ boards. Using this tool, I got it down to three 2″x6″x8′ and two 2″x8″x8′. That drops the price by about 20-25%!
The downside is that the cuts aren’t as simple to make. The way I had it originally drawn, I cross cut the wood and then ripped it to the right width. This more efficient use of the wood requires more strategic cuts, but if it saves enough money, it’s worth the effort.
Dust Collection Update
About two months ago, I picked up a Dust Deputy and attached it to my shop vac to help control dust while woodworking. I let the 5 gallon bucket under the cyclone fill up completely before emptying it the first time and you see the results below. The bucket is mostly full and the shop vac has almost no trace of dust in it! I did take the filter off anyway and blow it with compressed air to clean it anyway, but it didn’t need it. If I had sucked up this much sawdust without the Dust Deputy, I would have easily gone through two shop vac filters and those things aren’t cheap. I’m very happy with this setup!

Sliding Miter Saw
 Back in November of 2006, I got my first miter saw. DougS found it at a garage sale for me. It was a 10″ Delta and it served me very well, especially considering that I only paid a few bucks for it. Aside from the fact that I needed to sharpen the blade, the only thing that really bugged me about it was the small size. I couldn’t cut through a 4×4 or a 2×8. I use 2×8’s a lot in my projects so that means making a cut, flipping it over, cutting again, and then going over to the table saw with the cross cut sled to get a clean cut. That’s three cuts where I should have one. After months of hemming and hawing, I finally pulled the trigger on a new saw: the Ridgid 10″ sliding double bevel miter saw.
My search originally started with 12″ sliding saws and for a long time, I was saving up for the DeWalt. More recently, I gave the 12″ Ridgid a serious look and was very impressed, especially considering that it was $200 less. The drawback was the size. 12″ sliding miter saws are huge and the Ridgid was significantly bigger than the DeWalt.
Looking around at various reviews, lots of wood magazines targeted at the amateur and semi-pro woodworker did 10″ sliding miter saw reviews. Why were 12″ reviews so hard to find? I ran across one article which talked about the advantages of the 10″: lighter, smaller size, and the blades are a little cheaper. And it turns out that unless you’re doing big crown molding, you probably won’t care too much about the difference in capacity. For example, when cutting at a 90 degree angle, both the 10″ and 12″ can cut 4x4s and 2x12s. At a 45 degree miter cut, the 12″ can cut a little more (2×10 vs 2×8), but that’s about the only major difference in the cutting specs. The smaller size seemed like a positive tradeoff.
I would have jumped on the 10″ at that point, especially since it won a lot of those woodworking magazine shootouts, but it was exactly the same price as the 12″. Huh!? It took me a while to weed through the specs but I finally figured out that the 10″ has a few extra features compared to the 12″. There is a laser system that people say is actually somewhat useful, an LED light that illuminates your cutting area, and most importantly for me, a soft start system. On my old saw, I’d hit the button to turn on the blade and the instant 100% power surge would often jerk the saw around a bit and the wood would move. The soft start system spins up the blade a bit more slowly so it’s a very smooth operation.
I haven’t done a lot of serious work with this yet, but so far I’m in heaven. I was tempted to wait for this saw to go on sale (it was a Black Friday deal in the past), but eventually I decided that I wanted to be done researching and I wanted to start using it. Now that I have it, I wish I had bought it a long time ago!
Adirondack Chair
I’ve been talking about building an Adirondack chair for so long that it’s embarrassing. It’s been at least four years if not more. There always seemed to be other projects that were more pressing, and my excuse was that I still didn’t know exactly how I wanted to build it. Over the years, I sat in a lot of chairs trying to figure out what makes a comfortable Adirondack chair and I finally decided that a contoured seat makes a huge difference. Unfortunately that also ups the difficulty of the build and gave me another reason to put it off.
Finally I stumbled across some plans from Woodworkers Journal that looked like just what I wanted. Even better, they had done a refresher of the plans complete with a 15 minute video series showing all the steps. Bingo.
A couple weekends ago, I headed to Home Depot and picked up a bunch of cedar boards. The plans say pine but I decided to go with cedar as it seemed like something that would stand up to the weather better (not sure if that’s true.) Instead of trying to find the minimum sized boards that I needed, I bought a few bigger 8″ wide boards with the intention of trimming them down to size. The cost was about the same and it was a lot easier to find bigger boards without warping or cupping.
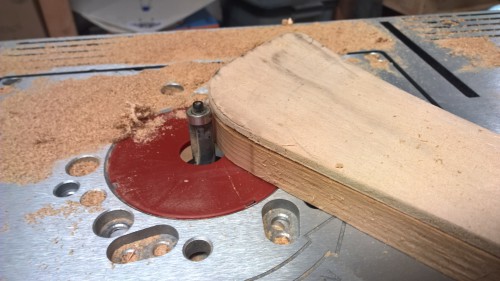
While I’ve done a lot of wood projects over the years, this is the most complicated plan I’ve ever followed and easily the nicest looking piece of furniture I’ve ever attempted. There were a couple new skills involved in the project. One was template routing. I spent a lot of time drawing out all the different pieces onto 1/4″ plywood and then I cut them out with a jigsaw and sanded them to perfect shape. To make the actual cedar pieces, I used double sided tape to stick the template onto the cedar and then used a flush trim bit in the router table. The top of the bit is a bearing that rides along the template and then underneath it’s cutting away the cedar allowing me to perfectly replicate the shape of the template on the cedar. Pretty cool!
The second new skill was cutting a taper into the back slats. I haven’t yet built a really nice tapering jig, but I was able to throw one together with some hold down clamps. It wasn’t pretty but it did the job well and gave me repeatable cuts at the right angle.

I was surprised at how well the whole thing went together. The only real hiccup was the upper back frame (part H) came out about an inch too narrow. It didn’t cover the entire top of the back legs. I checked my measurements over and over against the plans, couldn’t find the problem, and finally just cut a new piece that was a little wider. I don’t understand how there could be a bug in the plans after they made the video and didn’t catch it, but whatever. This works and it looks good.
There are a few things that look a little off if you are paying attention, but hey, most of the time you’re sitting in this chair you’ll be drinking a beer in the sun. It’s plenty good for that and very comfortable. Mission accomplished!
I still need to figure out how I’m going to finish this (or if I’ll just leave it bare). After that, the next step is to redo it all over again so that we have two. It should go MUCH faster this time since I already have all the templates. Plus, I feel confident that I can cut all the pieces first and then assemble them. The plan is very forgiving about pieces being off by an 1/8″ here or there and not having a huge effect on the outcome (for the most part.)

Stove Cover
When we have parties at our house, the counter between the kitchen and the eating area is usually covered with food. The stove makes a big chunk of that space unusable. One day I had the bright idea of building a cover for it using some of the scrap 3/4″ oak plywood leftover from the desk project. I bought a 1×8″ piece of oak and set off building the box.
I wanted to crank this out pretty quickly and new that it would only get used a few times per year, so I kept it really simple. The joints on the corners are simple butt joints held together with pocket screws. The top fits down inside the box and rests on support rails.
Storage was a key feature since we won’t be using this 99.9% of the time. We decided it would fit well in the drawer below the oven, but to fit there, it needed to be cut in half. So I built the cover as a single piece and then ran it through the table saw as the last step. That’s where it went a little wrong. I got some tear-out on the plywood. I improvised and cut a thin strip of oak to overlap the gap. It covers up the tear-out and also will make sure food doesn’t fall through the gap. It’s not ideal but it looks fine.
I finish it all with a cherry stain and then four coats of spray lacquer. It got it’s first use at the Super Bowl party and worked very well.
If you’re interested in this idea but don’t want to build one, you can buy them online.