Studio711.com – Ben Martens

CascadeSkier v3 for WP7

Around the end of last spring, I was contacted by a guy who wanted to do new graphics for my app. I was actually kind of proud of my old logo, but I decided to write him back. He offered to do it all for free as long as he could use it for his portfolio. Deal! When he sent over the first few samples, I knew the app was in for a big upgrade.

In addition to a complete graphics overhaul which you can see in the video below, I added some new features. Before the app would pull in specific details for each resort as you flipped from page to page. Now the whole thing is cached on my server and when the app loads, it pulls it all down at once. That makes it a lot faster to flip from resort to resort. You can also filter and sort the resorts which is a feature that people have been asking for since I launched. There are more features coming, but I launched a couple weeks ago to get this into people’s hands.

Want to learn more about Jeremy, the graphic designer? Go check out his website at sanfoj.com. And while you’re at it, go check out the medal design contest for the Winter X-Games. Both he and his girlfriend (JoEllen) had their designs make it to the final round of 16! Voting ends today so vote now!

If you have a Windows Phone, go check it out! And if you don’t have one, sorry, but it’s pretty unlikely that I’ll do this for Android and extremely unlikely that I’ll buy a Mac just to put it on the iPhone.

Vinyl Flooring

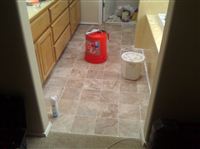
When we bought our house, the master bathroom had carpeting and no door. Odd, yes. There is a separate toilet room at the end of the bathroom and that part did have a door, but it’s still a bit weird to have someone watch you in the shower.

When we got our new carpet, I had them skip this room because we weren’t fans of carpet near the showers and tubs. Last weekend, I finally got around to installing a vinyl floor so we can use the bathroom.

One of my top priorities was going cheap on this project. We’re planning to gut the bathroom in a year or two and get rid of the ugly stuff in there now. I didn’t want to spend a lot of money on a floor that I knew would be going away, and I didn’t want to put anything fancy in because it probably would need to be modified. I had originally intended to find a remnant, but by ordering a new piece we got exactly what we wanted for a design and I was also able to get it in the newer “floating vinyl” style.

This floating vinyl has a pad on the back of it which keeps it from warping at the edges. It also provides a bit of a cushion as you walk on it. The big benefit is that you don’t have to cover your floor with adhesive which is hard to take up later. Instead, you cut the vinyl to fit and then place a few strips of double sided tape down to hold it in place. It’s meant to float around a bit as the floor expands and contracts.

This is the first time I can remember installing vinyl so I’m sure I made a lot of mistakes, but I’m happy to report that it’s at least functional. I’m not happy with the line along the tub and the shower. I had to fill that with caulk to keep water from getting underneath, but it’s a pretty thick line of white against the brown vinyl and yellow tub. Bleh. It remains to be seen whether I will live with that until we tear it out, or if I’ll try to come up with something better.

Next up: adding a door.

Tankless Water Heater

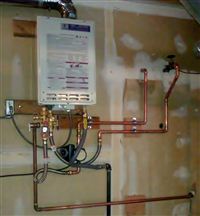
Our house came with a long list of appliances that needed to be replaced. Chelsea’s Dad, Brent, has a heating and cooling company (PMG Mechanical 206-624-5040) so I called him out to take a look at our water heater and furnace. His opinion about the water heater lined up with our inspector and a plumber that had been at the house: replace it soon. The furnace? That’s next year. Yeehaw.

Instead of just replacing the 50 gallon water heater with something similar, we went fancy and got a Takagi TK-3 tankless water heater. Tankless? Yep. That box hanging on the wall in the photo is our water heater. When you turn on a hot water faucet somewhere in the house, the burner fires up and it heats up the water as fast as it flows through the box. In theory you have to wait a tiny bit longer for your hot water, but since many of our faucets are on the other side of the house, I can’t tell any difference. The benefits are that you never run out of hot water and you aren’t paying to keep a bunch of water hot all day when you’re not using it.

Brent said that the water heater he took out was around 61% efficiency. For every $1 we spent on gas to heat the water, $0.39 was thrown away. The new system is 82% efficient and qualifies for some pretty large rebates and tax credits for being Energy Star certified.

You may notice that there is a recirculation pump in there. It’s the cheesy kind that works with a bypass value which forms a loop at the end of your plumbing run so your hot and cold pipes fill with hot water. This was on the old tank when we bought the house so I had him hook it up but it’s not enabled right now. Running a pump like this means that you’re burning gas the entire time and I’d rather just run the cold water out of the pipes myself in the morning. Also, when he set this up he added a hose bib for both the hot and cold water lines, so in theory, I could easily have hot water to wash my car!

All in all, I have no complaints with the system. I won’t really know if this saves us any money because we haven’t gotten enough gas bills to see a trend change. Brent said that for many people, the bill actually goes up because they never run out of hot water and use more of it. I’m not sure that Tyla and I will fit into that category since we aren’t in the habit of running out of hot water, but we’ll see. Hopefully this keeps our water warm for many years to come!

Painting

Before we moved in (and a little after moving in) we did a lot of painting. The living room, kitchen, family room, upstairs hallway, master bedroom, and master bedroom closet were all touched by the mad fury of paintbrushes and rollers. Thanks to everyone who helped out!

Some of these things might be obvious for those of you who paint a lot, but here are some things I learned that I figure I should remember for next time:

  • The computers at Home Depot do a great job of matching colors if you have the codes available. When you decide on a color, have them print off an extra code sticker and keep it safe so you can buy it again later.
  • The little $2 sample jars are great for touching up when you’re done.
  • The green Frog Tape is more expensive than the blue stuff, but it works amazingly well. I was unsure when we initially picked up our supplies, but after taking the tape off the first room, I was a believer.
  • If the four phases of painting are washing, taping, trimming and rolling, the distribution of work is about 20%, 35%, 35%, 10%. No matter how often I paint, I always seem to forget that the rolling is actually the quick part and by the time you get there, you’re almost done.
  • Unless you’re painting a small room, you can’t have too much help. Painting scales very well. If you have four people, you’ll get it done almost exactly twice as fast as if you did it yourself. It was amazing how long it took us to do little paint jobs after everyone left.
  • Radiused corners might look night but they are a pain to paint especially when you’re trying to stop a color at that corner.

Do you want to paint your house like ours? Here are the colors we used. White is the trim, gobi dessert is the “boring beige” on most of our walls, and shy violet is the color of the laundry room. I’m sure we’ll add more colors as time goes on, but it’s nice to have a small set of colors. The previous owners used a very slightly different shade in every room and left us ~40 cans of poorly marked paint in the garage.

Cost of a Light Bulb

Back in 2007 I wrote about the cost of running various things from a Christmas tree to an Xbox360. Maybe I’m a cheap skate, but I’m always amazed at the cost of the simple light bulb. Now that we have a bigger house, I’ve been looking for bulbs to replace to save money. It can make a big difference!

Take for example, your basic 60W old-school incandescent light bulb. If you left that on 24 hours a day, every day for a year, that would cost $52! That’s just ONE bulb. I had 100W equivalent exterior CFL bulbs that go on with my fancy timer every night, and I figured out that if I replaced them with 60W equivalent bulbs, I’d save about $20/year and it was plenty bright enough.

Or let’s say you have a living room with 3 100W incandescent bulbs that you use an average of 3 hours per day. If you replace them with 3 100W equivalent CFL bulbs, you’ll save $25/year.

I know it’s not really that much money, but you do that here and there a couple times and you’ve just paid for a Netflix subscription.

Generally you can run about 4 CFL bulbs for the cost of one incandescent bulbs. In a few years, the cost of LED bulbs will come down enough that we’ll all be buying those instead of CFL. You can run about 10 LED bulbs for the coast of one incandescent bulb, and LED bulbs don’t have the warm up time that CFL bulbs do. They’re still pricey but they last longer. You’ll want to do your math before you switch to LED.

By the way, if you’re at all interested in this stuff, you should pick up a Kill-a-Watt. I still find myself plugging various things into it and seeing how much power they use.

Light Timer

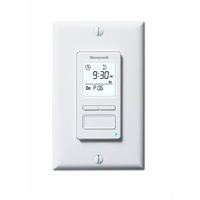
Every night since moving in, I have been doing battle with the external light timer. The previous owner left instructions, and I found the manual online, but no matter what I did, I couldn’t get them to work correctly. Even when I set the program, the timer drifted and would be wrong by the next day.

I finally gave up trying to get it working and ordered the fanciest light timer I’ve ever seen: a Honeywell Econoswitch. It’s a digital timer that fits right into the light switch panel. You can do a separate program for each day to turn the lights on and off, or the really cool feature is that it will calculate the sunrise and sunset based on the latitude and longitude that you enter in. The installation was simple and this one is a breeze to program. It’s well worth the money!

Motorcycles in the HOV Lane

One of the best laws I learned about when I got the motorcycle was that motorcycles are always allowed in HOV lanes (also known as carpool lanes and diamond lanes.) Now that 405 is the fastest route to work, I’m on the motorcycle a lot more because it’s so much faster than sitting in traffic.

But why are motorcycles allowed in HOV lanes? Because Uncle Sam says so. US federal law states that HOV lanes "must allow motorcycles and bicycles to use the HOV facility, unless either or both create a safety hazard." On a side note, I expect that in most places, bicycles aren’t allowed because they are a safety hazard.

I’ve spoken to some drivers who are annoyed by this, but frankly, having motorcycles in the HOV lane is probably a lot safer for everyone. How many rear end accidents do you see when traffic is backed up? Now imagine that you just rear ended a motorcycle instead of an SUV. Yuck.

Buzzing past in the HOV lane on a motorcycle makes me smile, but I’m also on high alert for anyone deciding to whip out into my lane especially when the rates of speed are very different. I generally try not to leave a big gap between myself and the car in front of me, ride on the right side of the lane so I’m more visible to people looking for an opening, and I pay extra extra attention after an on-ramp as people make their way over to the HOV lane.

Projector Mount

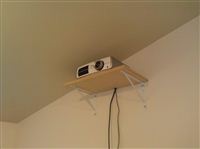
The first step after getting the projector running was getting it mounted. One reason I picked the Epson 8350 is that it has a huge amount of available vertical and horizontal lens shift. This allows you to place the projector just about wherever you want and then place the image at the right spot with no distortion. It will move the image about one screen above and below the lens and one screen right and left of the lens. There aren’t many other projectors in this price range that will do that.

As you can see in the picture, I didn’t purchase a fancy mount. And because of the lens shift capabilities, I didn’t even do an upside down mount like you would normally see. I grabbed a couple shelf brackets from Home Depot along with a 2’x4’ sheet of 1/2” MDF. I originally tried 1/4” MDF but it bent quite a bit with the projector on it. I built a little lip all the way around so it won’t slide off if we have a little earthquake or something like that.

The mount is far from beautiful, but it’s functional. Once I get around to painting that wall, the shelf will be painted to match. The next step is probably going to be running the wires down from the projector inside the wall. That’s not going to be simple though because it’s mounted up in the trusses of the elevated ceiling and I’ll need to cut the wall open halfway down to get through the horizontal piece of the truss.

It works wonderfully though. It creates a lot more seating area underneath and feels a lot more professional. It also means that when people get up they don’t have to walk in front of the image, and if we ever get a Kinect, we’ll be able to play it without blocking the screen.

There are a lot more projects like this coming, but it has gotten to a point where I can focus on a few other more pressing house projects.

Network Cabling

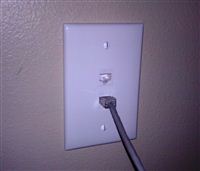
While I would love to have network cable installed in the entire house and run to a nice patch panel, realistically that’s either going to take me forever or cost a lot of money. So for now I’ve settled with running a couple wires from the family room to the theater room. The rooms sit on top of each other and share a wall in the garage, so it was a pretty simple job. I ran the cable out through the wall in the family room to the garage, up the other side of the wall, and then punched through into the theater room. It ended up looking really nice because all of the networking gear can stay upstairs in that room and the family room just gets the TV and a PC to drive it.

One great tip I got from Logan was to drive a six inch nail through the wall before cutting into it. This not only helps you locate where you need to cut on the other side of the wall, but it will also give you a hint if you’re trying to cut through something solid between the walls.

This is a tiny step forward, but I’m excited about what this room is going to turn into!

P.S. You may have noticed that I started a new blog category called “Man Cave.” Any time I do an improvement to that room, I’ll be posting it with this tag so that you can find them all easily if you are interested.

The Home Theater Begins

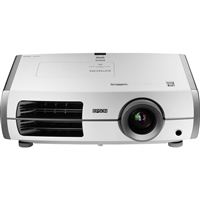
Tyla thinks we bought this house so that we’d have more room, own some dirt, etc etc etc. Wrong. We bought this house so that I could have a projector again. Those of you who have been reading for a while may remember that back in Jersey, we had a little theater room set up on the ground floor. That projector was only 800×600 but boy was it fun! There was no room for a projector in the condo, and ever since leaving that projector behind in Jersey, I’ve bided my time waiting for the opportunity to arise again.

As we walked through various houses, the thought of “where can I stick a projector” was never far from my mind. When we walked into this house, it was obvious. Upstairs there is a 15’x25’ bonus room with a huge wall just begging for a projector. I patiently (I’m lying) waited until we bought the important things like a fridge, but it wasn’t too long before I couldn’t wait anymore. I pulled the trigger on a new projector.

I present to you the Epson 8350. It’s a 1080p 3LCD projector, and depending on how it looks, I’m shooting for roughly a 120” diagonal screen. It’s going to blow my mind when it arrives. I won’t even have any furniture to put in that room yet, but details details, first things first! You can expect a lot more photos of this as soon as I get it set up. After that I’ll have a lot more projects lined up to make this into an incredible man cave!