
 The first step after getting the projector running was getting it mounted. One reason I picked the Epson 8350 is that it has a huge amount of available vertical and horizontal lens shift. This allows you to place the projector just about wherever you want and then place the image at the right spot with no distortion. It will move the image about one screen above and below the lens and one screen right and left of the lens. There aren’t many other projectors in this price range that will do that.
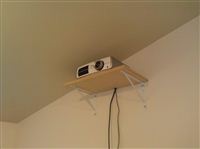
As you can see in the picture, I didn’t purchase a fancy mount. And because of the lens shift capabilities, I didn’t even do an upside down mount like you would normally see. I grabbed a couple shelf brackets from Home Depot along with a 2’x4’ sheet of 1/2” MDF. I originally tried 1/4” MDF but it bent quite a bit with the projector on it. I built a little lip all the way around so it won’t slide off if we have a little earthquake or something like that.
The mount is far from beautiful, but it’s functional. Once I get around to painting that wall, the shelf will be painted to match. The next step is probably going to be running the wires down from the projector inside the wall. That’s not going to be simple though because it’s mounted up in the trusses of the elevated ceiling and I’ll need to cut the wall open halfway down to get through the horizontal piece of the truss.
It works wonderfully though. It creates a lot more seating area underneath and feels a lot more professional. It also means that when people get up they don’t have to walk in front of the image, and if we ever get a Kinect, we’ll be able to play it without blocking the screen.
There are a lot more projects like this coming, but it has gotten to a point where I can focus on a few other more pressing house projects.