A laptop recently landed on my desk full of some lovely viruses. I won’t say who it was, but really, you shouldn’t be too embarrassed. These virus writers are good at what they do and it’s easy to be tricked. As I fixed up the laptop, I thought about a short series of blog posts that might be of interest to many of you readers, not just the household that got hacked. I’ll cover how virus writers try to get you through your browser, how they attack via email, and then what to do after you suspect you’ve been hacked.
The most common viruses get onto your machine because you clicked something. It’s pretty difficult to have a computer sitting idle with no human in front of it and get a virus. We are the weakest link. So when hackers try to attack you via websites, they’re going to present you with something that is out of the ordinary, but just plausible enough that you’ll click on it. These popups might seem fairly legit. Here’s an example:
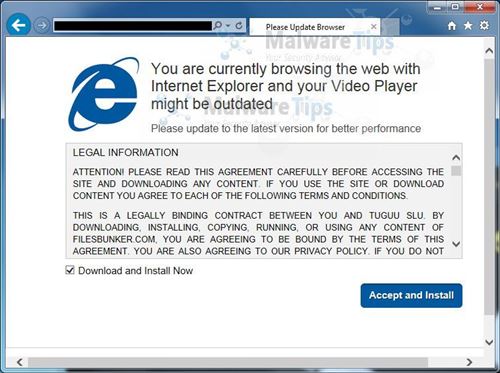
A geek will look at this and know it’s fake, but to the general populace, this seems like something serious that should be fixed by clicking Accept and Install. How can you tell it’s fake? That’s tricky but some basic ways are that this installation box is inside of a browser window. That’s your first red flag. What video player is it trying to update? If it’s going to install something, it should be pretty specific. If you have questions you could take that product name and search for it.
But really the best way to defend against this type of thing is to know the legitimate ways you’ll be warned about this type of thing and then be incredibly suspicious of anything that tells you to install something or “click here to fix your computer.” These days, nearly everything that is needed to fix your computer happens automatically in the background via Windows Update. You might see some notifications from Microsoft Security Essentials when you haven’t run a scan in a while but that’s about it.
You should also have Windows User Account Control enabled. Whenever a program tries to install on your machine or access protected areas of the operating system, it will pop up a warning dialog that asks if you’re sure you know what’s going on. Unfortunately if you believed something like the image above then this probably won’t stop you, but it’s a good backstop to really think about what you’re doing.
So if you get a popup that says you have a virus or that is asking you to install something unexpected, just stop. It’s probably a lie, but just in case it’s legitimate and Microsoft Security Essentials is trying to save you, snap a photo with your phone and email it to your favorite geek. Ask them if it’s legit and what you should click. You might save yourself a lot of trouble.
 Having a child has made me realize that I have way too many hobbies. Or rather, I have too many hobbies to sustain. When we transfer to new groups at work, the tradition is to send out mail introducing yourself and talking about your hobbies and interests. I included skiing, hiking, motorcycling, target shooting, phone and Win8 development, wood-working and RC airplanes. Even then I felt like I left some out! If there are 52 weekends in the year and a big chunk of them are taken up with family plans, there’s not nearly enough time left to devote to all of those.
 I heard about Peter F. Hamilton from enough distinct sources that I decided it was time to dive into his books. I started by reading
  We’ve gone through lots of books and Amazon reviews trying to find the right products for our home. Here are a few of our favorites:
 Our little man turned eight months old a couple weeks ago. It’s fun to look back at the photos from just a couple months ago and see the tremendous amount of changes. He’s still a very happy kid with lots of smiles no matter what’s going on. When he’s happy he loves to talk and roar, and if he’s really excited he lets out an ear piercing squeal. He learned to crawl recently and then almost immediately started pulling himself up onto whatever he could find. He’ll grab onto your fingers and happily walk around the house. I wonder how long it will be before he’s doing that on his own?

 A newfound RC addiction in the middle of the rainy season in Seattle is a tough combo. Thankfully, indoor RC has been making tremendous progress in the last couple years. One of the products near the top of the list right now is the
  This has been a very bad year for skiing in the Pacific Northwest. The bad weather, combined with my lack of free time, means that I haven’t had any days on the slopes yet. That all changed about a week and a half ago when a series for storms started hammering the mountains. They were receiving about a foot a day every day.