 On Friday the 14th, we had one of our regular OB appointments. Tyla was 9 days past her due date and while the fetal heart monitor tests were looking pretty good, her amniotic fluid was dropping quite a bit. The plan was that if she hadn’t gone into labor by Sunday morning, she’d come in to start the induction process, go home for 24 hours and then go in Monday to really get the ball rolling. When our OB ran that past the on-call doctor for the weekend, he wasn’t comfortable based on the day’s test results. He wanted to get the induction started sooner.
So on Friday night, we checked in to the hospital at 7:30, and after a couple hours of paperwork, they started her on Cervidil. She was hooked up to a fetal monitor and a contraction monitor. We finally fell asleep around 12:15 but 45 minutes later, the nurse came in and asked if Tyla was feeling the contractions. “What contractions?” The nurse said they were moderate and was really surprised that Tyla couldn’t feel them since they were clearly visible on the monitor. (She had been watching the screen out in the hall.) She seemed a little concerned about how the baby was reacting and asked Tyla to roll on her side a bit. She said Elijah’s heart rate was dropping quite low after each contraction and staying low which indicated that he was not handling it well. She said she need to call the doc and when she reached for the oxygen mask I scurried out to the hall to call our doula.
By the time the doc arrived about twenty minutes later, the nurse told us she was pretty sure that Tyla was heading for a c-section. After 30 hours of natural labor and birth classes, this was quite a blow to our plan. We tried all the lines of questioning that we had learned, but the answer was always the same. There was no choice to make the doctor was pretty convinced that no matter how labor started, this was going to be the result and that if we hadn’t been on the monitors, it would have ended very badly.
As we were trying to resist signing any papers, our doula walked in. The doctor had seen her in the hall and brought her up to speed before she walked in so when she saw us she confirmed that we really did need to do this to save our baby’s life. Doulas aren’t cheap and over the past few months, we had gone back and forth on whether or not it was worth it. With that one single answer, she made that whole fee worth it. Here was someone who specialized in helping mom’s through natural births and avoiding medical interventions whenever possible, but she was fully convinced we needed this procedure.
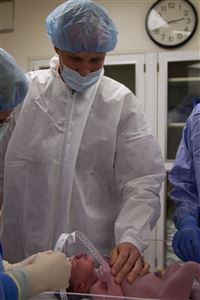
Once we stopped digging in our heals and signed the paperwork, everything kicked into high gear. About 1:30am they were prepping Tyla for surgery and wheeling her off. The doula and I got into our protective gear and went into the operating room with Tyla. I held her hand as the very nice anesthesiologist got her started on the epidural and then I stayed right by her head as they started the procedure around 2:25am.
At 2:39am, Elijah left the womb and was officially born. His first act was to let out a nice stream of poo as they carried him over to the warming table to clean him off and take some measurements. He was letting out a very healthy cry when the doula reminded me that this was my baby and I could touch him and talk to him. It was easy to forget in the room full of sterile equipment and gloves. Now I don’t know if this was coincidence or not, but as soon as I leaned over to touch his chest and said “Hi Elijah, I love you” he immediately stopped crying. It was incredible and I was a ball of tears. Of course he started crying again, but we shared an amazing moment.
Within a couple minutes they had finished their tests so I picked him up and held him wrapped in a blanket. We took him the 10 feet back over to Tyla and held them close together. She started feeling a bit sick, and since the baby was out, the anesthesiologist had a full suite of medicines to work with. He turned some knobs and she felt a lot better very quickly.
It took about 30 minutes to get her sewed back up and wheeled back to the room. We laid naked Elijah on Tyla’s bare chest and got that valuable skin-to-skin contact. For a solid hour they sat like this as Elijah rooted around on his own trying to start his first breastfeeding session.
With a c-section, they want you to stay in the hospital for 48 hours so we didn’t leave until Monday morning, but the time was well-spent. Elijah didn’t really feed the first days but everyone told us that was very normal for c-section babies who take a little extra time to clear the amniotic fluid out of their system. Once he was through that phase, the lactation consultants made regular visits to our room to help Tyla get started with breastfeeding.
We haven’t decided if we’ll have more kids, but if we do, I can almost guarantee they will be delivered at Evergreen. It’s routinely ranked as one of the best places to have your baby and it’s easy to see why. Every nurse, doctor, pediatrician, and lactation consultant that we met were incredible people that hold a special place in our hearts. Whenever we had a question about anything, we’d hit the call button on the bed and not only would someone come answer the question, but it would be somebody who specializes in that exact question. The breadth of knowledge and resources at our fingertips was astonishing.
Elijah’s birth was not at ALL what we had planned except for the end result: a healthy mom and baby. And what else really matters? God’s guiding hand is abundantly clear in how this played out and we couldn’t be more thankful.

 We’re starting to get some beautiful summer weekends so I thought I would like out a few of my favorite day or weekend trips.
 Last week our printer, a


 We use Bartells for a lot of our photo printing since it’s so close, but lately we’ve had a lot of trouble using their photo printing website (LifePics). The interface is completely messed up. After trying it in IE, Firefox and Chrome with the same result, I decided to downgraded flash and it worked! I generally use IE with Chrome as a backup, so Firefox is where I downgraded Flash. Here are the steps if you’re having the same problems.
 I’ve been writing on this site every week day for almost the last 11 years, but I could seriously see that streak being broken soon. I knew that a newborn was a lot of work, but wow, this isn’t what I expected! He’s a great kid and is doing very well, but the goals I have to set for myself each day are TINY. Thankfully Mom and Dad are staying with us for a bit and have been an enormous help keeping the house from falling apart and giving us some breaks so we can get some sleep. I’ve been trying to add up the little bits of sleep that I’ve gotten each night and I can’t figure out how I’m still able to function. But hey, it works and everyone is healthy so I’m not going to complain.
 My digital life started in 2002. In the years leading up to 2002, I have maybe ~50-100 photos per year. After that I have thousands of photos per year. Couple that with the explosion of the internet in the late 90s, archaeologists are going to know a LOT more about the year 2010 than they will about the year 1990.
Makeshift Greenhouse
Temps in the Seattle area are often just a bit too cold for plants to grow well in a garden, so I decided to try a makeshift greenhouse. I picked up some PEX tubing and 0.7mil painters plastic. A couple clothespins later and I had a very rudimentary hoop house. It seemed like it was working really well for the plants that it covered so I decided to try a little experiment. I planted three zucchini plants at the same time and once they had all popped up, I put the hoop house over two of them. The plants circled in blue had the house and the one without is circled in red. What a difference! I think next year I need to expand this greenhouse idea.