
One of my favorite rooms in this house is the garage. Coming from the extremely tiny garage in the condo, this one feels like a monstrous cavern. I’ve spent a lot of time wondering if I could drive in one bay and drive out another. Or could I do laps with my motorcycle? Watch the video below and find out! I did a lot of laps with the motorcycle but I was trying to make a full loop without putting my foot down. I finally did it in the last shot you see here in the video. I wonder what my neighbors thought?
Snowmaghetti
 As our snowstorm dragged on last week, the pantry started getting thin. Thankfully we’re only a half mile walk from the grocery store, but what fun is that? I decided to invent some dinner. Since they were calling the storm “snowmaggedon”, I decided to call this “snowmaghetti.” The picture is atrocious, but that’s kind of the point. It doesn’t matter what it looks like as long as it tastes good and you can use what you already have in the pantry. So here’s how I made it, but when you make this, you’re required to experiment!
Ingredients
- 1lb of ground beef
- 1lb of chicken
- 1 bag of frozen broccoli
- 1 can of corn
- 1 can of mushrooms
- 1 can of cream of celery soup
- 1 can of cream of mushroom soup
- Cheddar cheese
- 1 box of whole wheat elbow macaroni
Directions
- Cook the meat until it’s done.
- Coat 9×13 baking dish with nonstick spray and then put in the meat, veggies, and soup. Top with cheddar cheese.
- Bake at 375 for about 20 minutes
- Meanwhile, cook the macaroni according to the directions on the box
- Let the dish cool for a few minutes after removing it from the oven so it’s not quite so soupy.
- Serve the mixture on top of the macaroni.
It was surprisingly delicious! The one thing I’ll probably change next time is only using one kind of meat. I wanted to go straight chicken, but we only had one chicken breast in the house.
If you attempt something like this, let me know what you did to improve it. If you feel like Jake and Eddie from Earnest Goes to Camp then you’re doing it right!
Cistern at Gates Foundation
 I’ve been pestering TimS with a lot of questions now that I actually have a yard. His landscaping expertise has already come in very handy. We were discussing various ways to improve water runoff from my roof. It tends to drain back down into the crawlspace making extra work for the sump pump and the previous owners already had a little bit of an issue down there. I think I’ll probably end up installing one of these dry wells, but we started talking about cisterns. He mentioned that The Bill and Melinda Gates Foundation headquarters here in Seattle has a 1 million gallon cistern that is used for flushing toilets and irrigation! The runoff from the paved areas and the roof of the building is collected there and reused.
I know it’s completely impractical for a lot as small as mine, but I can’t stop thinking about it. Sure I’d have to dig up most of my yard to fit a decent sized cistern in it. Sure I’d have to do a lot of work to get all of my downspouts to funnel into it. Sure it would cost orders of magnitude more money than I would save. But none of that means I don’t dream about it!
Baked Mac and Cheese
 I tried making baked mac and cheese a few weeks ago and it turned out gross. I found a new recipe that was supposed to be healthier. We changed it a bit by using broccoli and tomatoes instead of spinach and it was fantastic! I’ve included that change in the recipe. You’re supposed to do a bread crumb topping, but I read that can get mushy if you refrigerate leftovers so I topped with some extra cheese instead.
Ingredients
- 6 tablespoons plain dry breadcrumbs, (see Tip)
- 2 teaspoon extra-virgin olive oil
- 1/2 teaspoon paprika
- 1 package of frozen broccoli thawed
- 1 can of fire roasted diced tomatoes
- 3 1/2 cups low-fat milk, divided
- 6 tablespoons all-purpose flour
- 4 cups shredded extra-sharp Cheddar cheese
- 2 cup low-fat cottage cheese
- 1/4 teaspoon ground nutmeg
- 1/2 teaspoon salt
- Freshly ground pepper, to taste
- 16 ounces (4 cups) whole-wheat elbow macaroni, or penne
Directions
- Put a large pot of water on to boil. Preheat oven to 450°F. Coat a 9×13-inch baking dish with cooking spray.
- Mix breadcrumbs, oil and paprika in a small bowl.
- Heat 3 cups milk in a large heavy saucepan over medium-high heat until steaming. Whisk remaining 1/2 cup milk and flour in a small bowl until smooth; add to the hot milk and cook, whisking constantly, until the sauce simmers and thickens, 2 to 3 minutes. Remove from heat and stir in Cheddar until melted. Stir in cottage cheese, nutmeg, salt and pepper.
- Cook pasta for 4 minutes, or until not quite tender. (It will continue to cook during baking.) Drain and add to the cheese sauce; mix well. Spread half the pasta mixture in the prepared baking dish. Spoon the broccoli and tomatoes on top. Top with the remaining pasta; sprinkle with the breadcrumb mixture.
- Bake the casserole until bubbly and golden, 25 to 30 minutes.
CascadeSkier for Windows Phone 7
 I’ve spent way too much time working on my most popular Windows Phone app this winter. Version 3.0 hit the marketplace in November and I just released version 3.5. There have been numerous updates for various things but biggest changes were support for multiple live tiles and live tiles that flip over to reveal a one day weather forecast. The updates have been very well received and it’s very rewarding to see the positive reviews fly in. Right now this is the #10 paid app in the sports category. I realize that’s not saying a LOT, but I’m still proud of it.
A few years back you may remember that I tried to start a website called cascadeskier.com. That was where the gadget first started and then the Windows Phone app came later. The site was supposed to be devoted to the Pacific Northwest skier. I cancelled it after a few months because it was way too much work for one person to handle and I wasn’t getting the kind of traffic numbers that I was hoping for. I was fed up with the whole thing and I let the domain name lapse. Big mistake. I regretted it pretty quickly, but a squatter had purchased the domain. I patiently waited for two years until they gave up on the domain and then I bought it again.
So now if you head to cascadeskier.com, you’ll see a simple page showing off the Windows Phone app and the Windows 7/Vista gadget. There’s also a demo video showing off the current version of the app.
The astute among you will notice a hint at a Windows 8 version on the site. I’ve played around with it a little, but I really need to devote some major time to that. I think I’m going to slow down on the Windows Phone app updates for a while and focus on Windows 8.
Toilet Repair
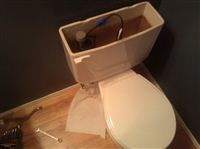 When the inspector went through this house, he noted that all of the toilets had very old gaskets that should be replaced. It wasn’t something we asked the homeowners to fix so I’ve been going through and getting them changed out. I’m far from an expert, but since I had a few issues that were solved by the Internet, I thought I’d give back some of the things I learned.
- Home Depot sells a bunch of products by Fluidmaster. They have mixed reviews about their longevity, but it’s what I’ve been going with. I recommend the model that has two chains. In addition to the normal one, another runs to the float. When you flush, it unlocks the float and lets it drop. This way if you somehow do have a leak, your toilet won’t run until you flush it the next time.
- Some of the Fluidmaster kits also include a nifty pinch valve that fits on to the bowl refill line. You can adjust how much water goes back into the bowl after a flush. I have one toilet that doesn’t need any extra water after a flush so all of that water was being wasted.
- If you’re going to take the tank off as part of your repair, just replace everything including the main gasket between the tank and the bowl. It hardly costs any extra money and then you’ll be good to go for many more years.
- Can’t get those rusty tank bolts off? Take the blade off your hack saw, slip it between the tank and the bowl and saw that bolt off. It’s way easier than trying to use WD40 or something to loosen it up.
- Don’t put your tools away when you’re done. Leave them there for a couple hours and then check for leaks. If you’re like me, you’ll need to give the tank bolts a little more of a turn. I’m always afraid of tightening them too much and cracking the porcelain.
- If it ain’t broke, don’t fix it. The first toilet went smoothly, but the second one was a pain. In retrospect, replacing the filler valve to be the kind that doesn’t run until you flush again was fine, but I should have left the tank bolts and main flush valve alone. It took me days to get past all the leaks and I’m still not convinced that I’m done.
- Don’t invite your wife in to see what the guts of a toilet looks like. She won’t be amused. Ha!
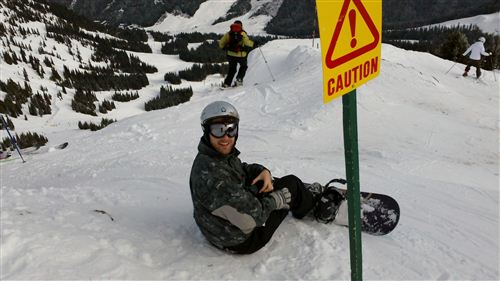
Skiing at Crystal
This winter hasn’t been a great ski year for most of the country. Washington is very lucky to have about an average amount of snow for this time of year. We got most of it Thanksgiving week and it has been pretty dry since then, so although we have a decent amount of snow, it’s not great quality.
A couple weekends ago, I couldn’t take it anymore. I had to get out for my first turns of the year. Tyla and my friend Andy from work headed down to Crystal with me. We had a great day and the groomers were pretty nice. Andy and I snuck off at lunch for a quick run down Powder Bowl. The entry was a bit dicey as we picked through some rock bands, but the snow was decent. Throughout the day, I was smiling from ear to ear watching Tyla get better and better with every run. It’s quite an accomplishment for her considering that I’m her teacher and that starts her out in a big hole!


Motorcycle Miles
I didn’t get to spend much time with my motorcycle this summer. Tim and Chelsea were kind enough to store it in their garage for me while we were between houses. With all the work looking for a house, I didn’t have much free time to ride. So this was the least mileage I’ve done since I bought my first motorcycle. Obviously these are estimates, but I’ve put together a list of how many miles I’ve ridden on my motorcycles each year.

When I had my first motorcycle, I rode almost exactly 2500 every year. In 2009 I got my new motorcycle and put a ton of miles on it. Now that I can get my motorcycle out of the garage without moving two cars, I’m able to ride it a lot more often. Hopefully 2012 will be a good year for riding!
Wall Switches
We have various colors of outlets and switches in our house. I’m planning to do a full sweep through the house replacing them all with white. The big question I’m dealing with right now is should I go for the flat switches or the older style that everyone is familiar with?
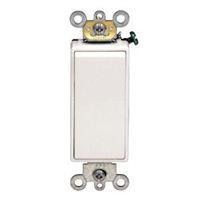
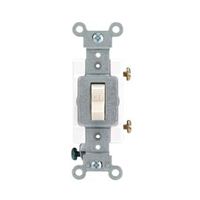
Which do you prefer? Leave a comment or shoot me an email.
Garage Shelves: Part 3
After the success of the shelves and the workbench, I decided to build some shelves and a coat rack by the door. For those of you keeping track at home, this is day four of the garage project.
Instead of designing them myself, I used some plans that I found online. I’ll spare you the details since you can read the plans, but here are before and after shots.
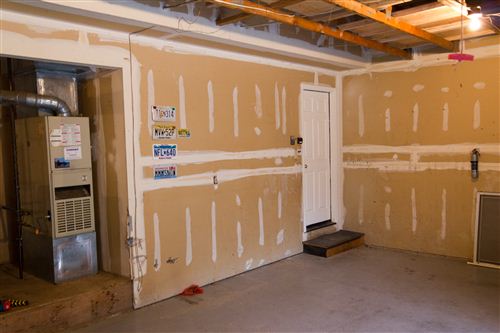
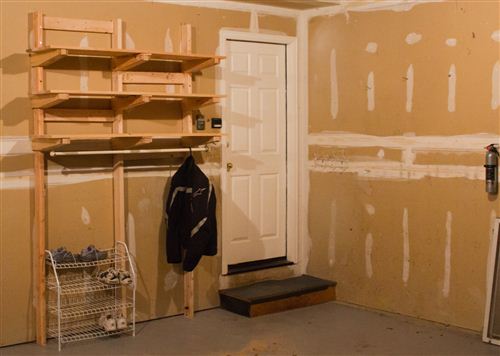
While the plans look nice, I can’t recommend that you build these shelves. They took FOREVER and it was very difficult to mount them to a finished wall. I had to be super careful to make sure the lag bolts went into the studs behind the wall. If I missed, the shelves would end up on top of Tyla’s car.
The horizontal 2x4s look goofy. I added them because the center vertical 2×4 doesn’t tie into any wall studs. It’s there for vertical support only. The horizontal 2x4s are screwed into it and then screwed into the wall studs. Also, that was about the only way I could hold the shelves up and screw them in myself. If I had it to do over, I think I would place 2x4s horizontally across the wall and then build shelves onto those. But I guess once I have some boxes on the shelves, I won’t see that anyway.
The coat rack is made from a bathroom shower rod and some eye hooks. We have coat closets inside, but this will be a good spot to hang motorcycle gear and wet clothes.
I think this will be the end of the garage updates for a while.
[UPDATE] Since I wrote this and took the photo, I have removed the bottom shelf. Our garage door openers don’t have working lights (they’re OLD!) so a motion detector by the door is our only hope of getting some light when we drive in and step out of the car. The bottom shelf blocked the motion detector’s sensing range. I’m not very proud of these shelves. They’re functional but I know I can do better. You might hear more about this some day.