 This is an easy one: what’s the biggest news of the year? I’m married! It’s still amazing that somebody as wonderful as Tyla would want to be married to me, but I’m thankful that she does.
At the end of last year, we were smack dab in the middle of planning mode. The first four months of this year continued that trend. I still maintain that the smartest decision we made during the planning phase was hiring Wendi, our wedding planner. I didn’t think there was any way that would fit into our smallish budget, but trust me, the economics work out. We were able to actually enjoy the planning process (not that I’d want to do it again) and remember every minute of April 10. And what a day that was! The days leading up included a nasty mixture of snow, sleet, hail, and rain, yet Saturday and Sunday were two of the nicest days we had all spring! We planned for rain but reaped the benefits of a gorgeous day. Thank you to everyone who made the long trip out here to take part! If you scroll back through my April posts, you’ll see a lot of wedding-related ones.
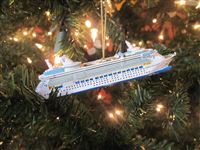
We took a month to get Tyla moved in and recover from the wedding. Then we headed out on an incredible honeymoon! I count myself lucky to have had a lot of great vacations over the years, but this one tops the list. We both regularly bring up memories from that trip, and I’m quite sure that we’ll end up on another cruise before too long. It was spectacular in so many ways that I didn’t expect, which is probably obvious after seeing my incredibly long cruise journal. The video is probably a lot better way to consume that information, or if you’re going on a cruise, you can read our tips.
I think the biggest adjustment we made after getting married was realizing that we had a lot more free time together. For the last couple years, we had been carefully scheduling our visits and doing a lot of late night drives back to our respective homes. It was so nice to say goodnight and walk down the hallway instead of getting in the car for a 40 minute drive.
Tyla’s birthday was quite an adventure. We stayed the night at the fancy Heathman hotel and had dinner at Jalisco’s where we had our first date. The next day, we drove to Crystal and went on an incredible horseback ride. It was just the two of us and a guide riding through incredible mountain terrain and even along the Pacific Crest Trail for a while. As far as trail rides go, that was the best one I’ve ever been on. Tyla followed up that birthday adventure with one for me. She rented a condo in Ocean Shores, invited a great group of friends down and we partied the weekend away as I turned 30.
Thirty is officially an adult. Actually, I think I felt that way when I had a mortgage, but now there’s no fooling myself. I never could have predicted what life would be like at 30, but as I look at how it turned out, I wouldn’t change a thing! I’m married, have a great job, and I’m living in one of the most beautiful parts of the country.
Before I crossed the line into my thirties, I completed a hike that I’ve put off for four years: Camp Muir. I haven’t consciously put it off, but every year, the time slipped away without me completing it. At 10,000 feet high, with the last 2000 feet on a snowfield, it’s one of the most strenuous non-technical (no ropes, etc) day hikes in the area. AndyD, AndyM and I completed that hike on a remarkably clear day. It was such a rush to tackle that big unknown and succeed! It’s hard to describe the feeling, but I hope to return again soon. The whole effort drove home the point that if you really want to do something, get a group of people and put it on the calendar. Otherwise it’s probably not going to happen.
We had quite a few camping trips during the summer but the two biggest were Birch Bay State Park and Potholes. The former was fun because of the usual summer camping crew, and the latter was an adventure in a bit more rustic camping in an area that feels like it’s a world away from the cool and wet Seattle area.
I ripped through a good series of hikes in 2010. In previous years, I’ve spent time exploring the various mountain areas, but this year I really focused on the destination of the hikes. I ended up at Annette Lake, Thunder Knob, Snoqualmie Lake, Crystal Lakes, and Talapus and Olallie Lakes along with a couple hikes up the Cable Line Trail to prepare for Muir. Snoqualmie Lake was the biggest surprise for me in the bunch. The lake was beautiful, but Tim and I bit off more than we could chew when we tried to do that in a single day. I ran out of water with about three miles to go and that last bit was miserable. I’m not sure if I’ll continue the lake exploration next year or maybe switch to something like old fire towers.
Other highlights of the year included whitewater rafting, a bunch of dirt road explorations, Lady Antebellum, Jim Gaffigan, a trip to the Olympics, and a lot of other stuff I’m probably forgetting to mention.
Skiing took a major hit as I only got out a couple times in 2010 and there were no big ski trips, but I obviously had more important things on my plate so that’s not a huge disappointment. And I had been hitting it pretty hard in the previous years so a break has been good to refresh the batteries. I’m hoping that this new ski season will give me a lot more opportunities.
There’s no doubt that 2010 will be remembered for the wedding and the honeymoon, but even ignoring those two events, it was still a remarkable year. I saw loads of new sights, crossed a bunch of items off my bucket list, and best of all, my wife was beside me for a lot of the adventures!
Previous Year In Review Posts: 2003, 2004, 2005, 2006, 2007, 2008, 2009


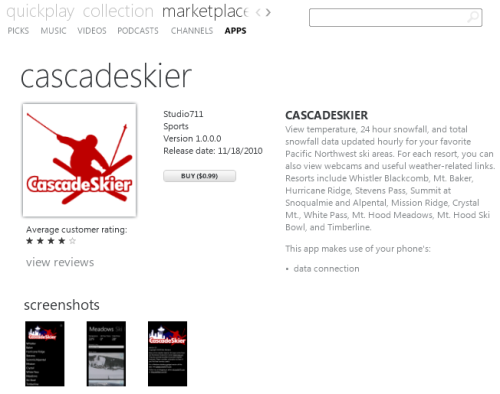
 I’ve always been intrigued by the beauty of Windows Media Center. It comes with virtually every SKU of Windows now, but how can I get my cable TV hooked up to it? There have been various methods for the past few years, but nothing was good enough for me to take the plunge of killing the Tivo and switching to Media Center. I’m planning a couple posts about this project, but the first one will be on the hardware side of things.
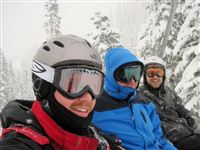 On the Friday after Thanksgiving, I headed up to Mt. Baker with AndyM and LorenzP. If I didn’t have people to go with, I don’t know that I could have crawled out of bed when my alarm went off at 4:30am. It’s about 3.5 hours from my house so I don’t get up there very often. However, they have the most open terrain in the area right now so that was our destination.


 It’s not even Thanksgiving but it feels like winter here in Seattle. Because of the proximity of the Puget Sound, we rarely get much below 40 degrees, but highs today and tomorrow will struggle to reach 30. The TV weathermen have been building hype around snow which whips everyone into a frenzy, but anyone who looks at the maps will see that the chances are very very low for any snow to stick unless you’re in Bellingham, in the foothills, or down south.
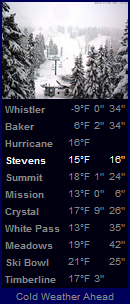
 I was randomly flipping through food.com when I stumbled across this. It turned out to be delicious! The hardest part was finding canned plum tomatoes, but Tyla eventually spotted them on the store shelf.
2010 Year In Review
At the end of last year, we were smack dab in the middle of planning mode. The first four months of this year continued that trend. I still maintain that the smartest decision we made during the planning phase was hiring Wendi, our wedding planner. I didn’t think there was any way that would fit into our smallish budget, but trust me, the economics work out. We were able to actually enjoy the planning process (not that I’d want to do it again) and remember every minute of April 10. And what a day that was! The days leading up included a nasty mixture of snow, sleet, hail, and rain, yet Saturday and Sunday were two of the nicest days we had all spring! We planned for rain but reaped the benefits of a gorgeous day. Thank you to everyone who made the long trip out here to take part! If you scroll back through my April posts, you’ll see a lot of wedding-related ones.
We took a month to get Tyla moved in and recover from the wedding. Then we headed out on an incredible honeymoon! I count myself lucky to have had a lot of great vacations over the years, but this one tops the list. We both regularly bring up memories from that trip, and I’m quite sure that we’ll end up on another cruise before too long. It was spectacular in so many ways that I didn’t expect, which is probably obvious after seeing my incredibly long cruise journal. The video is probably a lot better way to consume that information, or if you’re going on a cruise, you can read our tips.
I think the biggest adjustment we made after getting married was realizing that we had a lot more free time together. For the last couple years, we had been carefully scheduling our visits and doing a lot of late night drives back to our respective homes. It was so nice to say goodnight and walk down the hallway instead of getting in the car for a 40 minute drive.
Tyla’s birthday was quite an adventure. We stayed the night at the fancy Heathman hotel and had dinner at Jalisco’s where we had our first date. The next day, we drove to Crystal and went on an incredible horseback ride. It was just the two of us and a guide riding through incredible mountain terrain and even along the Pacific Crest Trail for a while. As far as trail rides go, that was the best one I’ve ever been on. Tyla followed up that birthday adventure with one for me. She rented a condo in Ocean Shores, invited a great group of friends down and we partied the weekend away as I turned 30.
Thirty is officially an adult. Actually, I think I felt that way when I had a mortgage, but now there’s no fooling myself. I never could have predicted what life would be like at 30, but as I look at how it turned out, I wouldn’t change a thing! I’m married, have a great job, and I’m living in one of the most beautiful parts of the country.
Before I crossed the line into my thirties, I completed a hike that I’ve put off for four years: Camp Muir. I haven’t consciously put it off, but every year, the time slipped away without me completing it. At 10,000 feet high, with the last 2000 feet on a snowfield, it’s one of the most strenuous non-technical (no ropes, etc) day hikes in the area. AndyD, AndyM and I completed that hike on a remarkably clear day. It was such a rush to tackle that big unknown and succeed! It’s hard to describe the feeling, but I hope to return again soon. The whole effort drove home the point that if you really want to do something, get a group of people and put it on the calendar. Otherwise it’s probably not going to happen.
We had quite a few camping trips during the summer but the two biggest were Birch Bay State Park and Potholes. The former was fun because of the usual summer camping crew, and the latter was an adventure in a bit more rustic camping in an area that feels like it’s a world away from the cool and wet Seattle area.
I ripped through a good series of hikes in 2010. In previous years, I’ve spent time exploring the various mountain areas, but this year I really focused on the destination of the hikes. I ended up at Annette Lake, Thunder Knob, Snoqualmie Lake, Crystal Lakes, and Talapus and Olallie Lakes along with a couple hikes up the Cable Line Trail to prepare for Muir. Snoqualmie Lake was the biggest surprise for me in the bunch. The lake was beautiful, but Tim and I bit off more than we could chew when we tried to do that in a single day. I ran out of water with about three miles to go and that last bit was miserable. I’m not sure if I’ll continue the lake exploration next year or maybe switch to something like old fire towers.
Other highlights of the year included whitewater rafting, a bunch of dirt road explorations, Lady Antebellum, Jim Gaffigan, a trip to the Olympics, and a lot of other stuff I’m probably forgetting to mention.
Skiing took a major hit as I only got out a couple times in 2010 and there were no big ski trips, but I obviously had more important things on my plate so that’s not a huge disappointment. And I had been hitting it pretty hard in the previous years so a break has been good to refresh the batteries. I’m hoping that this new ski season will give me a lot more opportunities.
There’s no doubt that 2010 will be remembered for the wedding and the honeymoon, but even ignoring those two events, it was still a remarkable year. I saw loads of new sights, crossed a bunch of items off my bucket list, and best of all, my wife was beside me for a lot of the adventures!
Previous Year In Review Posts: 2003, 2004, 2005, 2006, 2007, 2008, 2009