Marc over at The Wood Whisperer sent a message to members of his guild and asked us for videos of our shops. He’s working on a new video that somehow incorporates videos from normal humans. I have no idea how that will work, but I decided to film a quick video and send it to him. We’ll see how that plays out but I thought that I’d share it here too. The ask was to focus on organization so I hit few points in my shop that I think are interesting.
It’s interesting looking back at photos and videos I shot in the garage in the past. I don’t feel like I change/update my workshop area that often, but it’s in a constant state of flux. It just keeps getting a little better every year.
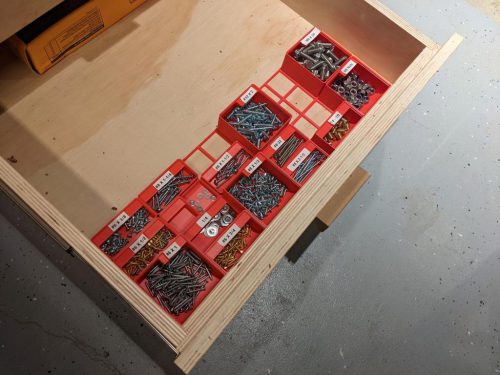
I have a pile of random screws, nuts, bolts, and washers in my shop. I buy little bags or boxes of random sizes of things, use a third of them, and then the bags sit around forever because they are such a mess that I can never find them when I need them. The whole thing seemed so random that I never really put much time into looking for an organization system, but now that I have 3D printer, I have the ability to custom make exactly what I need!
A couple of months ago, Zack Freedman released his “Gridfinity” system. The system is based on a grid of baseplates and then each bin/holder can be easily stacked in various combinations. I was downloaded exactly the bins I wanted, customized his model to make some new bins, and made a series of prints that resulted in a lot more organization. This is a project that I’ll keep adding to, but for now it feels good to have brought some order to the chaos. Not bad for ~$10 in filament!
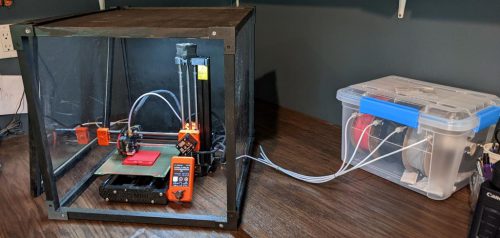
Some people build elaborate 3D printer enclosures to do things like control temperature during prints. I haven’t done anything that complicated yet, but I do like keeping dust and cat hair off the printer. So when it’s not in use, I have been setting a cardboard box over the top of it. It works, but it looks ugly.
The other problem I needed to solve is that filament is hydroscopic. If it sucks up too much moisture from the air, it can cause print problems. I’ve been storing the filament rolls in Ziploc bags with desiccant packs in them. Again, this works fine, but it looks messy and when I want to print, I have to pull the roll out of the bag and get it set into the rollers so it will feed into the printer, etc.
I set out to make an enclosure and dry box that would solve these problems. I’m not sure I’m there yet, but I’m at least at a stopping point for now.
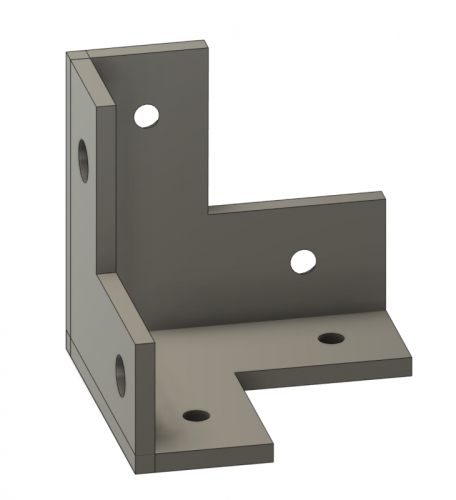
For the enclosure, I decided to go with a minimalistic design. I just wanted to have sticks making a cube and then fill in the panels with either plywood or plexiglass. I modeled up corner brackets in Fusion360 and 3D printed them.
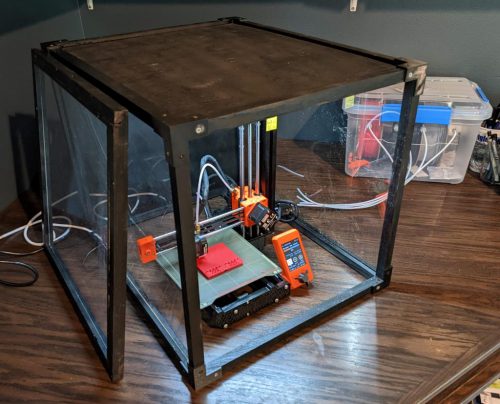
Acrylic seemed a bit expensive, and I thought I could save myself some money by purchasing cheap poster frames. That choice ended up making this a very frustrating project. The plastic frames technically did work but they were extremely thin and difficult to work with. They got scratched up and cracked during the project.
I further complicated the box by making it the wrong size the first time. I forgot how much the bed of the printer slides back and forth so I had to take it apart, cut some of my extra plastic, and try again.
The door was the last piece of the puzzle and by that point, I was tired of the project so I made a frame to hold a plastic sheet and then used rare earth magnets so that it would stick to the face of the enclosure but be easily removable.
Next up was the dry box for the filament. That part went much smoother because Becky Stern has an excellent Instructable article. I 3D printed my own nuts and bolts (with a hole down the middle for filament to feed through) and also printed hangers for the PVC pipe that the filament rolls sit on.
After what seemed like forever, I attached a battery powered LED light to the roof of the enclosure and called it good for now. Maybe this will last me for years, but I could also see getting frustrated with it and wanted to redo it. The basic design is ok but I do want to change the plastic panels, the way the door works, and give it a better paint job. I do really like that I can just leave the filament in the machine instead of unloading it and storing it away every time though.
The audio-visual setup at our church is not very impressive. We don’t ask a lot of it. The main functions are:
Amplifying pastor’s voice
Providing a feed to the screen in the nursery area
Recording the service
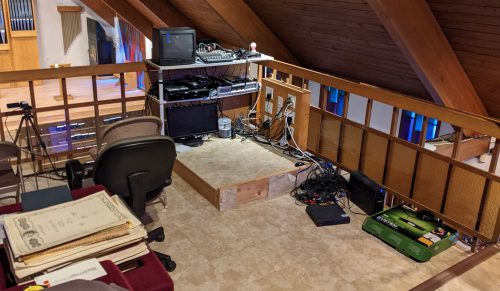
Check out this “before” picture. Believe it or not, this is after I had started replacing some gear and throwing stuff away.
Yes that is a CRT TV and yes it was used every Sunday.
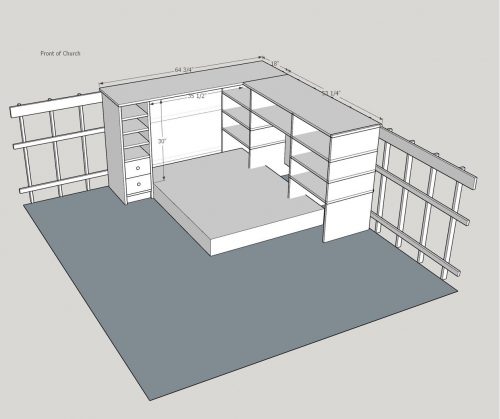
I’m the one who ends up running the equipment most of the time so I decided it was time to take this area on as a project. If you’ve been following my @martenswoodworks account then you’ve seen some progress updates in the stories, but over the last couple months I’ve been slowly building up the new solution piece by piece. I wasn’t confident enough to do it all at once since there are so many unique constraints to a project at church. Things rarely play out as expected. This was my rough plan going into it:
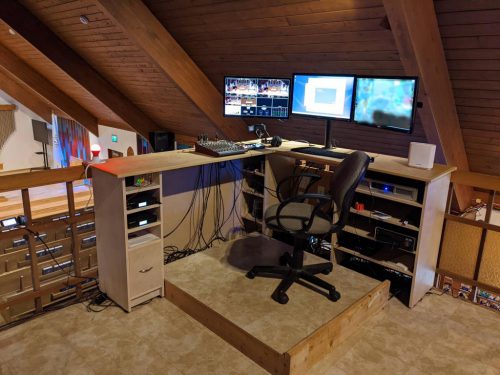
Along the way, I was happy to find someone at work who was selling three 24″ monitors and a monitor arm to hold them all. That was the perfect addition to the project because I’m always nervous about stuff toppling over the edge and landing on people. Here’s a look at the end result:
The screen on the left is the video switcher. It takes input from up to four cameras though we only use two today and it combines in the audio from our audio mixer. It records straight to USB (or in the future can live stream to YouTube.) The middle screen is a PC that I’ll use for uploading to YouTube, using extra features of the video switcher, and, in the future, controlling the TV in front of the church. The right screen is for our security cameras.
If I wanted to post a sermon with the old setup, I would come home with two SD cards from the video cameras and a DVD with audio from the mixer. I would have to edit that all together and then upload it to YouTube. That was a couple hours of work for me when I got home every Sunday. So you can imagine my joy when yesterday I recorded the whole service to a USB stick and uploaded it directly to YouTube before I left church!
I hesitate to post this because there are always more things that can be improved (cable management for one), but I do feel like this is in a place where I can slow down for a bit. Not only is this a nicer to use, it opens more possibilities down the road and hopefully it’s not so intimidating for others to learn.
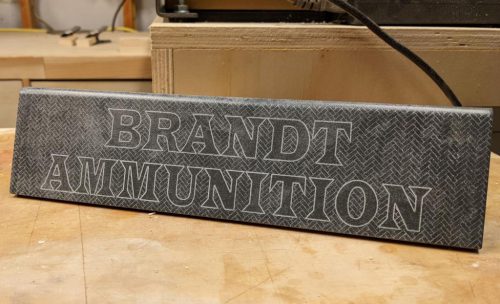
For Christmas, my father-in-law gave me the 120 degree MC Etcher diamond drag engraver bit from Carbide 3D. It fits into my CNC router but is used without the router powered on. The tip is spring loaded so that it will have constant pressure with the surface as it gets dragged along. You can drag engrave many different materials so on a trip to Home Depot, I randomly picked out a couple tiles.
My first attempt was making a sign for the reloading bench that my father-in-law was building. I drew up a design with a herringbone background not knowing if it would work. The sound is a bit like nails on a chalkboard, but it worked great! I ended up going over parts of the design multiple times to get a more defined line.
I’m looking forward to trying some other materials too. I think a smooth granite tile could make really nice award plaque and some acrylic could be neat with edge lighting. The possibilities are endless and it’s a fun tool to have at my disposal.
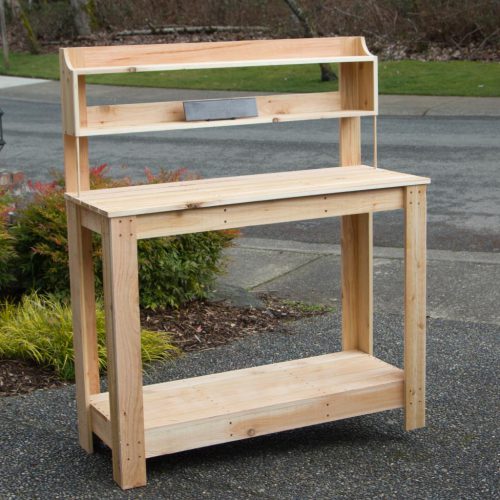
Elijah’s school is having another charity auction this year. I got ahead of the game and donated another wooden flag since those are fairly simple and it brought in a lot of money last year. A couple weeks ago, the school posted on the parent teacher group asking if someone would be willing to make a garden/potting bench. I don’t have enough to do so I volunteered.
My first step was downloading the Potting Bench plans from I Like To Make Stuff. This project isn’t rocket science, but it’s so nice to have all that thinking done for me. I was able to walk into Home Depot and get the right amount of wood in a single trip. I made a few changes to the plans though: I didn’t add the sink in the top and I made two shelves along the top instead of one. Since it was all screws and butt joints, I was able to finish it in a weekend.
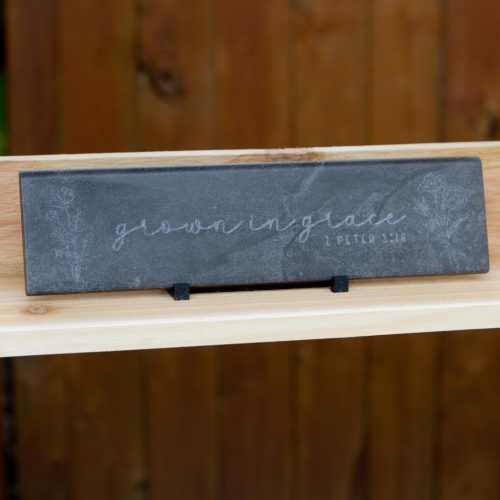
To add a little more to the project, I tried out my new diamond drag engraver bit for the CNC machine. I used it on a random tile that I bought at Home Depot. I picked a vaguely garden-related Bible verse (you have to squint and kind of take it out of context) and found a good SVG on Etsy that I could alter for my purposes. I didn’t etch is super deep, but when you’re up close, it’s easy to read the message and see the flowers on the sides.
I think that this is going to be part of a classroom project. The kids will donate related gardening supplies and then it will all get auctioned as one unit.
And since I was curious about wood prices when I started this project, I’ll share that the wood and a box of screws came to just under $200. It’s cedar so it will weather nicely outside or easily accept stain, but you could probably save a little money if it was pine.
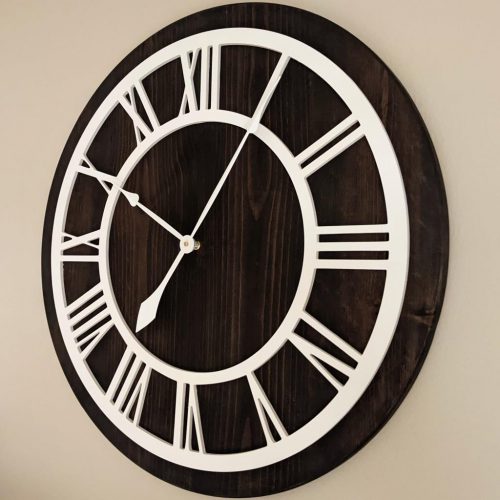
The idea of making a large wall clock has been floating around in my mind for a while. My CNC often gets used for small cuts so the idea of doing something that uses all the real estate was appealing.
I started by gluing up a panel of 1×8″ pine boards to make a blank big enough for the clock. It’s always tricky to get a nice flat panel, especially when using cheap boards from the home center, but it came out reasonably flat and I kept it clamped down to the surface of my CNC machine when I wasn’t out there working on it.
The next task was cutting the face of the clock out of 1/4″ MDF. Instead of starting from scratch, I purchased a vector art design from Etsy, but with all the modifications I had to make to it, I might have been better starting from scratch (or at least from a different store.) I eventually got it all programmed and even though it would take a lot longer, I decided to run the whole pattern with a 1/8″ bit instead of a 1/4″ bit. That would give me more definition in any sharp corners. The whole cut ended up taking around 3 hours with some stopping in the middle to make adjustments.
After a lot of sanding, I finished the back with some stain and used an off-white spray paint for the face. I usually got for pure white but decided to try off-white this time. I wasn’t sold on the idea until I got to the very end of the project.
For the clock parts, I used clockparts.com. I had used them once before and was happy with their stuff. This time I purchased their high torque clock movement to support moving those giant hands. When the parts arrived, I sprayed the white hands to be the same off-white color as the face.
I cut the blank into a giant circle on the CNC and I was careful to hole right at the center which came in handy for finding the same center again later and for mounting the movement. With the blank flipped over, I pocketed in a whole for the movement and I also added some keyhole slots for mounting it on the wall.
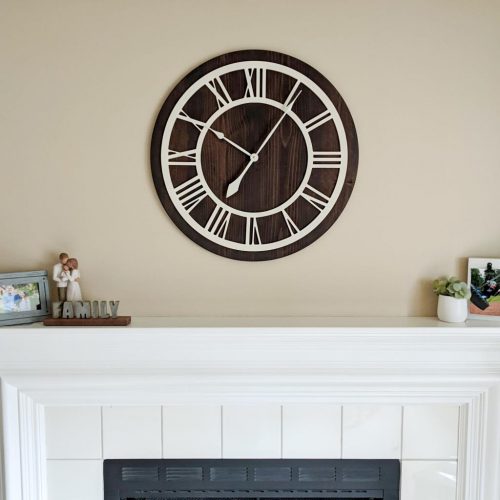
We hung it above the fireplace in the front room and while it’s a fun piece of art, it’s a little tricky to read the time from it. The counterweight on the minute hand and the rings that encapsulate the Roman numerals are all distracting. I don’t know that I’d change the design at all though.
I see these on Etsy and Instagram and feel “meh” about them in general, but I’m super happy with how this project came out. It wasn’t a huge project but it had enough small new things in it to really entertain me.
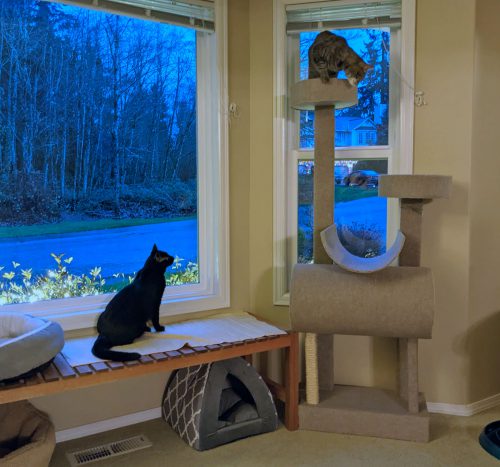
When we got the cats, we bought a cat tree so they would have something to play on immediately. But every time I walked but it, I thought it would be a fun project to attempt on my own. After doing some research and getting a ton of inspiration from this video by Matt Weere, I decided to jump in.
I started by drawing it out in Sketchup. This is pretty much a direct copy of the one in the video but since there were no plans, it helped to at least do a rough drawing first.
The carpet was always the biggest blocker when I thought about the project. Buying remnants is the cheapest way to go, but where can I get just the right amount and not end up with gobs of extra (or too little.) I found out that you can buy carpet from Home Depot by the foot. It comes on 12′ wide rolls but you only need to buy one 12′ strip at a time. I went there with the intention of doing that but ended up getting a 6’x9′ piece of indoor/outdoor carpet like what you would lay outside of a camper. I thought that was a smart move because it was cheaper and easier to work with.
It wasn’t a smart move. While it was cheaper and easier to work with, it doesn’t look as good because you can’t hide staples in it, and you can’t join the fibers together at the seams.
That being said, it did work out ok. It just doesn’t look as nice as I had hoped it would. I used 12″ carboards tubes (meant for doing concreate work) for the various circles in the project and the rest was just a few 2x4s and some 3/4″ plywood.
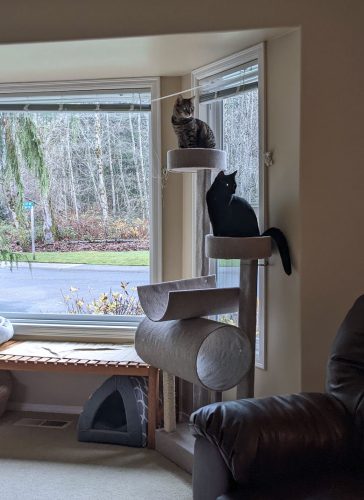
The cats were hesitant about the new structure but quickly warmed up to it and they can regularly be found sleeping on it. The circles on top of the posts are probably a few inches too small (our cats are 10-11 pounds) but they don’t seem to mind and they love having another view out of the window.
If I was going to do it again… I wouldn’t do it again. Covering shapes with carpet is tough and it would have been even more work with shaggy carpet. I won’t mind paying for the next one as much now that I know how much work goes into making one. I do have some other cat projects in mind, but I don’t think it will be another tree.
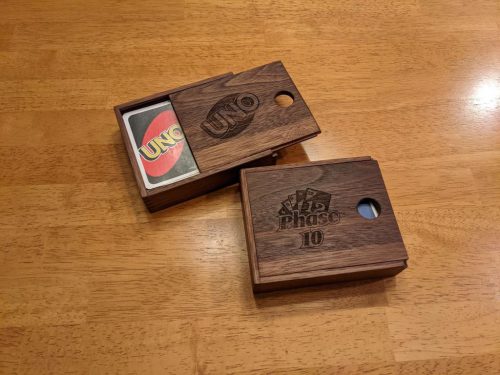
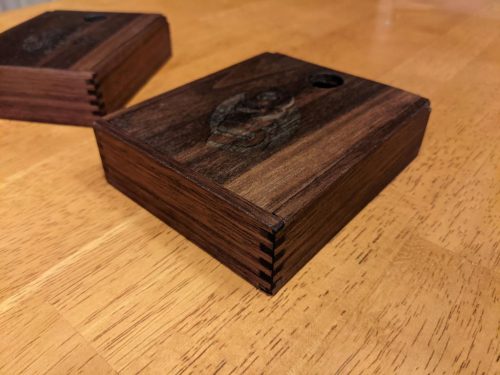
We play quite a bit of Uno and Phase 10 in our house, but just like when I was growing up, the boxes for those games are barely holding together. I thought it would be an interesting project to try and build boxes to hold the cards, and it would be a good way to use up some scrap wood too.
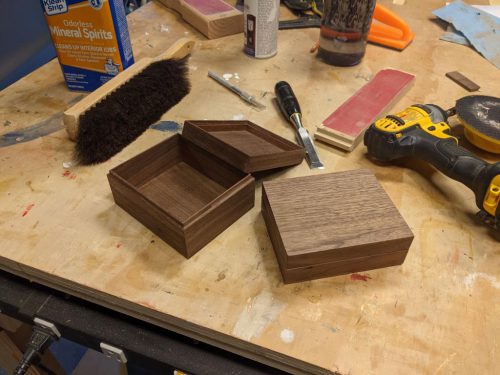
My first attempt used a method that I learned about from Steve Ramsey, though I’m sure he didn’t invent it. With some careful router work, you can end up with a lid that perfectly fits onto the box. The corners were 45 degree miters while the top and the bottom fit on with some rabbets. The router cuts technically worked ok, and one of them was sufficiently snug, but the other one was way too loose. There’s a very fine line between not fitting and too lose. Since the lids flopped off and I didn’t feel satisfied, I finished the boxes with spray lacquer and gave them to Elijah.
I wanted to try again, but instead of just remaking the same thing, this time I decided to make box joints. And instead of having the top and bottom overlap the sides, I set them into dadoes in the does so they’d be flush. The lid didn’t get glued in and was able to slide out the shorter front piece. That plan worked better and those box joints are really solid, but I still had fit issues. One lid fit very well and I got too cocky on the second one and sanded just a hair too long. It was good enough to use though. I thought it would be fun to put the logo into the top of the boxes and I tried making a paint mask with the Cricut as well as using a mask for a Scorch pen, but the paint didn’t look great and the heat for the Scorch pen ended up warping the wood. In the end, I used the laser cutter at work to engrave the logo on the top of the boxes, and they got finished with boiled linseed oil.
Is it overkill? Of course! But I enjoyed making all four and learned lessons that will help the next time I make a box… and a lot of woodworking is a variation on making a box.
While I was making this, I counted our Uno cards and we were missing quite a few so I ordered a new set on Amazon. The day after I wrapped up this project, the cards arrived… in a nice tin case.
(Somehow I forgot to blog about this project from December of 2020 so I’ll make up for it now…)
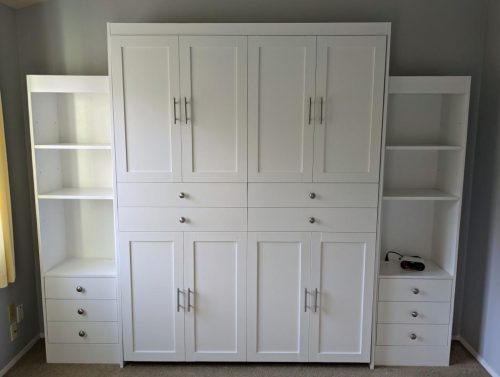
I often walked past our guest bedroom and thought that it was kind of a wasted room or at least a luxury. We had entire room of our house that got used maybe a week out of the year. Then COVID hit and it was clear that we weren’t even going to have house guests for even that one week of the year. We decided it was a good time to put in a murphy bed.
It’s not a cheap project though. First I had to buy a hardware kit. There are a number of similar items on the Rockler website, but I chose the Vertical Deluxe Murphy Bed Hardware Kit. I chose that one largely because it had a tension adjustment so that the spring could be tuned for the weight of our specific mattress. There was a lot of wood to buy for the project too, but since it was going to be painted, we saved some money with pine plywood and poplar for the trim.
I looked at a few designs around the web and we liked having bookcases and drawers on each side of the bed along with some extra trim and hardware on the front to disguise it a bit.
For the bed itself, I used the plans that came with the kit. I didn’t want to mess with that at all as the pivot points need to be very exact for everything to fit. For the side pieces, I mostly used some plans from a different murphy bed kit on Rockler’s site. It was a big build but nothing was too complicated. It was a bunch of boxes inside of other boxes, but I suppose most woodworking projects could be described that way.
I usually use random paint from the big box store, but this time I decided to try an water based acrylic alkyd paint from Sherwin Williams. You can read up on that kind of paint yourself, but it was supposed to give a nicer finish than a standard latex paint. The weather was too cool to paint in the garage which meant our bonus room got turned into a painting zone. I laid out drop cloths and painted as many pieces at once as I could fit. It probably would have been even nicer if I could spray it on, but it looked great even brushing it.
I had a difficult time getting the rectangle around the bed to be square (the part that stays upright.) I could hide the gap difference with the trim on the front/bottom of the bed, but it was very obvious when I put the bookshelves next to the bed. I ended up caulking the gap and voila, problem solved.
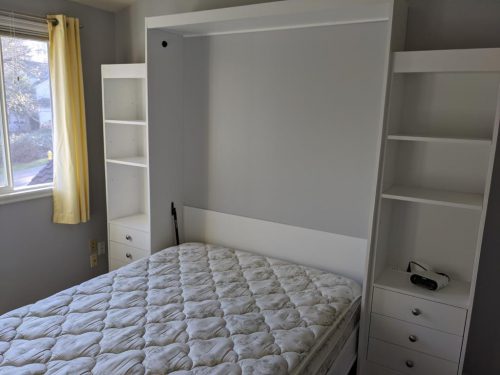
The bed and the shelves cover up an outlet so I added some recessed power strips to the bed-height shelf on each side. They have two power plugs and two USB plugs each which should be enough for people who are charging their phones at night. We’ll add a small lamp to each side as well, but we haven’t gotten around to that yet.
After painting everything and attaching the pieces to the wall so they wouldn’t tip, I moved on to the trim pieces. Everything on the face of that bed is fake. The whole bed folds down as one piece, but the trim and extra hardware pieces make it look more like cabinets and less like a murphy bed.
Elijah slept on it one night and declared it a success, but otherwise, the bed has remained folded up and we’ve been enjoying the extra space. It’s our Room of Requirement! Most often it has been used for puzzles so we can easily close the door and keep the cats away when we’re not in there.
This was a big project but I knocked it off in just a few weeks. I had a lot of vacation time to use up at the end of 2020 so this project kept me busy and made me feel like I wasn’t just wasting my vacation away.