Did you know that you can get a passport book and collect stamps at the national parks? There are various options available at americasnationalparks.org and it seems like a neat idea that we might get for Elijah.
That got me thinking about all the national parks that I’ve been to. Thanks to Mom directly helping to create this list and for scanning in lots of old slides and photos that I used as references.
Shenandoah National Park (1989)
Gateway Arch National Park (1989)
Mammoth Cave National Park (1992)
Badlands National Park (1994)
Rocky Mountain National Park (1996)
Gettysburg National Park (1998)
Acadia National Park (1999)
Everglades National Park (2003)
Mount Rainier National Park (Many times starting in 2006)
Olympic National Park (2009)
North Cascades National Park (2010)
I’ll also include Indiana Dunes National Park, but I was there long before it became a national park in 2019.
The full list of “national parks” is huge because it includes landmarks, sites, trails, memorials, rivers, gardens, towers, islands, etc. I restricted the above list to anything with an official name that ends in “National Park”, but here are some other places I’ve been that don’t fall into that category:
Frederick Law Olmsted National Historic Site/Niagra Falls (1993)
Mount Rushmore National Memorial (1994)
Pictured Rocks National Lakeshore (1998)
I visited many different DC sites on two separate trips in 1998. One was with my school and the other was with my family.
Mount St. Helens National Volcanic Monument (Many times starting in 2007)
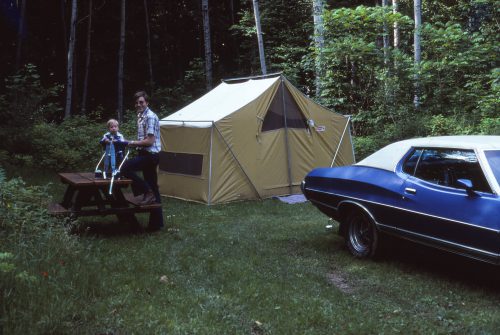
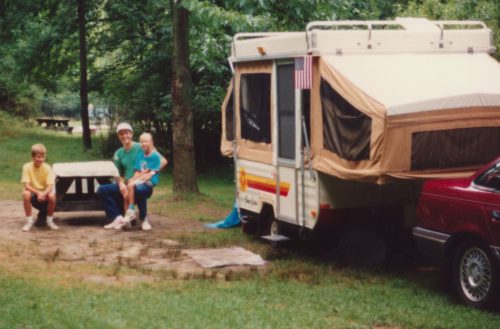
The trips before 2006 were family trips. Those trips started off in a tent and then eventually moved to a pop up camper. The camper felt so fancy because we had a dry place to hang out as a family when it rained and there was a fridge so we could avoid dealing with ice and coolers! (Thanks to Mom for apparently taking both pictures.)
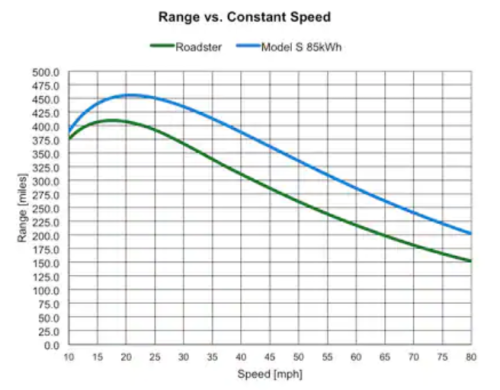
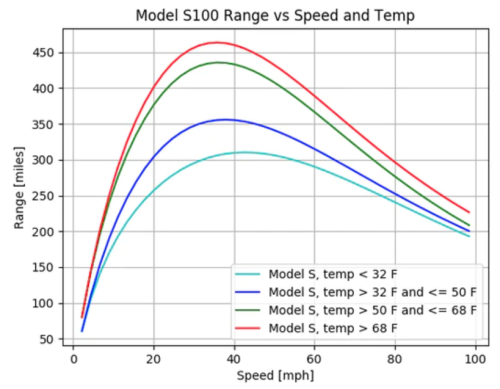
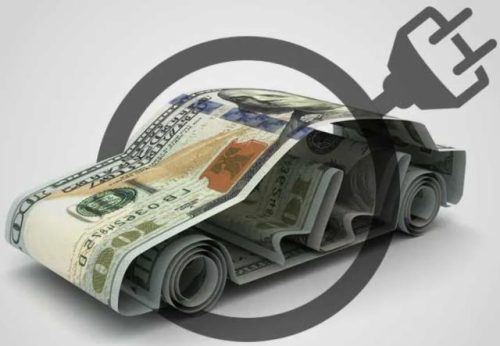
When driving a car powered by a standard internal combustion engine, the speed that gives you the best fuel efficiency is somewhere shortly after the point where you can cruise in the highest gear. That’s generally around 40-45 miles. But electric vehicles don’t have gears, so what speed can I drive if I really want to get the most range?
The short answer is that somewhere around 25-30mph gives optimal range, but the full answer is more complicated.
Other than driving speed, one of the biggest factors is how much air conditioning or heating is being used. Heat in a traditional car is free except for the blower motor, but in an electric vehicle, you pay to generate both hot and cool air. It’s a battery load that varies with temperature, not speed. Other electric loads such as headlights and wipers along with things like tire inflation, elevation, wind, and extra weight can all play a part as well. Most tests are assuming that HVAC is not used and that all the other factors remain constant. Real world values will vary.
Tesla did a blog post back in 2008 about this topic with the original Roadster. Unfortunately the images don’t load for that post anymore. They have an updated post from 2012 when the Model S was coming out and that does have all the charts available.
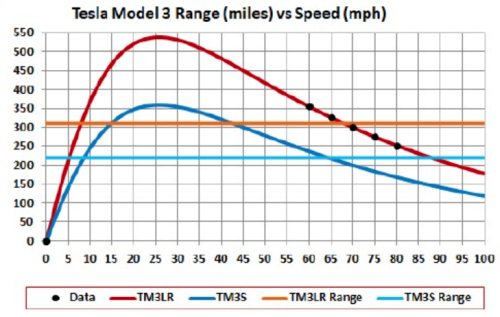
Another chart that I found with an image search shows a similar curve for the newer Model 3.
A post on cleantechnica.com does a breakdown of how the Model S range varies with the outdoor temperature. They pulled a lot of real world data donated by owners to generate this chart. It shows how much range can be lost when it’s cold, mostly because of cabin heating. The falloff in cold weather performance is one clear area where EVs lag behind traditional vehicles, but if you go look at Norway (a place we’d all agree is generally “cold”), more than 80% of their new cars sold are EVs. The whole country is transitioning to it. So while this is something to keep in mind, it’s far from a blocker for adoption.
The curves in these charts are generally more interesting than the actual y-axis values because those values will depend on your specific model. And while the shape of these curves is pretty consistent across the Tesla lineup (except maybe the Model X which is huge), they’re no the same across brands. You’ll generally find that there aren’t many cars that sip their battery power more efficiently than Tesla. Their experience really pays off in that category.
A lot of this data is available because Tesla is collecting so much of it and it can be easily shared/collected for these studies. These same laws of physics apply to traditional cars too, but we’re a lot less conscious of it because we can’t see the data as easily. I’ve never heard anyone ask “How much range did you lose when you changed your rims?” or “How much range do you lose because you added running boards to your truck?” But with a Tesla, it’s relatively easy to measure all these impacts.
So now I have a car that’s fun to drive, cheap to operate, and spewing out huge amounts of data! Win win win!
Like most of you, we get lots of junk mail. It’s kind of absurd. It all just goes straight in the recycling and aside from wasting my time, it feels like a waste of resources too. I’ve used Catalog Choice in the past to try and stop some catalogs. (I never kept track of the ones I tried to stop so I don’t know if it worked.) Now I’m trying six months of Paper Karma. I’ve been throwing junk mail into a box for a couple months so that I can make good use of my subscription time for the service.
The way the app works is that for every piece of junk mail you get, you scan it with your phone as a quick way to search for the sender and then they take care of contacting the company to try and get you removed from their mailing list. They have direct access to the recipient lists for quite a few companies, but for others, they have to take slower methods of notification that may or may not work. I scanned in the whole pile shown in the image and probably about half of them have a “success” status already which means that I shouldn’t continue to receive those mailings. It’s not a guarantee, but even if it cuts my junk mail in half, I’ll be happy.
In the last three months, one in every 26 cars sold in the United States was a Tesla.
Staggering! In the third quarter of 2022, 6.1% of all US auto sales were full electric vehicles with about two thirds of those being Teslas and most of the Teslas are either the Model Y or the Model 3. With the way things are going now, it is looking like the fourth quarter will end with Tesla will be one of the top 10 auto brands by quarterly sales in the United States. They’re growing very rapidly while traditional auto maker sales are still roughly flat.
Electric vehicles are very common in my area. I pulled up to a stoplight the other day driving our Model Y and of the six cars waiting at the light with me (all going the same way, not spread around the intersection), FIVE of them were Teslas. Ford is coming on strong too and looks to be in solid possession of second place. I know that I’m living in a bubble of EVs so while the percentage of EVs being sold is huge out here, I didn’t expect it to average out to 6.1% for the whole country.
There’s a long way to go as the country shifts to EVs, but it’s awesome seeing so many people choosing this on their own and not being forced into it by legislation. EVs might not be for everyone yet, but they’ve certainly earned serious consideration in every car purchasing decision.
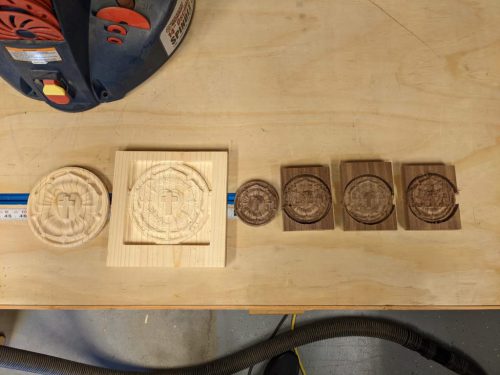
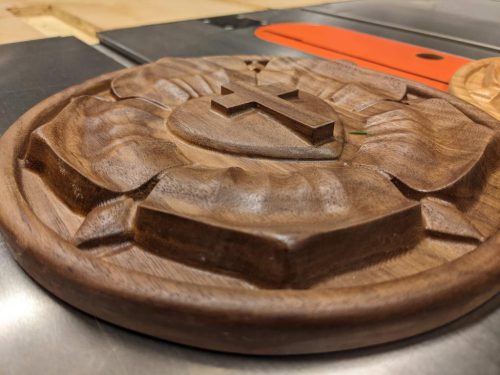
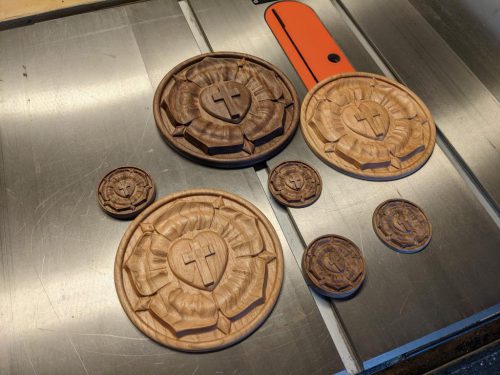
All of my CNC work up to this point has been two dimensional. I draw lines and then have the machine cut them to a certain depth. But there’s a whole other world of three dimensional carving that I have never tried so I invented a project to learn a bit about that.
For a model, I picked a Luther Rose model from Thingiverse. I brought it into Fusion 360 and spent a long time learning about all the different 3D tool paths that it has. I knew that I wanted to do one roughing pass to get rid of most of the material and then do a finishing pass with a much smaller bit to get the detail. I planned the first pass with a 1/8″ endmill and then a follow up with a 1/16″ ball nose mill. (I had to buy a special collect to hold the 1/16″ endmill because it only had a 1/8″ shank.)
From there it was off to the CNC to try it out. What followed was a long series of errors. The board would slip, I’d lose my zero when I changed bits and not be able to reset it, the bit would slip in the chuck etc. I started with some cheap pine boards and eventually moved to 3″ walnut squares.
These are all failures… err… steps in the learning process.
With much perseverance, I finally got it dialed in! On the 3″ walnut pieces, the first pass took about an hour and then the second pass would take 3-4 hours. Usually I stay in the garage when the CNC is running, but this was the first time that I let it run attended. I would go out and check on it regularly and I’d watch it via the camera in the garage. Working from home was a big advantage because I could run it throughout the day while I worked.
After I made four successful roses and ran out of the walnut board, I felt like I still had more to learn. I also had some very wide scraps of wood leftover from the dresser build. So next I set out to make a couple 8″ roses out of cherry. I switched to a 1/4″ endmill for the first pass and an 1/8″ ball mill for the finishing pass to keep the total time down. Neither one of those cherry roses was flawless, but with a lot of sanding afterwards, they look great. And then the pièce de résistance was a 9.5″ wide piece of walnut. That one started warping a bit as I cut it, but I was able to salvage it with a lot of hand sanding.
It was a huge learning experience, but it was also a lot of fun. I feel like I’ve unlocked a new woodworking skill! There’s still plenty to learn, but I won’t avoid a project if I need to do some 3D stuff on the CNC.
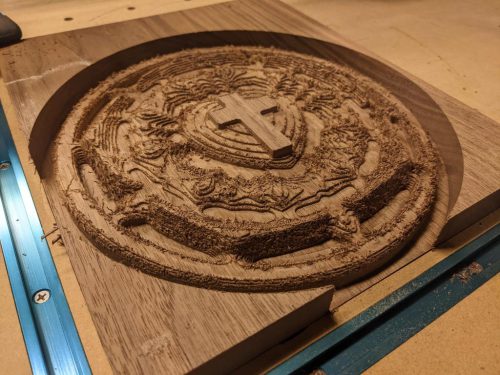
After the first pass with the big piece of walnut
Second pass
Follow me on Instagram @martenswoodworks. I usually post mid-project updates to stories and then make posts for the finished projects.
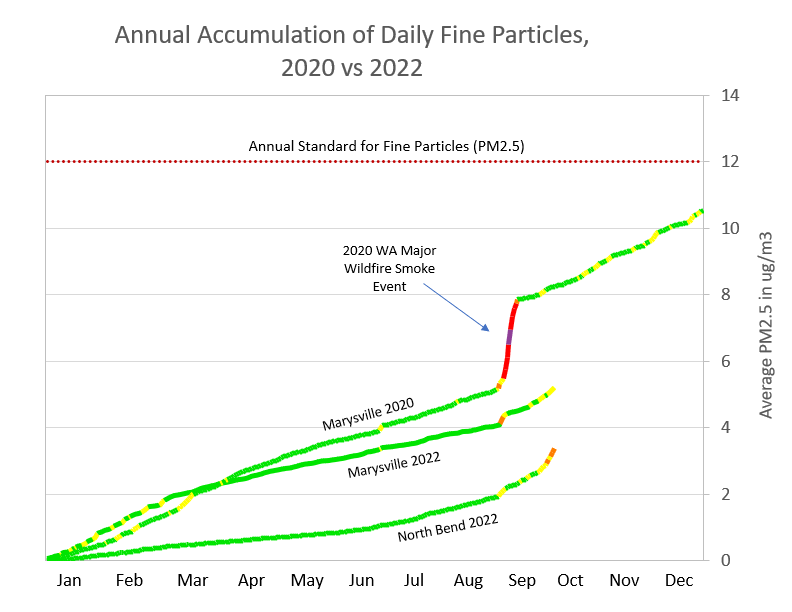
We’ve had a lot of smoke this year, largely due to the Bolt Creek Fire which is burning about 30 miles east of here. Whenever the winds are easterly, we get inundated with bad air quality. When someone asked “Has it been smokier this year?” I got to wondering how you would quantify that. To the data we go!
I run the studio711.com/air website which is a simple view of the air quality right around our house. When Elijah says “Is the air ok outside for me to play?” I can quickly open my phone and see. It pulls data from about 10 different sensors in our area (links for the detailed data are at the bottom of the page.) I’ve been running that since the summer of 2018 so that’s as far back as this post will cover. Here are some stats:
The smokiest day we ever had was September 15, 2020 when we hit 274 ug/m3 which is into the “Hazardous” range of the scale (the worst category.)
If we look at total days where we hit the “Unhealthy” category, 2022 has had the most (12 days) followed by 10 days in 2018 and 9 days in 2020. Dropping down to “Unhealthy for sensitive groups” gives the same ordering.
Looking at Unhealthy days by month, October 2022 ranks third on the list behind August 2018 and September 2020. And since we’re only about halfway into October, we could break that record this month. So far two thirds of our October days have had Unhealthy air quality. But the hope is that as things get cooler and wetter, the smoke should die down.
Looking at it in those terms, this has been a bad year, but looking at the year as a whole, we’ve had it rather good. We went very deep into the summer before we hit wildfire season. The Washington Smoke Blog has a good post about that showing that our total particle count this year is less than it was in 2020.
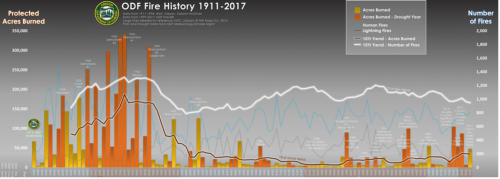
What’s going on? Why all the smoke? I won’t repeat the entire post, but if you’re interested, read Cliff Mass’s excellent post on what a “normal amount of smoke” is for this region. It is well-summarized by this chart showing the number of protected acres burned by year in Oregon.
More fires have returned to the area, but these are healthy for the land and still very different from what “normal” was before we were trying to suppress every fire. He concludes his post with this: “wildfire is a natural element of Northwest ecology and meteorology and that the 50-year period of suppressed wildfire and smoke are anomalies from the natural state of the region.”
We wait all winter for dry, warm weather and when it finally comes, it’s easy to be frustrated by the smoke. Thankfully, modern HVAC systems do a good job at protecting us during these periods even if it does mean that we need to carefully monitor the amount of time we spend outside.
One recurring theme on this blog has been encouraging you to back up your data. Imagine going home and one of the devices in your house is completely and irrecoverably dead. How much do you lose? Are those family photos gone forever? The strategy I recommend is a 3-2-1 strategy: keep three copies of the data stored in at least two places with one of them being offsite.
If you don’t have this today, you can remedy that very easily by going to backblaze.com and paying them to keep an encrypted copy of all your data. They aren’t sponsoring this post, but I’ve used them for ~4 years now both here and at church and I’ve been satisfied. The key features for me are that it runs automatically in the background and there are no limits on how much data you can store which is good because I currently have 5TB stored on their servers.
Since I recently updated my setup at home, I thought I’d give another overview of my setup. We have a central server in the house that runs Blue Iris (security cameras), TeslaMate (Tesla data capture), and Plex (video streaming). It also serves as our file storage. All our computers use that server for file storage. Backblaze is running on that server to keep everything backed up to the cloud. Our phones also have everything backed up to the cloud through services like Google Photos and OneDrive, but periodically I take the photos off the phones and put them on the file server so the full resolution copies are backed up too.
The file server is a bit complicated though. We have about 7TB of data on it, and I don’t trust having all that data on a single drive because I’ve had a handful of drive failures over the years. Sure, it’s backed up to the cloud, but the goal is to never have to resort to the cloud backup. So our file server uses a feature of Windows called “Storage Spaces.” I shove various drives into the machine and then it is configured to keep each file on two different drives. I previously had four 4TB drives (giving me 8TB of duplicated storage) but we were hitting the limits of that setup so I swapped out two of the drives for 8TB drives. (Pro tip if you’re going to use Storage Spaces: leave one port open so that when you get a new drive, you can plug it in and then decommission the old drive. I’ve also done it where I just pull a drive out and tell Windows that it is dead, forcing it to rebuild on the new drive, but that’s a lot messier and riskier.)
When I upgrade drives in the file server, I take the old ones and put them in external enclosures. The Silverstone tool-less enclosure is the best one that I’ve used. These drives get another copy of all our files and they are protected by BitLocker. When I worked in the office I would keep them in my desk at work. I wouldn’t pay to add this layer of protection, but it gives me something to do with the drives that are retired from the file server.
As I mentioned at the beginning, you don’t have to get this fancy to protect your data, but you do need to make sure you’re protecting your data. When (not if) one of your hard drives fail, you don’t want to be bummed that you’ve lost things you can never get back.
Disclosure: I don’t work on the Windows team, but I do work at Microsoft.
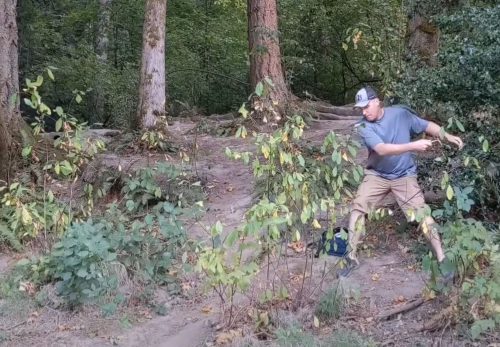
I played my first disc golf round in early August, so less than two months later, I’m clearly ready to enter a tournament, right?
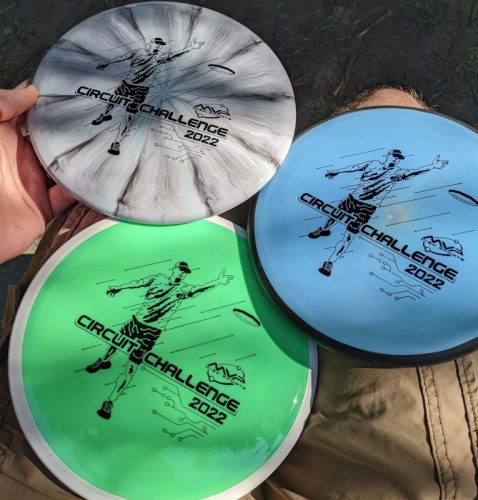
We play most often at Blyth Park and I saw some signs up for a tournament. This was an “unsanctioned” tournament meaning you didn’t need a PDGA (Professional Disc Golf Association) membership to enter. I figured it would be a stretch for my skill level, but the $40 entry fee included three discs and that’s about how much three discs would cost so it seemed like a reasonable way to add more discs to my bag and learn more about the sport. The catch was that you can only use those exact three discs in the tournament even though you’ve never thrown them before.
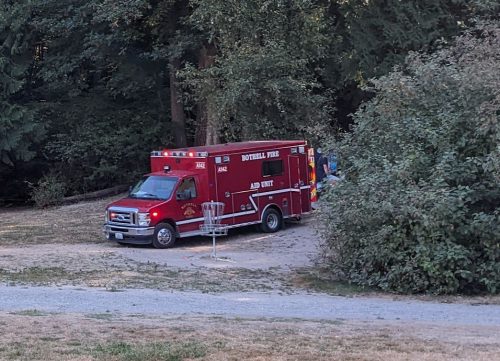
My tee time was at 12:30pm so I showed up around 11:30am not knowing what to expect. We got there just as an ambulance was pulling up. I quickly learned that a player had broken their leg on the course! It winds through the woods and there are some very steep sections. He took a bad step and SNAP! That delayed everything by about half an hour so I didn’t end up teeing off until 1pm. The injury happened in the furthest point from the road so it took them a long time to extract him.
There were three other guys in my group and thankfully they were all nice to play with. Most people in the sport seem to be very nice but there are always a few of “those guys.” The first whole on the course is very difficult. There’s a row of trees across the fairway and it feels a bit like the windmill hole on a putt putt course. You try to get it right but there’s a lot of luck involved (at least at my skill level.)
I was encouraged to see lots of other players hitting the trees too. That was a common theme for me during the day. Lots of other people struggle with the same things that I do. Anway, my tee shot survived the trees (in a different gap than I aimed for) and my next shot from about 100 feet out hit the chains and bounced out! I was thrilled with a par on that hole and told me teammates not to expect more throws like that from me in the future.
We were keeping score right in the UDisc app. I don’t know if there are other disc golf apps, but this one seems to have pretty much cornered the market. They’ve done a really good job with it and I keep all my scores in there. For the tournament, it easily let one person track scores for the whole group and all the stats show up right on everyone else’s phones so they can find errors, track live leaderboards, etc.
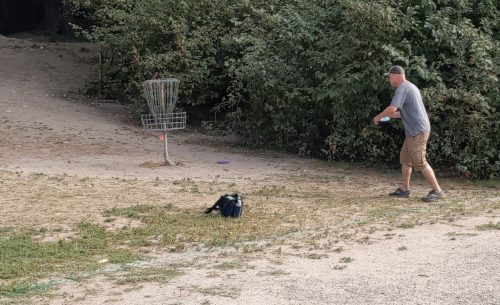
When playing the course normally, there aren’t official out of bounds areas clearly marked but they had them all marked for this tournament. Some of the baskets are within a few feet of the out of bounds line so that adds a significant challenge. On hole three, my putt hit the chains of the basket, bounced out, and had an agonizingly slow roll just barely across the line. So my par 3 turned into a 5. Ouch!
I can finish a round (10 holes) by myself on an empty course in 25-30 minutes. If I play with Elijah, it’s about 45 minutes. But it took us 1.5 hours to finish our first 10 holes. (For some reason this course has 10 holes instead of 9.) Thankfully, the weather was perfect. It was a real blessing for being so late in September. It was in the low 70s and sunny, and if there was anything to complain about, there was just enough wind to make you think about it on some throws.
I get to spend a lot of time learning my recovery shots when I hit a tree and end up off course.
I finished the first 10 holes at 4 over which is good for me. I’ve had two rounds at 3 over and if you factor in the OB rules that I had to contend with this time, I was very happy. Two of the other guys in my group were a stroke or two under par and the third guy was quite a few strokes behind me.
The second 10 holes was rougher and looking back, I think I was getting tired. It had already been a long day and I usually only play 10 holes at a time. The whole course is in the woods so it’s not uncommon to hit a tree, but usually I can recover and still get par or bogey. But I hit multiple trees on both holes and double bogeyed both. I was able to pick up a birdie later to offset some other less than stellar holes a little and ended up +6 on the back 10 for a final score of +10 over 20 holes.
Tyla and Elijah came to watch my final few holes and take some pictures.
There were some extra competitions happening within the tourney too. You could pay an extra $5 for an “ace pot” to be split among any players who got a hole in one. As far as I know, only one player got it so he won $500. (It was on hole 8 if you know the course. He had a good throw plus a bit of luck with a friendly tree bounce.) The other competition was “closest to the pin” on every hole. There was an orange flag marking the closest tee shot. By the end of the day, all of the flags were either touching the pole or within a couple feet. It was amazing to see some of those throws when I’m happy just to par the holes.
I’m waiting to see the official results with the full 100 players, but the UDisc leaderboard says I was 65 out of 84 players. My goal going in was to have fun, stay out of the way, and not be last. I’d say I accomplished all of those goals!
Will I do it again? Yes, but probably not very often. I like that you get free discs for playing the courses, but until I’m good enough to have a chance at making it into the money, I probably won’t do more than one a year. The top 30 players got a payout in this tournament and a score of +1 was the cutoff for that. That’s a big stretch for me right now but my personal goal is one round (10 holes) at even par. I have a ways to go before I’m in possible contention for the money but it seems achievable.
I’ve mentioned before that I’m pulling in a lot of car stats with TeslaMate. I’m also using the GasBuddy API to record the prices at the six gas stations closest to my house. This lets me calculate how much I would be spending on gas if I drove the exact same distances at the same time. I assume that I would fill up every day which isn’t accurate, but over time, it should be nearly spot on.
I take all that gas price data and compare it against the cost for every charge I’ve put into the car. Most of the charging is done at home (92%), but if I’m on the road, I have all those prices as well too.
So if I compare my actual charging costs versus the estimate gas prices for the same driving pattern, we have saved our first $1000! Despite the high entry price, we bought this car because I believe it will be cheaper than if we bought another Escape. Using my conservative estimates and the lower gas prices from last summer, I expected to save $1000 every ~8000 miles, but we hit the first $1000 of savings at 5800 miles.
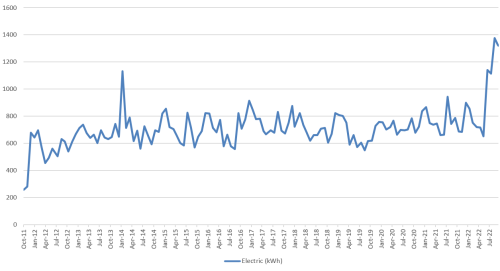
Digging into those charging costs at home a bit more, here’s a chart for our electric usage for the last 11 years:
You can see where we got the new car at the end of the chart, and our monthly usage can vary quite a bit based on how much we drive. Do you see that spike back in January 2014? That winter we tried running a space heater in one room. I cut that off quickly after monitoring how much power it used. The space heater wasn’t cheaper than just turning up the furnace a bit more. So if you’re nervous about the additional cost of charging an EV at home, look around your house at those space heaters. If you have one or two of them running, that’s roughly the same as charging an EV (caveat caveat caveat but they can be in the same ballpark.)
Gas savings alone won’t make this car cheaper. I’m also counting on lower total service bills (no oil changes, less moving parts to fail, etc) and a higher resale value. We won’t know how all that plays out for many years, but it’s fun to see it working out better than planned so far!
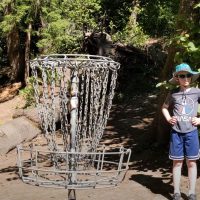
The new craze in our house is disc golf. I asked for a cheap starter pack of discs for Father’s Day, and all three of us enjoyed it the very first time we went out. There are about half a dozen free courses within a 30 minute drive and the closest one is only 5 minutes away.
I was a bit nervous/embarrassed the first time we went out, but I’ve found the disc golf crowd to be extremely friendly and welcoming. Plus, we quickly learned that lots of people are just out there having family fun and we weren’t as slow or bad as we thought. Course etiquette is very similar to golf so I was able to work on those social norms with Elijah first and then we started learning more about the game.
YouTube is a great resource for learning disc golf and it helped us understand the basic form, the flow of play, special rules, etc. While there are people who are extremely good at the sport, I’ve found it to be very accessible for inexperienced players. You can go out there knowing nothing and have a blast. And while it would take a huge amount of time to master the sport, you can find bits success early on. For example, only about 10 rounds into the sport, we’ve all made a par and I was a few inches off from a hole-in-one. You can pick up a starter set of discs for around $30, and as I mentioned, many of the courses are free. The UDisc app is a great way to find nearby courses and keep score.
It’s fun to discover a new activity where I can compete against myself, play for basically free, and see myself rapidly improve since I went in knowing nothing! If you’re in the area, I’d be happy to share some discs with you and show you what it’s like. At the very least, you get to enjoy walking around in a park for an hour.


Getting Rid Of Junk Mail
Like most of you, we get lots of junk mail. It’s kind of absurd. It all just goes straight in the recycling and aside from wasting my time, it feels like a waste of resources too. I’ve used Catalog Choice in the past to try and stop some catalogs. (I never kept track of the ones I tried to stop so I don’t know if it worked.) Now I’m trying six months of Paper Karma. I’ve been throwing junk mail into a box for a couple months so that I can make good use of my subscription time for the service.
The way the app works is that for every piece of junk mail you get, you scan it with your phone as a quick way to search for the sender and then they take care of contacting the company to try and get you removed from their mailing list. They have direct access to the recipient lists for quite a few companies, but for others, they have to take slower methods of notification that may or may not work. I scanned in the whole pile shown in the image and probably about half of them have a “success” status already which means that I shouldn’t continue to receive those mailings. It’s not a guarantee, but even if it cuts my junk mail in half, I’ll be happy.