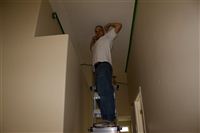
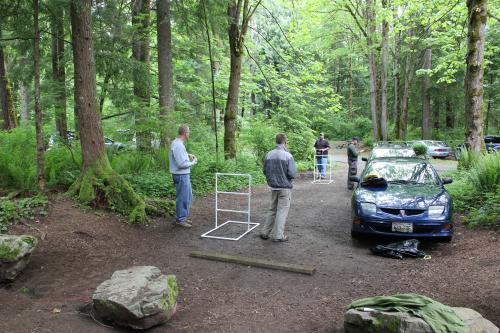
Last weekend we spent a lot more time at the house getting it prepped. We owe another huge thanks to Don, Nancy, Logan, Megan, Andy and Stephanie for coming over. We’ve gotten so much more done than I thought would ever be possible! The projects for this weekend were painting a weird bar in the master bedroom white, painting the hallway (vaulted ceilings), and cleaning out the pantry and painting it. We were home before dinner on both days which is a testament to how much help we had. The house is really looking great!
There are eight new photos available under the House tag. In the photo of Don in the kitchen you can spot our brand new fridge. That was delivered earlier in the week along with a washer and dryer.
We spent a lot of time painting this weekend, and before we got started, I knew I was going to need some ladders. I figured I would need a step ladder and an extension ladder, but being the geek I am, I found one ladder that does both. It’s available from a lot of places, but one of the cheapest is Amazon and you can get it with 2 day shipping if you have Amazon Prime!
It turned out to be even more useful than I thought it would be. You can use it as a regular step ladder but you can set it at different heights between 5’ and 9’. As an extension ladder, it will go all the way out to 22’. And as an unexpected (and probably not recommended) bonus, when you get close to a corner, you can decrease the height of one side of the stepladder to bring you closer to the corner. The same idea applies if you want to set up the ladder on the stairs.
The biggest drawback is the weight. It’s a heavy ladder, but given it’s flexibility and price, I’m very happy that I bought it.
Plus, you get to have this video run through your head the whole time you’re using it. (No, the ladder in the video isn’t the one I bought and the one I bought doesn’t support this configuration.)
After a long and crazy journey, we finally closed on the house on Friday! We were very thankful to finally have the keys in hand and be the proud owners of a house that exceeded our dreams.
Friday night we went over after work to meet with the carpet guy and have dinner on the floor. Logan was nice enough to bring over a little fridge so we could keep beer cold over the weekend.
Saturday morning started with spending a lot of money at Home Depot (a theme of the weekend) and then painting and cleaning. The whole Brandt family came over to help for the entire day. We got the whole kitchen deep cleaned and painted the living room and taped the family room.
Since we were going to church on Monday night this week, we were able to spend all day Sunday at the house. The whole family came over AGAIN and Tim and Chelsea were there too. With all that help, we were able to get both bathrooms cleaned, two coats on the family room and kitchen and one coat in the master bedroom! Tyla and I finished the night by putting a coat of purple in the laundry room.
It was a long weekend, but it was a blast to be in the new house and show our friends and family around. Appliances come later in the week and carpet comes next week. Combined with all the paint and little projects we’re doing, it’s really going through a big transformation.
We can’t thank you all enough for helping out! It would have easily taken us a couple weeks to get this far on our own. We’re both eager to get moved in and have you over for relaxation instead of work!
The day before my birthday, I headed out on one of my favorite local rides. It’s called the Three Pass Blast because you head through three very different mountain passes: Snoqualmie, Blewett and Stevens. I’ve done this before (and incorrectly counted it as four passes) and it’s a beautiful ride. I did it clockwise this time, and since I set out to do as little on two lane roads as possible, it changed the route a bit for me. I headed down 203 to Fall City and headed up past Snoqualmie Falls to North Bend. I hopped on I-90 for a few miles and then got off at exit 47 to catch NF-56. It’s a fantastic little twisty road that I’ve videoed before. When I’m king of the world, I will block off this road and stage a motorcycle race. After that I pounded the pavement on I-90 through Snoqualmie Pass before hopping off to catch US-97 north through Blewett pass. The dry, arid land is a stark contrast to Snoqualmie Pass. The heat was also starting to build so I didn’t waste any time getting to Leavenworth. I stopped for a quick lunch and then finished up with a beautiful ride through Stevens Pass.
It was a gorgeous day for a ride, and I was having so much fun that I didn’t stop to take any pictures. Sorry! You’ll have to take my word for it. I timed the traffic well and had fairly clear sailing until about 10 miles west of the Stevens Pass summit. It wasn’t anything too bad though and the 240 miles flew by.
This weekend you couldn’t turn on the TV or open up your internet browser without seeing a flood of information about the 10th anniversary of 9/11. Whether it was worthwhile coverage or just the media grabbing for ratings is for you to decide. But since this blog is a bit of a journal, I thought I should write down my experiences from that day…
I was in my senior year at Purdue and it was going to be a big day. It was the start of a two day job fair out in Memorial Mall on campus. John Deere had recently told me that although they wanted to hire me after my internship, they couldn’t because of a hiring freeze. That put me into a bit of a tail spin and I felt that I really needed to come out of that job fair with some solid options.
The first I heard about the attacks was when I went down for breakfast. One of the ladies who worked there was a friend of Grandma Hinkle so we always had a little chat when we saw each other. She told me that a plane had flown into the World Trade Center, but since she didn’t seem too concerned, I didn’t think much of it. I was picturing a little Cessna that had an accident or something along those lines.
I took the food back up to my room and flipped on the TV. That’s when I saw how devastating it actually was. A few minutes later, I watched the second plane crash and then the towers crashed.
Looking back now, I don’t think I realized how big of an event this was. It doesn’t seem possible now, but watching on a little TV screen with so many unanswered questions, it didn’t bring the same feeling that it does now. I knew it was a big deal, but I had no idea who was behind it or what would follow in the coming years.
So I suited up and head out to the job fair armed with resumes. The first thing I noticed was how quiet campus was. Purdue has one of the busiest airports in the Midwest (in terms of touchdowns and landings, mostly from small planes), but there wasn’t anyone in the sky. When I got to the job fair, it was a bit chaotic. Some company employees were on the phone with their loved ones or their home office trying to figure out if they should stay or go. The armed forces booths were being hurriedly packed up. Trains seemed to be the transportation of choice, but people from the west coast were left wondering if they should just start driving because the train tickets were quickly snatched up.
A majority of the companies stayed at the job fair. I ended up getting a few good interviews that resulted in some job offers, but in terms of world events, that was far from the most important thing that happened.
Later in life, I would meet people who were actually in the city at the time, see a lot of friends head off to the ensuing wars, and visit the site of the old towers a few times. It still brings back a wide variety of emotions and I can’t see that ever changing. I wonder if this is how Pearl Harbor felt. Are they comparable? Was Pearl Harbor scarier for the average citizen because of the small amount of information? Was 9/11 worse because we had so many data streams coming in everywhere we looked? I think about people like my grandparents who lived through both of them and wonder how they connect the two events. I’ll have to ask Grandpa and Grandma about this at Christmas.
After writing that paragraph, I went back and read what I wrote on the day it happened. Most of my post seems to be about how this event was much worse than Pearl Harbor. I don’t know if I agree with that anymore, but I’m so glad that I took the time to write down some thoughts on that day. It doesn’t really matter which one was worse. They were both terrible in their own right.
I’ve included a few of the videos below. Posting images of this seems to be taboo in our culture, but I think it’s important for us to see it happen and remember back to those first few minutes of horror and confusion. Put aside your politics and just watch these…
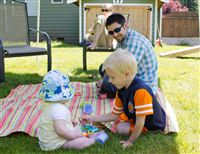
While Luke, Rachel and David were here last week, we had a sunny BBQ up at Tim and Chelsea’s house. They made one of the most amazing lunches I’ve ever eaten: grilled carne asada, rice, refried beans, guacamole, salsa, and buffalo fries. Everything was homemade (except the rice I guess?) and fantastically delicious. We played cornhole and lazed around in the sun. Check out the pictures in the photo gallery (posted on July 1.)
I headed out with the Brandt family to Alder Lake State Park for the Fourth of July weekend. It wasn’t our first choice since we got a late start on reservations, but the campground actually was pretty nice. The biggest downside was that it was close to Hwy 7 which is the western entrance to Mt. Rainier, but the traffic died down a bit at night and the fan in the camper drowned out the noise.
Our campsite was just a short walk from a boat launch into Alder Lake and Oskar made good use of that with a lot of swimming. Tyla and I even joined him for a bit. The water is pretty cold since it flows straight off the Nisqually glacier on Rainier, but we had a good time.
On Saturday, we braved the crowds and headed up to the Paradise visitors center on the south side of Rainier. It was pretty easy to spot the extra dirty snow on the Nisqually glacier from a big rock slide they had last week. (Video is posted on YouTube from hikers.)
On Sunday night we headed up the road to Eatonville to check out their fireworks display. After a couple conversations with the police, we ended up getting booted off the school grounds viewing area because pets were not allowed. We watched from the parking lot, had a great view, and beat all the traffic leaving town.
All in all it was a great trip. We couldn’t have asked for better weather and camping was a great way to celebrate one of the first weekends that has really felt like summer!
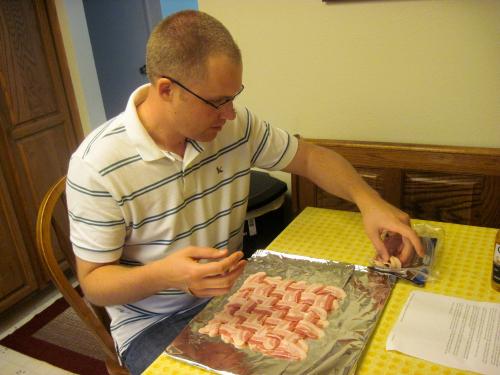
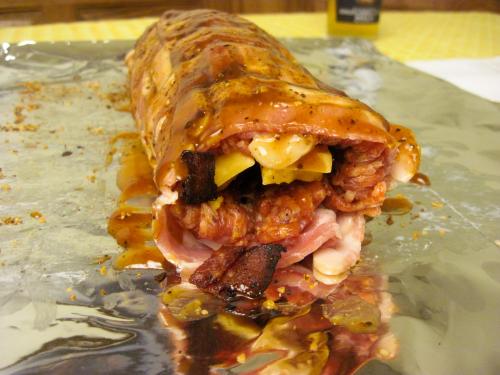
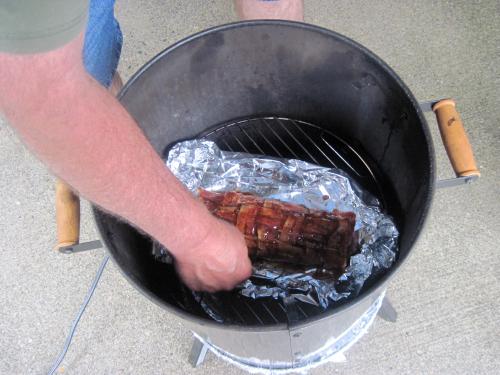
For Father’s Day, I brought the ingredients for a bacon log over to Don’s house and we set to work. This time we added crumbled, cooked bacon in the middle of the log and a rub on the outside of the log. The real improvement was that Don cooked it for three hours in his smoker. We placed the log on top of aluminum foil and poked holes in the foil for the grease to drain out. The last time we made this, the log boiled in the grease and made it soggy. The end result was delicious!
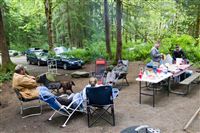
We have had quite a few new young couples join our church recently, so we decided to put together a camping trip. Unfortunately I picked a weekend when not a lot of the new people could join us, but we still did get a good crew together for a fun weekend.
Logan, Megan, Micah, Tim, Chelsea, Tyla and I headed south to Kanaskat Palmer State Park. You may remember that I camped there about three years ago. This time we got two sites to hold all the tents.
Camping this time of year is a bit risky because of the weather, but thankfully the rain held off for the most part. It broke up our Friday night fire around 1am, but we were probably overdue for bed anyway. Saturday was spent exploring the campground, playing ladder golf and generally being lazy.
Photos are posted in the photo gallery. Check the dates on the pictures to see where this trip stops and the last trip photos begin.
This game goes by many names. Here are all the names I found for it as I looked around:
Norwegian Horseshoes, Laddergolf, Snakes, Hillbilly Golf, Polish Golf, Horseballs, Tower Ball, Bolo Golf, Gladiator, Bola, Snake Toss, BlongoBall, Ladder Toss, Bolo, Rodeo Golf, Dingle Balls, Bolo Polo, Cowboy Golf, Redneck Golf, Pocca Bolo, The Snake Game, Willy Ball, Ladder Ball, Slither, Zing-Ball, Snakes & Ladders, Hillbilly Horseshoes, Flingy Ball, Top Toss, Norwegian Golf, Monkey Bars Golf, Swedish Golf, Polish Horsehoes, Dandy Golf, Montana Golf, Lasso Golf, Australian Horseshoes, Ladder Game, Monkey Balls, Rattlerail Toss, Golfball Horseshoes, Arizona Golf Balls, Spin-It, Ball Dangle, Bolo Ball, Poor Mans Golf, Bolo Toss, and Testicle Toss
Whatever you call it, Tim and I made a couple sets the other weekend. We both love cornhole but it’s pretty big and heavy to carry around. The hope was that this would be easier to haul with us and just as fun.
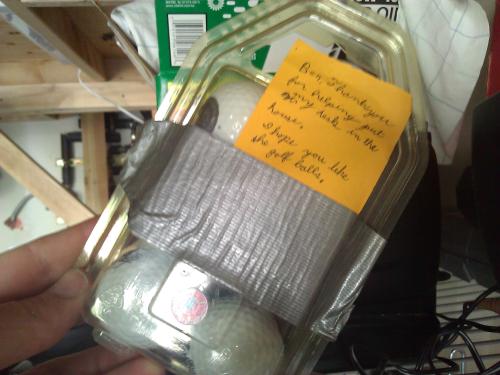
While Tim worked on the PVC piping, I tried to figure out how to drill holes in golffballs without a drill press. I made one set with 6 Purdue golf balls that I got as a thank you gift from KenC at least 15 years ago if not more. I never used them for real golf because I didn’t want to lose them. They are now the coolest set of bolos ever!
We tried out the game on our camping trip this past weekend. I don’t think I like the game quite as much as cornhole, and it wasn’t as easy to transport as I had hoped, but we still had a lot of fun playing. I envision someday having a barbeque in our backyard with cornhole, ladder golf, and washers games going on. Maybe we need some sort of backyard Olympics event!

 Last weekend we spent a lot more time at the house getting it prepped. We owe another huge thanks to Don, Nancy, Logan, Megan, Andy and Stephanie for coming over. We’ve gotten so much more done than I thought would ever be possible! The projects for this weekend were painting a weird bar in the master bedroom white, painting the hallway (vaulted ceilings), and cleaning out the pantry and painting it. We were home before dinner on both days which is a testament to how much help we had. The house is really looking great!
 We spent a lot of time painting this weekend, and before we got started, I knew I was going to need some ladders. I figured I would need a step ladder and an extension ladder, but being the geek I am, I found one ladder that does both. It’s available from a lot of places, but one of the cheapest is
 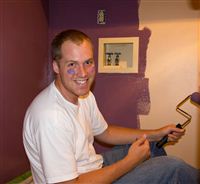 After a long and crazy journey, we finally closed on the house on Friday! We were very thankful to finally have the keys in hand and be the proud owners of a house that exceeded our dreams.
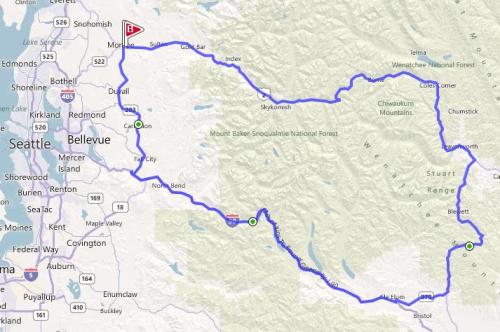
 While Luke, Rachel and David were here last week, we had a sunny BBQ up at Tim and Chelsea’s house. They made one of the most amazing lunches I’ve ever eaten: grilled carne asada, rice, refried beans, guacamole, salsa, and
 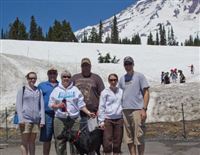 I headed out with the Brandt family to Alder Lake State Park for the Fourth of July weekend. It wasn’t our first choice since we got a late start on reservations, but the campground actually was pretty nice. The biggest downside was that it was close to Hwy 7 which is the western entrance to Mt. Rainier, but the traffic died down a bit at night and the fan in the camper drowned out the noise.
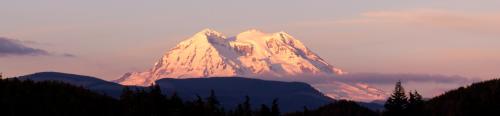
 We have had quite a few new young couples join our church recently, so we decided to put together a camping trip. Unfortunately I picked a weekend when not a lot of the new people could join us, but we still did get a good crew together for a fun weekend.
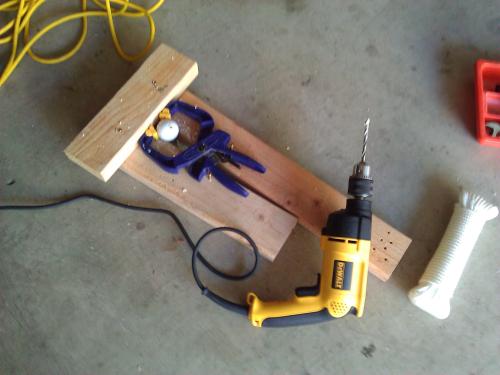
September 11 Retrospective
I was in my senior year at Purdue and it was going to be a big day. It was the start of a two day job fair out in Memorial Mall on campus. John Deere had recently told me that although they wanted to hire me after my internship, they couldn’t because of a hiring freeze. That put me into a bit of a tail spin and I felt that I really needed to come out of that job fair with some solid options.
The first I heard about the attacks was when I went down for breakfast. One of the ladies who worked there was a friend of Grandma Hinkle so we always had a little chat when we saw each other. She told me that a plane had flown into the World Trade Center, but since she didn’t seem too concerned, I didn’t think much of it. I was picturing a little Cessna that had an accident or something along those lines.
I took the food back up to my room and flipped on the TV. That’s when I saw how devastating it actually was. A few minutes later, I watched the second plane crash and then the towers crashed.
Looking back now, I don’t think I realized how big of an event this was. It doesn’t seem possible now, but watching on a little TV screen with so many unanswered questions, it didn’t bring the same feeling that it does now. I knew it was a big deal, but I had no idea who was behind it or what would follow in the coming years.
So I suited up and head out to the job fair armed with resumes. The first thing I noticed was how quiet campus was. Purdue has one of the busiest airports in the Midwest (in terms of touchdowns and landings, mostly from small planes), but there wasn’t anyone in the sky. When I got to the job fair, it was a bit chaotic. Some company employees were on the phone with their loved ones or their home office trying to figure out if they should stay or go. The armed forces booths were being hurriedly packed up. Trains seemed to be the transportation of choice, but people from the west coast were left wondering if they should just start driving because the train tickets were quickly snatched up.
A majority of the companies stayed at the job fair. I ended up getting a few good interviews that resulted in some job offers, but in terms of world events, that was far from the most important thing that happened.
Later in life, I would meet people who were actually in the city at the time, see a lot of friends head off to the ensuing wars, and visit the site of the old towers a few times. It still brings back a wide variety of emotions and I can’t see that ever changing. I wonder if this is how Pearl Harbor felt. Are they comparable? Was Pearl Harbor scarier for the average citizen because of the small amount of information? Was 9/11 worse because we had so many data streams coming in everywhere we looked? I think about people like my grandparents who lived through both of them and wonder how they connect the two events. I’ll have to ask Grandpa and Grandma about this at Christmas.
After writing that paragraph, I went back and read what I wrote on the day it happened. Most of my post seems to be about how this event was much worse than Pearl Harbor. I don’t know if I agree with that anymore, but I’m so glad that I took the time to write down some thoughts on that day. It doesn’t really matter which one was worse. They were both terrible in their own right.
I’ve included a few of the videos below. Posting images of this seems to be taboo in our culture, but I think it’s important for us to see it happen and remember back to those first few minutes of horror and confusion. Put aside your politics and just watch these…