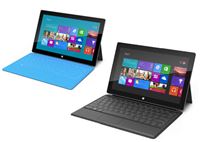
 Tyla and I have had the Surface RT for a few weeks now. I’ve been putting off this review, but I’ll explain that later. First off, the device is great. If you want to step into the world of tablets, I have no trouble recommending this. It’s competitively priced and it has some strong differentiators.
Our device came with the touch keyboard. The first thing I did when I pulled it out was try a typing test. On my desktop keyboard, I average 100-110 words per minutes. On my first test with the touch cover, I got 66 words a minute and that includes backspacing to correct my errors. So yes, it’s slower, but it’s very usable and I expect that the type cover would be even faster. This unique keyboard/cover is the probably the single biggest win for the Surface. It removes one of my biggest complaints with tablets. You’re never going to type a two page email with an on-screen keyboard, but with one of these covers, it’s not too bad. However, unless you really want the super thin cover, I’d recommend getting the slightly thicker “type cover” which has keys that physically depress.
Word and Excel are included in the price of a Surface RT. I don’t use them a ton on the device, but if that’s something you need, your search stops with the Surface RT because no other (non-Windows) tablet can do this.
If you’re already heavily invested in the Apple world, stop reading and go buy an iPad. We know that’s what you’ll end up with anyway. Yes, they have more apps. I haven’t had a problem finding apps to do what I want on the tablet, but if you have some very specific app that you require, you should see which platforms carry it. You’ll only be able to run CascadeSkier if you’re on Windows 8. I’m sure THAT will drive millions of Surface sales.
So why did I say I’ve been hesitating to write this review? Well, it’s because I’m still trying to figure out why I want a tablet. Even Tyla will grab the laptop first if that’s closer. The only reason I pick up the Surface is because I’m bored while watching TV and it’s a novelty. Pretty soon I think it’s going to start gathering dust in the corner. I’m either in the mood to really use a computer in which case I’ll use a laptop or desktop or I want to kill time or play a game. In that situation my phone is already in my pocket. Why would I get up to get a tablet? That problem isn’t specific to the Surface. We don’t have an Android or Apple tablet for the same reason. The sweet spot for me seems to be as child entertainment or as a small device to take on planes. Neither one of those things apply very much to us at this point. I’m much more excited about devices like the Dell XPS 12 which functions most of the time as a laptop but can lay flat like a tablet.
I’m not going to complain about a gift from my company, but having a tablet in my house has convinced me that I’ve been correct in not spending my money on any device like this. If you have a need/desire for a tablet and want to try out a Surface before deciding, let us know! We can’t gift or sell this device, but you’re welcome to come play with it.


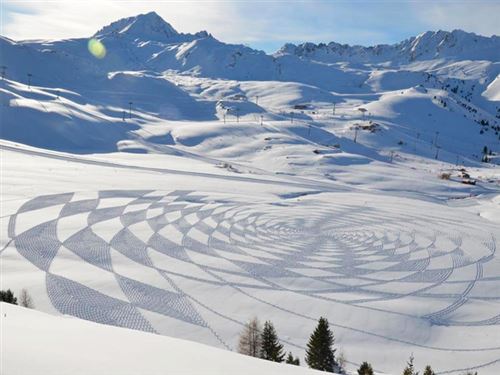
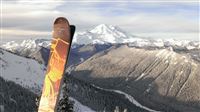 As I headed out the door at 6:30AM on Saturday, the sensors on top of Crystal Mountain were reporting 7 degrees. That’s about what it felt like all day. But the cold was outweighed by bluebird skies and incredible views stretch from Baker to St. Helens. This was my seventh day at Crystal this season but the first that I’ve been able to see Mt. Rainier.
 After getting a wisdom tooth ripped out and my sinuses fixed last year, I had hoped that I was done with doctor’s offices for a while. Unfortunately it doesn’t look like that’s going to be the case. Around the end of last year, I saw a dermatologist for a routine skin check. I have lots of moles which puts me in a higher risk category for skin cancer. Without going into unnecessary details, the lab results showed one area that was “severely abnormal.” Yikes. I never thought at the age of 32, I’d be on the phone saying, “Wait… so… do I have cancer?” Thankfully that answer was no, but it was still something that needed immediate action. This is basically the last thing they see before they see skin cancer so they need to cut out a bunch more skin around that area. That’s happening today. I’ll end up with stitches and have to take it easy for a couple weeks. I shouldn’t need to miss any work but it will keep me off the ski slopes for a week or two.
 It’s rare that I write a post praising a business, much less a car mechanic, but if you have a Subaru, you should consider taking it to
 All of the videos that Tim and I recorded during the Sunday, Christmas Eve, and Christmas Day services have been editing and posted to YouTube. We have some extremely talented musicians in our congregation! You can find all of these videos on the
Beer Bottle Prep
We brew our beer at Gallagher’s, and one of the many pieces of equipment they provide is a bottle sanitizer. In about 10 minutes, it will sanitize a hundred or so bottles. Note that this is sanitization only, not cleaning. You can’t put any moldy bottles or bottles with labels in the machine.
The best part about all this is that it’s relatively inexpensive. If you buy clean/empty bottles at Gallagher’s they charge you $1. That’s about what I pay for the bottle AND the beer at the store so by recycling the bottle, I’m basically getting free beer!