 It’s Rum Friday and you’re thinking, “I want to participate but I have no idea what kind of rum to buy.” Luckily for you, I’ve been doing a lot of research.
History and Varieties
Rum originated on sugarcane plantations in the Caribbean in the 17th century. The molasses left over after refining sugar was fermented and distilled. As the Europeans came over to the Americas, rum quickly gained popularity. In fact, the saying “no taxation without representation” started from a tax on rum, not tea as many people think. Technically the tax was on the molasses used to make rum. The English wanted the colonists to buy the inferior English molasses so they heavily taxed the Caribbean molasses and really got the colonists riled up. The “no taxation without representation” slogan flew above many rum distilleries as they ignored this tax and continued to use Caribbean molasses. In those days, rum was often drank as part of a punch.
Today there are a variety of rums:
- Light (silver/white): Mostly used in cocktails and often on the lower end of the price scale.
- Gold: They’re aged in wooden barrels to get the color. Sometimes the barrels were previously used for whiskey.
- Dark: These rums are aged longer in the wooden barrels and have stronger flavors than light or gold rums.
- Spiced: Usually based on gold rums, these have spices added to them.
- Flavored: You can find rums flavored with a variety of fruits and they’re most often used in mixed drinks.
Rum and Coke
The easiest rum drink is a Rum and Coke. I use Coke Zero but I’ve known other people to use regular Coke, Diet Coke, or even a cherry version. You can use a variety of rums in your coke but Baccardi silver and Captain Morgan’s spiced rums are probably the two you’ll find most often in the bar. I’ve really been enjoying Black Kraken spiced rum in my Coke Zero lately. Mount Gay Eclipse is another good one with coke.
Rum Punch
Rum punch is a great drink as well and there are lots of good recipes. Here’s an easy one called a “Painkiller” that we enjoyed down in St. Thomas.
2 Parts Pineapple Juice
1 Part Coco Lopez Coconut
1 Part Orange Juice
Lots of RUM!
Want to get a little more fancy with your rum punch? I got this recipe from someone who grew up in the Caribbean and it was a big hit at recent party in our house.
1 Part fresh squeezed lime juice
2 Parts brown sugar dissolved in a little hot water
3 Parts quality dark rum
4 Parts cold water
You can get fancy and add freshly grated nutmeg after pouring too
Straight Rum
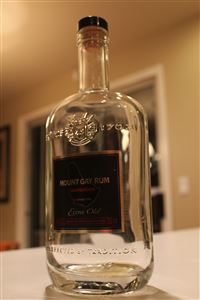
If you have a good rum, you can just drink it straight. Of all the rums I’ve tried, Mount Gay makes some of my favorites. Started in 1703, it’s the world’s first and oldest rum distillery. They have five different rums spanning the gamut of prices and types, but if you’re drinking it straight, go for Mount Gay Extra Old. Whiskey stones are a good addition to cool the drink without watering it down. If you’re more of a whiskey/scotch drinker, check out the Mount Gay 1703 Old Cask Selection.
A couple other excellent choices:
Rum Cake
And finally, rum is also used in a lot of cooking. For example, here’s a fantastic rum cake recipe:
Ingredients
- 1 box Duncan Hines Classic White cake mix
- 1 small box instant vanilla pudding
- 1/2 cup Wesson Oil
- 1/2 cup water
- 1/2 cup light rum
- 4 eggs
Directions
Combine everything but the eggs ’til moist. Then add eggs one at a time and beat for 2 minutes. Bake at 350 for 50-55 min in a bundt pan that has been greased and floured. Take out of oven to cool and make the glaze.
Glaze Ingredients/Directions
Combine in saucepan over low heat
- 1 stick of butter
- 1/8 – 1/4 cup water
- 1/2 – 3/4 cup sugar
- Bring to a boil (stir a couple of times) and let it boil for about a minute. Remove from the heat and add
- 1/4 cup light rum
Stir. And pour on cake. (see below)
Use a fork and poke some holes around the bottom of the rum cake (really what is on top in the pan) and slide a knife around the edges of cake to loosen it and allow room for glaze to get on the sides. Pour warm glaze over the partially cooled rum cake. Let it sit for about 5 minutes then remove the cake onto a cooling rack. It’s important to do this while the cake is still a little warm so it comes out… but not too warm or else it will break.
So there you have it. Head down to the liquor store and start experimenting with rum! I don’t think I’ve even tried a quarter of the rums that Total Wine has on their shelves. There’s bound to be one that’s exactly what you’re looking for. And if you find one you don’t like, bring it over to my house and I’ll dispose of it for you.

 This one is a classic from my childhood. Mom always made it in a pie pan, but I love it so much that I calculated the volume of a pie pan and expanded the recipe to fit perfectly in a 9×13 pan. So it no longer looks like a pie but I’ll still call it that. This isn’t quite how Mom used to make it, but I think she’ll approve of my modifications.
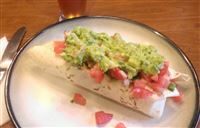 Tim and Chelsea have an amazing Mexican meal. They sent me the recipe, but they do it so well, I didn’t want to just copy them exactly. So instead I took pieces of their meal and changed it up a bit. The end result is something that makes my mouth water just typing this out. It’s a lot of work, but I think you’ll find that it’s worth it. And if you’re really pressed for time, there are plenty of places where you could take shortcuts.
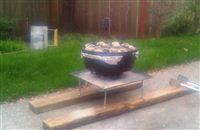 My parents came out for a visit this past weekend. While they were here, I thought it would be fun to attempt some food in the
 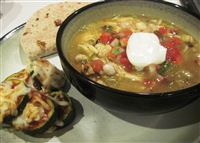 Jay sent me a recipe and said it was so awesome that I had to make it. Since he rarely sends me recipes, I figured I’d give it a shot.
 As our snowstorm dragged on last week, the pantry started getting thin. Thankfully we’re only a half mile walk from the grocery store, but what fun is that? I decided to invent some dinner. Since they were calling the storm “snowmaggedon”, I decided to call this “snowmaghetti.” The picture is atrocious, but that’s kind of the point. It doesn’t matter what it looks like as long as it tastes good and you can use what you already have in the pantry. So here’s how I made it, but when you make this, you’re required to experiment!
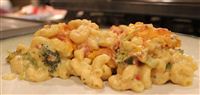 I tried making baked mac and cheese a few weeks ago and it turned out gross. I found a new recipe that was supposed to be healthier. We changed it a bit by using broccoli and tomatoes instead of spinach and it was fantastic! I’ve included that change in the recipe. You’re supposed to do a bread crumb topping, but I read that can get mushy if you refrigerate leftovers so I topped with some extra cheese instead.
Rum 101
History and Varieties
Rum originated on sugarcane plantations in the Caribbean in the 17th century. The molasses left over after refining sugar was fermented and distilled. As the Europeans came over to the Americas, rum quickly gained popularity. In fact, the saying “no taxation without representation” started from a tax on rum, not tea as many people think. Technically the tax was on the molasses used to make rum. The English wanted the colonists to buy the inferior English molasses so they heavily taxed the Caribbean molasses and really got the colonists riled up. The “no taxation without representation” slogan flew above many rum distilleries as they ignored this tax and continued to use Caribbean molasses. In those days, rum was often drank as part of a punch.
Today there are a variety of rums:
Rum and Coke
The easiest rum drink is a Rum and Coke. I use Coke Zero but I’ve known other people to use regular Coke, Diet Coke, or even a cherry version. You can use a variety of rums in your coke but Baccardi silver and Captain Morgan’s spiced rums are probably the two you’ll find most often in the bar. I’ve really been enjoying Black Kraken spiced rum in my Coke Zero lately. Mount Gay Eclipse is another good one with coke.
Rum Punch
Rum punch is a great drink as well and there are lots of good recipes. Here’s an easy one called a “Painkiller” that we enjoyed down in St. Thomas.
Want to get a little more fancy with your rum punch? I got this recipe from someone who grew up in the Caribbean and it was a big hit at recent party in our house.
Straight Rum
If you have a good rum, you can just drink it straight. Of all the rums I’ve tried, Mount Gay makes some of my favorites. Started in 1703, it’s the world’s first and oldest rum distillery. They have five different rums spanning the gamut of prices and types, but if you’re drinking it straight, go for Mount Gay Extra Old. Whiskey stones are a good addition to cool the drink without watering it down. If you’re more of a whiskey/scotch drinker, check out the Mount Gay 1703 Old Cask Selection.
A couple other excellent choices:
Rum Cake
And finally, rum is also used in a lot of cooking. For example, here’s a fantastic rum cake recipe:
So there you have it. Head down to the liquor store and start experimenting with rum! I don’t think I’ve even tried a quarter of the rums that Total Wine has on their shelves. There’s bound to be one that’s exactly what you’re looking for. And if you find one you don’t like, bring it over to my house and I’ll dispose of it for you.