
 I have an amazing wife. Not only is she carrying our child, but she agreed to let me get a season pass to Crystal and Snoqualmie this year since my skiing opportunities in the future will be quite a bit different. Thank you Tyla!
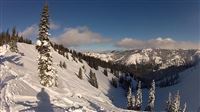
On Saturday, I made my first use of the pass. The resorts opened a couple weeks ago, but early season conditions are still in full effect. Rocks and trees poke through in a lot of places and the bottom half of the mountain is mostly ice. That being said, the top of the mountain was still a blast and my legs wore out long before the snow did.
I have had a season pass in a couple years, but I was reminded on Saturday of how great it feels. There’s not much worrying the night before about whether or not the snow will be good enough to justify a $65 lift ticket and there’s no pressure to stay the entire day to get as much use out of that lift ticket as possible.
Unfortunately I couldn’t find the right mount for my GoPro (a replacement has already been ordered!) so I didn’t get a chance to really test out the camera. I took a quick video using the headband mount but that meant I had to carry my helmet and goggles and squint through the blowing snow. Still, it gives you a bit of an idea of what it looked like up there. Most of the video shows a run from the top of the gondola down Lucky Shot to the base of Rainier Express. Normally this would include a great view of Rainier off to the right, but it was clouded in. Mom and Dad, the first half of this run is right where we hiked when you were out here earlier this year. The last few seconds of the video show a short clip of the Northway area which opened for the first time of the season while I was there. My skinny rock skis were no match for that deep snow, but it was still fun to see what lies ahead this season!
Soon there will be enough snow that I can switch to my regular skis and then in January I’m planning to pick up a new pair of skis thanks the new benefits package from my job. If any of you have thoughts about the following skis, please let me know: Line Prophet 98, Salomon Rocker 2 108, K2 Hardside, Rossignol S3.
UPDATE: Some of you asked how my sinuses did in the cold/dry air since I’m only 2.5 weeks past the surgery. This is a bit gross, but you asked for it. I still wake up every day with some bloody mucus draining down my throat or out my nose and that definitely increased while I was skiing. It was never a cause for alarm though and honestly I didn’t think much about it during the day because I was having so much fun. The drainage quickly return to normal levels and I don’t think I set my healing process back at all. At my last checkup the doctor said I was cleared to ski as long as nothing crazy started happening with my nose. I’m very thankful to be back to normal activities so quickly after the surgery!
 I’ve been running this CascadeSkier thing on the side for five years now. The sidebar gadget is still running but will be phased out as people move to Windows 8. The
 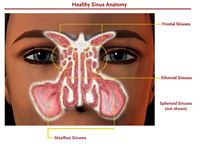 If all goes well, I won’t remember at least an hour of today. After a lifetime of sinus infections and being unable to breath out of my nose very well, my ENT doctor has recommended sinus surgery. They’re going to knock me out for about an hour, straighten my deviated septum, reduce the size of my turbinates (parts of your nose that help warm the air as it passes but in my case are blocking sinus cavities), and clean out some of my ethnoid sinus cavities. It’s going to be pretty unpleasant for a few days, but hopefully going forward I’ll be able to breathe better and have fewer infections.
 I’ve been doing this daily blogging thing for over 10 years now, and I often wonder what it would be like if my parents or grandparents had done something like this. Would I read it? Most likely I think I’d go back to read their thoughts on major world events and big changes in their lives. Actually, Grandma Martens does keep a daily journal and I’d be very interested in going back through that at some point.
 Tyla and I aren’t going back to Indiana for Thanksgiving or Christmas this year so we picked a cheap weekend in October instead. Luke, Rachel and David came over from Toledo and we all had a great weekend! It was a nice lazy, relaxing weekend with some Catan, pumpkin carving, and visiting a petting zoo and corn maze! Being back home always brings back a lot of great memories and it was fun to add a few more to that list.
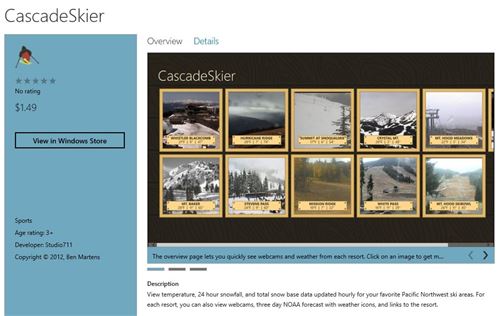
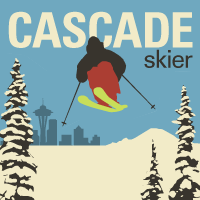 I’ve been hard at work getting a new version of the
Surgery Update
It has been one week since my sinus surgery. The first few days were really miserable, but on Monday I saw the doctor again. He said things were healing normally but I had more swelling than average. He is trying to combat that with some new meds. At the appointment he also cleaned a bunch of stuff out of my nose. I don’t know if it was that cleaning or the meds, but the last couple days have seen some big improvement. I’m still not allowed to blow my nose and I haven’t breathed out of it for a WEEK, but it’s draining a lot less now. I bet it will be another week or two before I’m done with all the symptoms, but I feel like I’ll be ready to head back to work on Monday.